Types of Questions
eLC offers instructors a number of different question types when creating quizzes. These are intended to make it possible for you to assess students in many different contexts about a variety of information types. Details about all question types and descriptions are below:
This format presents a question and a list of possible answers. Learners must choose only the best possible answer. This is different from Multi-select (MS) questions, where learners could potentially select multiple answers.
- Type the question text.
- Input the possible answers.
- Indicate which answer is correct by clicking that answer's radio button.
- Choose to randomize answers for each student.
- Enter a point value for this question.
- Click Save to save the question.

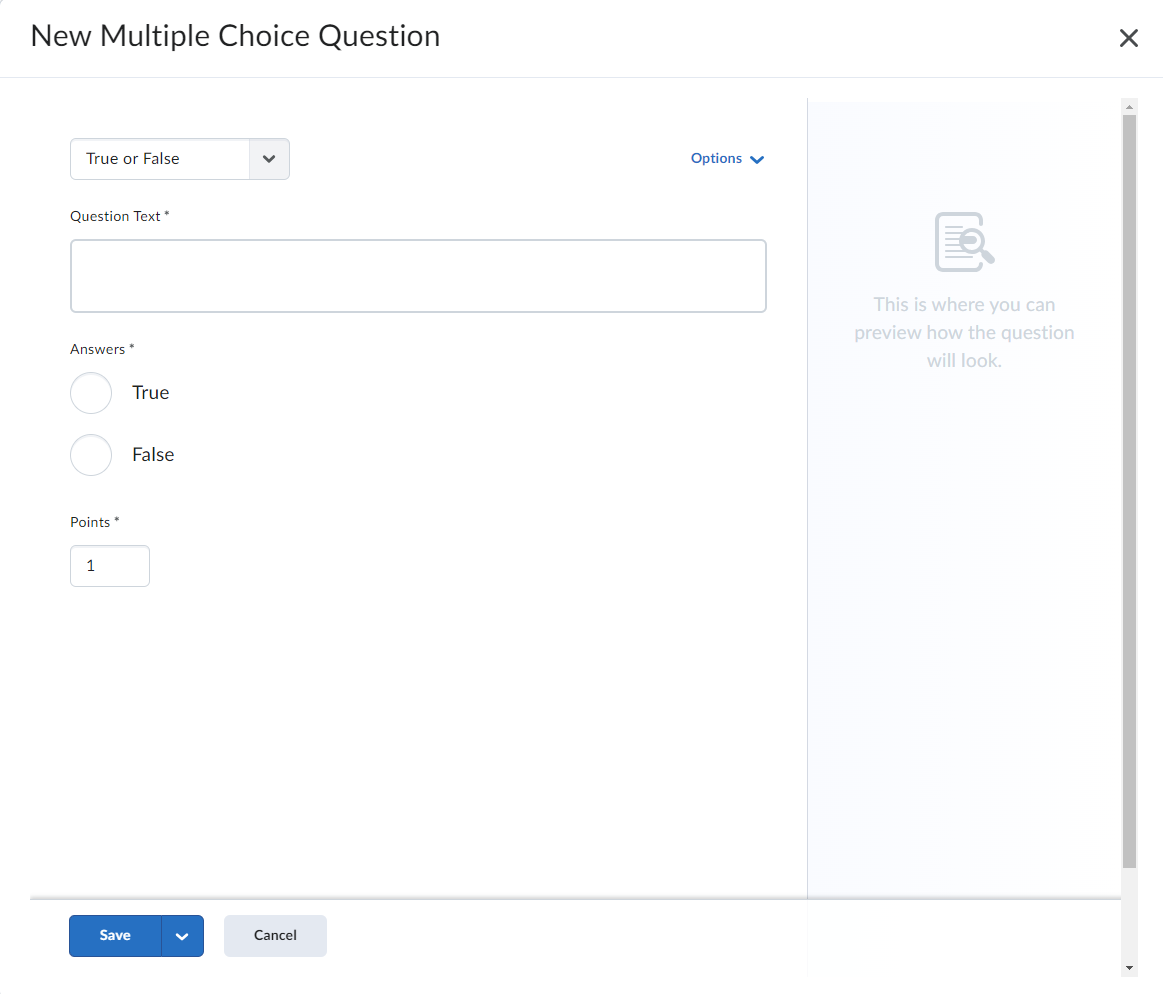
This format presents a statement. Learners must indicate if that statement is correct or not.
- Type your question text.
- Select the correct answer.
- Enter a point value.
- Click Save to save the question.
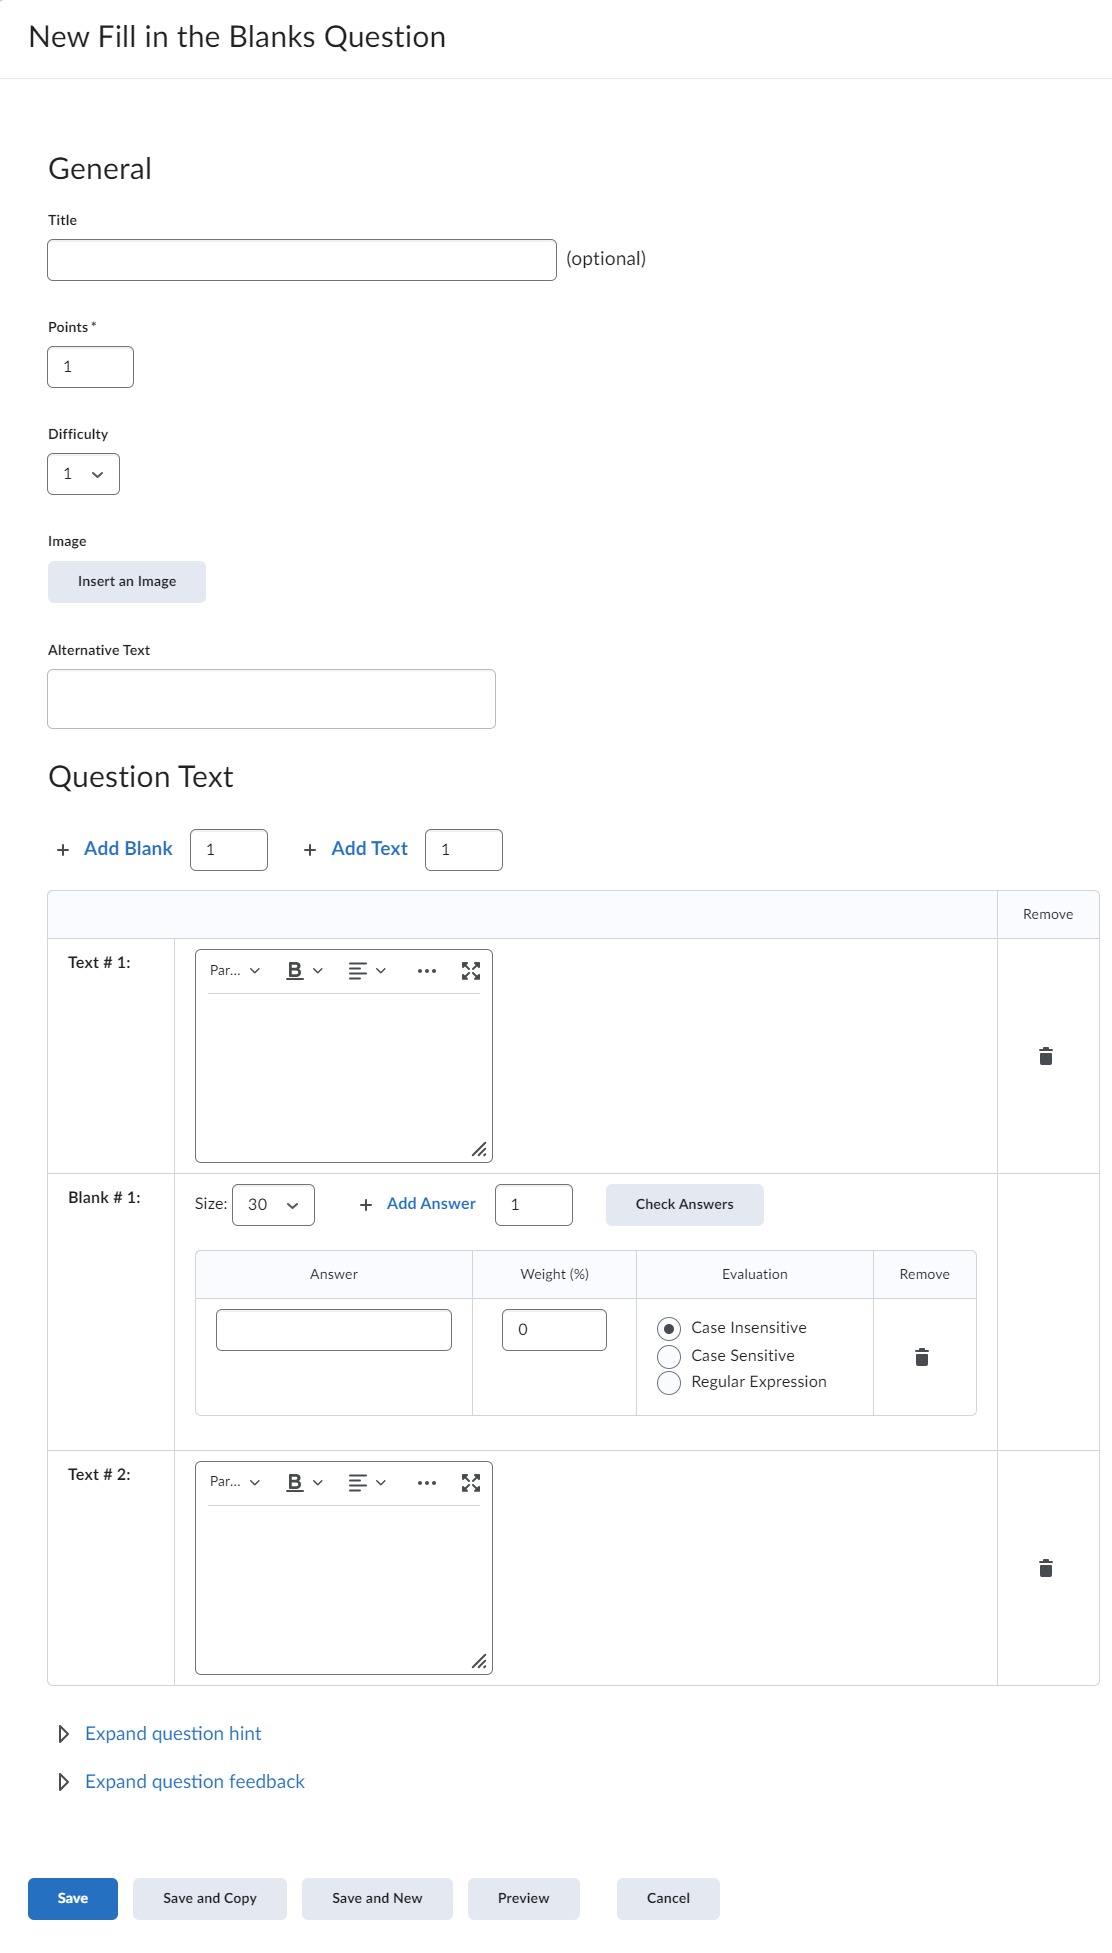
This format requires learners to complete one or more missing words of an incomplete statement. You can build Fill in the Blank questions by assembling parts of the incomplete statement and "blank" boxes where students will type their responses.
- Enter a point value.
- Optionally, you may title the question, select a question difficulty, insert an image, and provide alternative text for that image.
- Input the question text into the appropriate text boxes.
- Add or remove segments to customize where your blank will be located within the question
text.
- Click Add Blank to add additional blank boxes.
- Click Add Text to add additional text boxes.
- Click the trash can icon next to the blank you would like to remove.
- Assign a Weight (%) of the point value to each blank. Note: if you have only one blank, it should receive 100%
of the value.
- Choose the Evaluation for each blank in your question. Your options are:
- Case Insensitive - This is the default option and does not require students to match the exact capitalization of the answer key to receive credit.
- Case Sensitive - This option requires students to match the exact capitalization of the answer key to receive credit. This is not recommended unless capitalization is an essential part of the response.
- Regular Expression - These expressions use alpha-numeric and meta-characters to create a pattern that
describes one or more strings that must be identically matched within a body of text.
This is an advanced feature if you want to incorporate auto-grading of responses,
but also want to allow for a variety of possible responses or response patterns.
- Click Save to save the question. You can also Preview the question to see how it will appear to students.
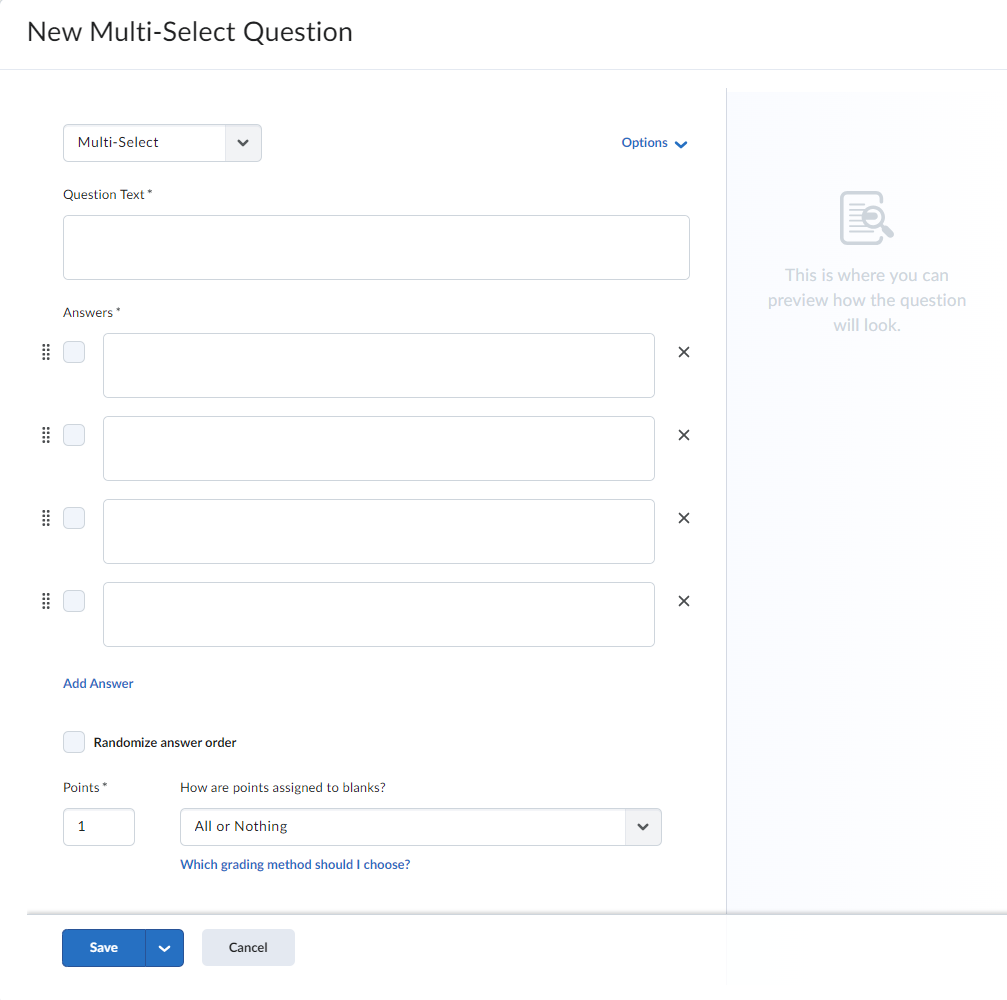
This format requires learners to select one or more correct answers from a list of possible answers. This is different from Multiple Choice (MC) questions which allow learners to pick only one option.
- Enter the Question Text.
- Input the Answers that will make up the list of choices.
- Select the checkbox for each acceptable answer.
- Choose to Randomize answer order.
- Assign the Point value.
- Select a choice from the How are points assigned to blanks? dropdown. Your choice are:
- All or Nothing - Learners earn full points only when all correct answers are selected, and all incorrect answers are left blank. Learners cannot ear partial points.
- Correct Solutions - Points are evenly distributed across correct answers only. The number of selections allowed is limited to the number of correct answers. Learners earn partial points for each correct answer selected.
- Right Minus Wrong Selections - Points are evenly distributed across all answers. Learners earn partial points
for each correct answer and for each incorrect answer left blank. Learners lose points
for answers that are incorrectly selected or left blank. Learners cannot receive less
than 0 points.
- Click Save to save the question.
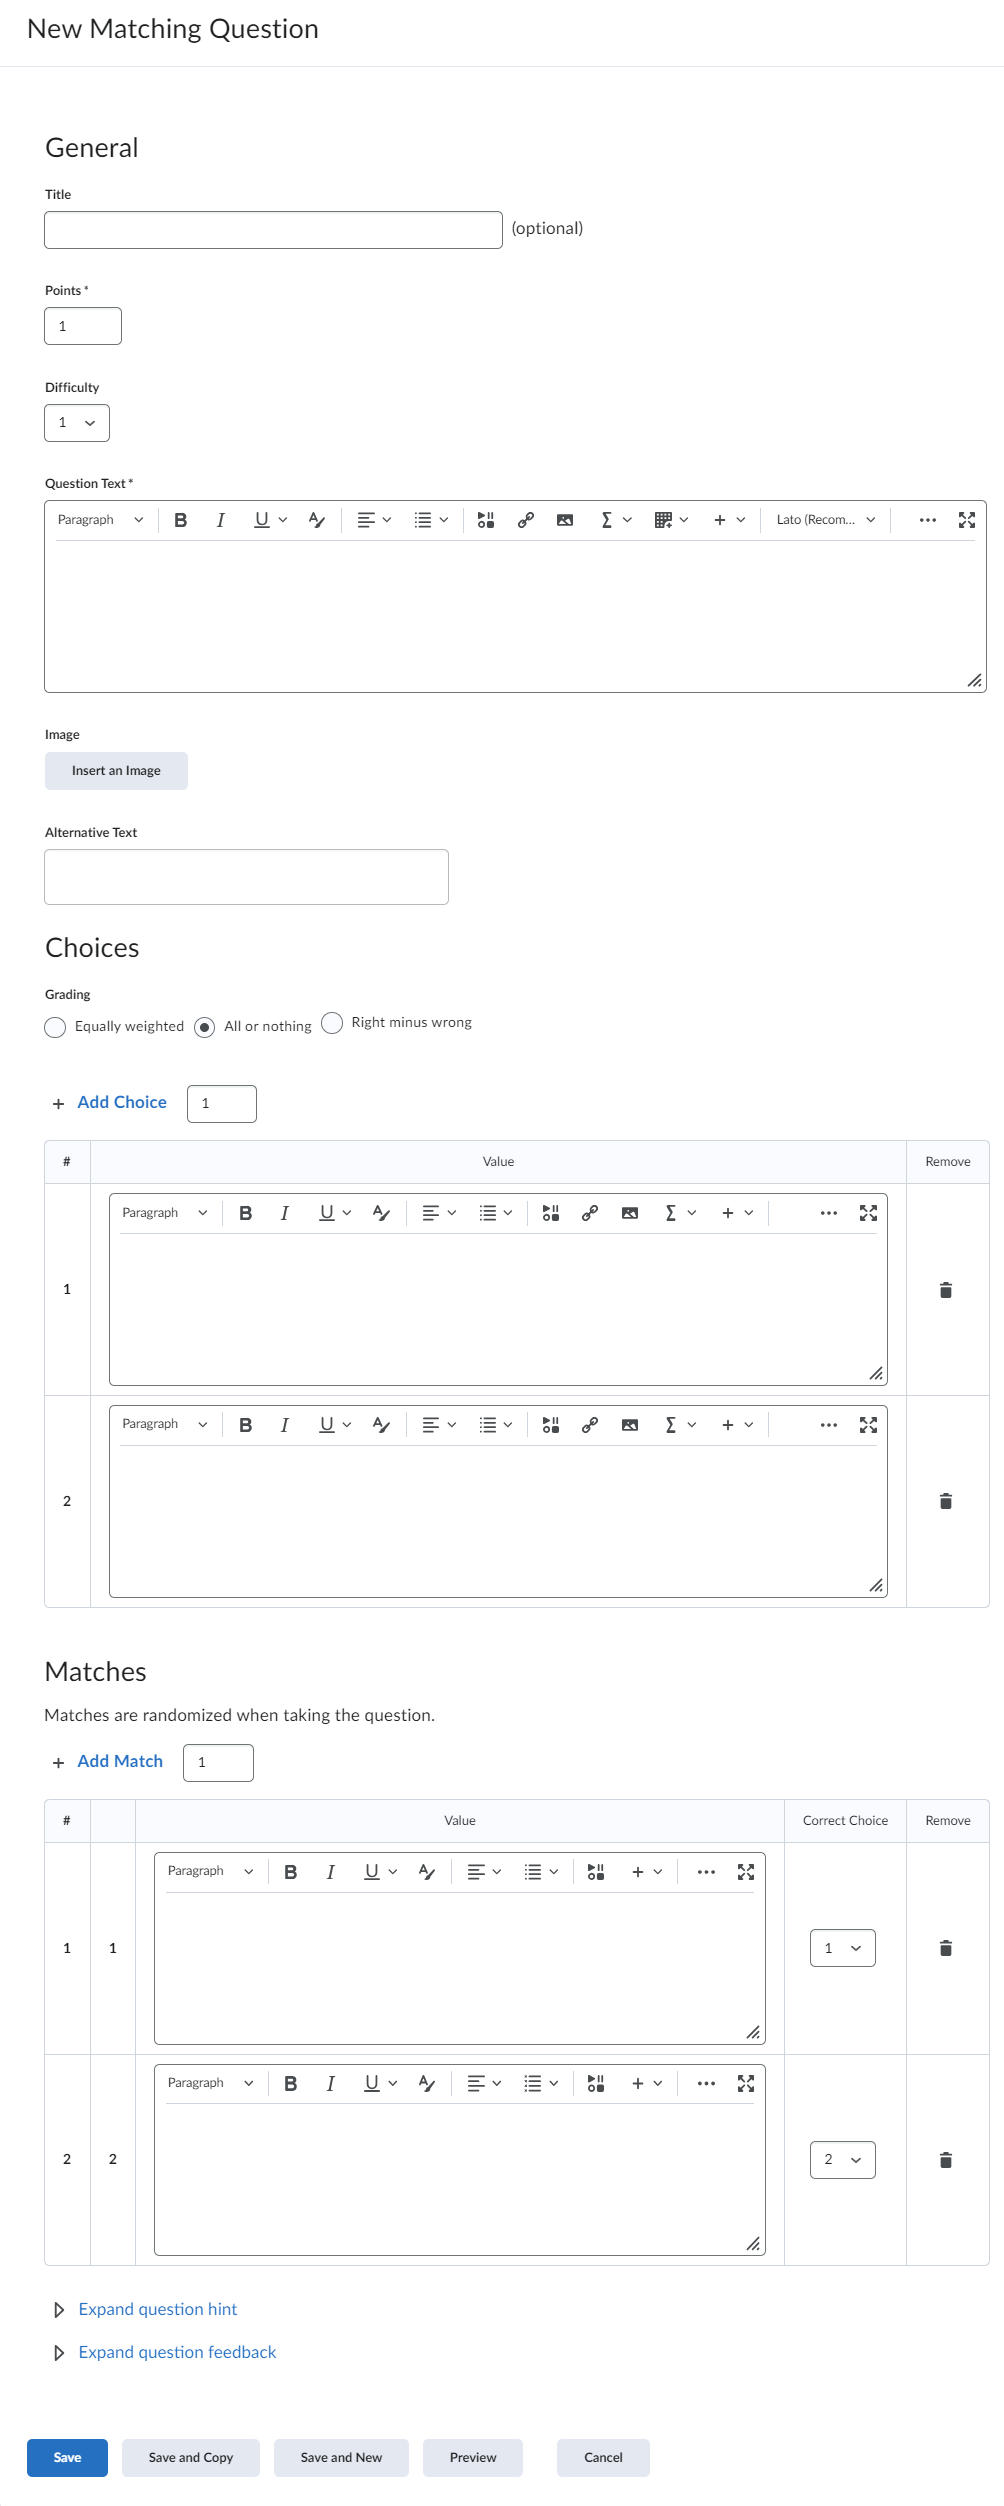
This format requires learners to correctly pair possible match choices with related items. MAT questions allow you to assess users' recognition of information and demonstrate comprehension of specific relationships.
- Assign a Point Value.
- Provide the Question Text.
- Optionally, provide a question Title, assign a Difficulty, insert an Image, and provide Alternative Text for that image.
- Select how Grading will be calculated:
- Equally Weighted - Points are evenly distributed among all possible correct matches. Users receive points for each correct match, but do not lose points for incorrect matches.
- All or Nothing - Learners earn full points only when all choices are matched correctly. Learners cannot earn partial points. This is the default choice.
- Right Minus Wrong - Points are evenly distributed across all choices. Learners earn partial points
for each correctly matched pair. Learners lose points for answers incorrectly matched
pair. Learners cannot receive less than 0 points.
- Type the list of choices. These are the items that learners will attempt to correctly pair to possible matches.
- Click Add Choice to add additional choices.
- Click the trash can icon beside a choice to remove it.
- Type the list of match items.
- Use the dropdown to select the Correct Choice that should pair for each match item.
- Click Save to save the question. You can also Preview the question to see how it will appear to students.
Note: Matches will be randomized when learners take the quiz. We highly recommend designing your question so that Choice 1 pairs with Match 1, Choice 2 with Match 2, etc. This reduces your chances of mistakenly pairing the wrong items together.
This format requires learners to arrange a series of items into a correct sequence or order.
- Assign a Point Value.
- Provide the Question Text.
- Optionally, provide a question Title, assign a Difficulty, insert an Image, and provide Alternative Text for that image.
- Select how the Grading will be calculated:
- Equally Weighted - Points are evenly distributed among all possible correct placements in the list. Users receive points for each correct placement, but do not lose points for incorrect ones.
- All or Nothing - Learners earn full points only when all items are ordered correctly. Learners cannot earn partial points. This is the default choice.
- Right Minus Wrong - Points are evenly distributed across all possible placements. Learners earn
partial points for each correctly placed item. Learners lose points for items that
are incorrectly ordered. Learners cannot receive less than 0 points.
- Type the list items that learners will attempt to correctly order.
- Click Add Item to add additional items.
- Click the trash can icon beside an item to remove it.
- Click the Correct Order dropdown to give each item its correct ordering.
- Optionally, you can provide Feedback for each item which will appear to students after they have completed the quiz.
- Click Save to save the question. You can also Preview the question to see how it will appear to students.
Note: Items will be randomized when learners take the quiz. We highly recommend designing
your question so that Item 1 is ordered 1st, Item 2 is ordered 2nd, etc. This reduces
your chances of mistakenly putting items in the wrong order for the auto-grader.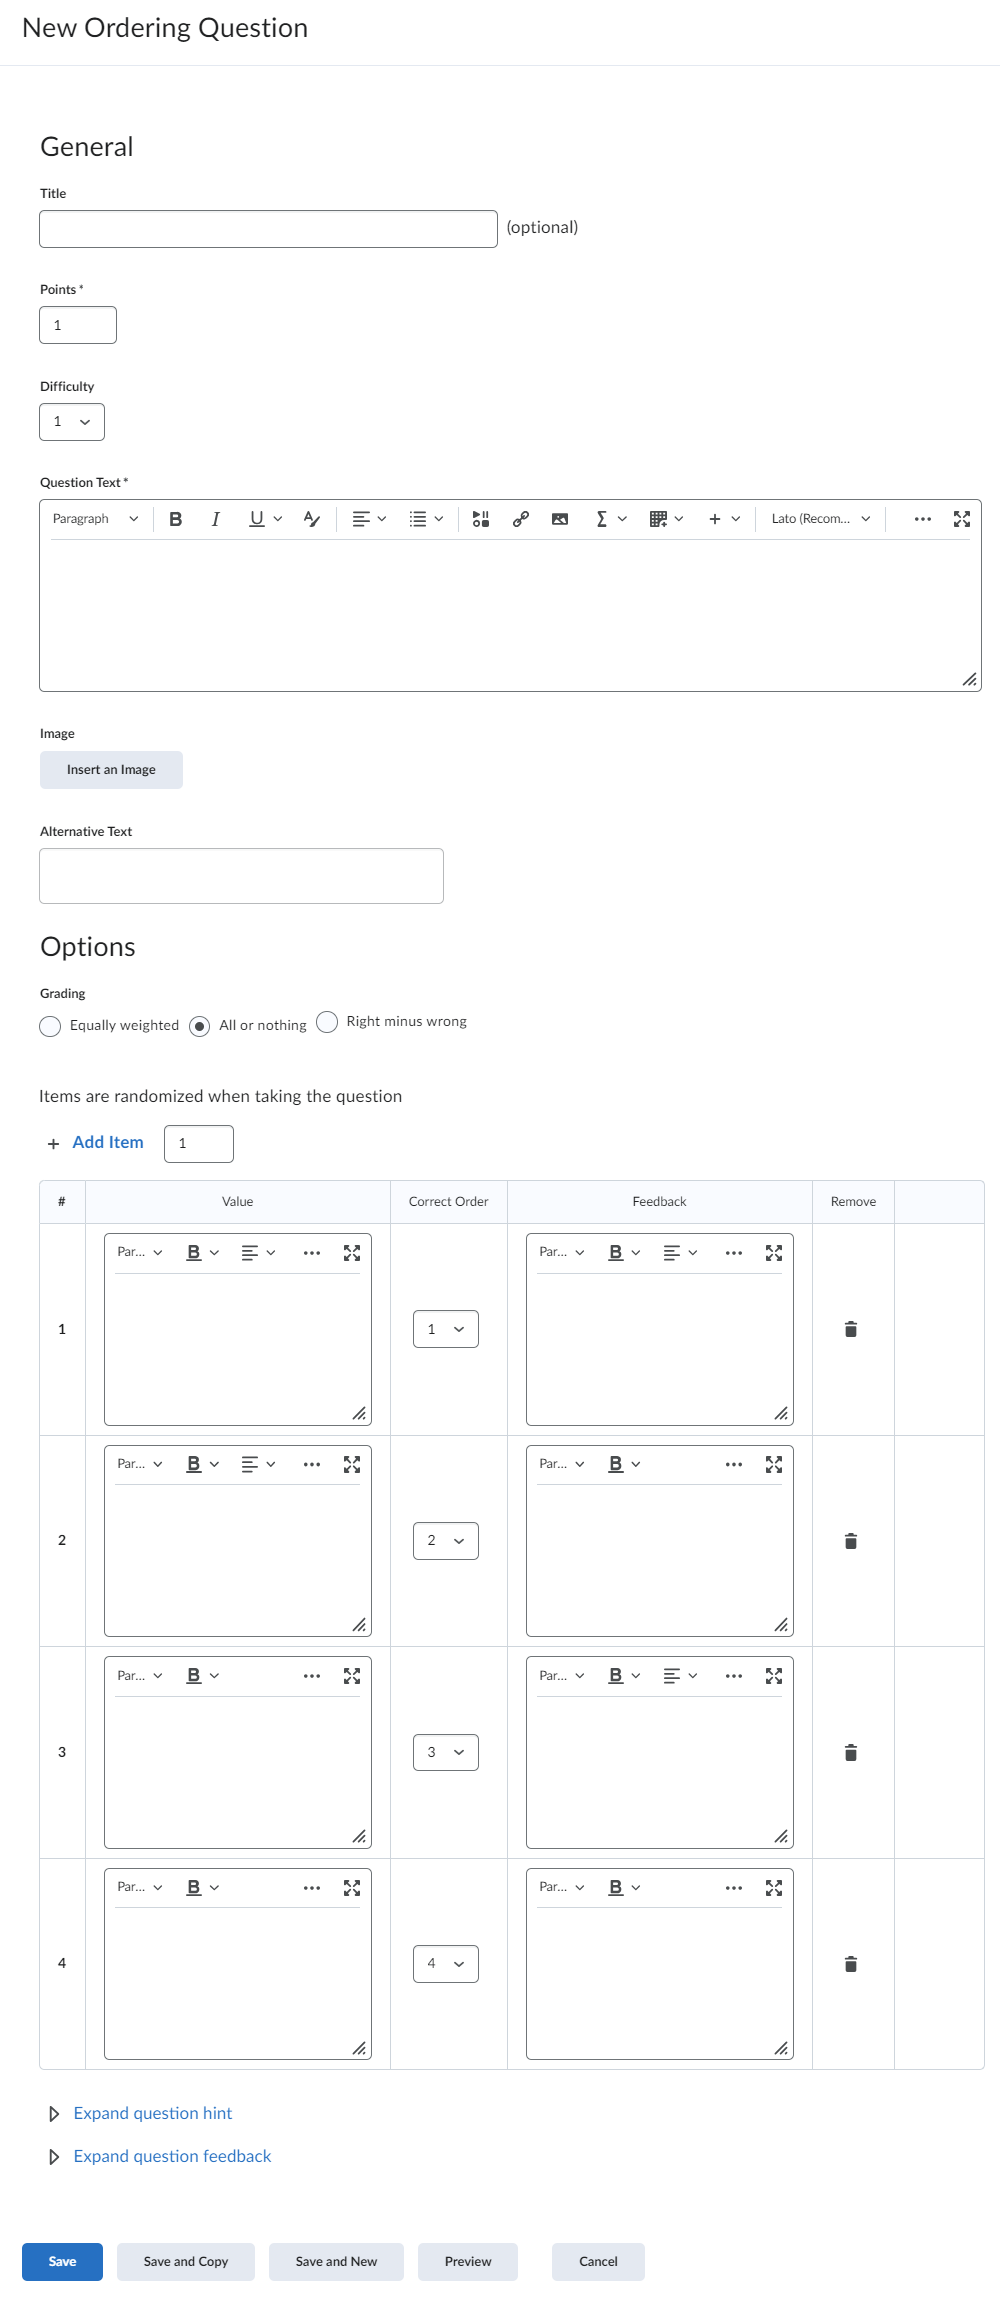
This format presents an open-ended question or prompt to which students will respond in detail. This format of question is good for responses of varying lengths from single-sentence responses up to entire short essays. Written response questions cannot be auto graded.
- Provide the Question Text. We recommend including some guidance about your expected response length, format,
and/or content here.
- Choose to Enable HTML editor for learner responses.
- Click the Custom Response Box Size dropdown to select the size of the response space that students will see. Your choices
are:
- Default size, about a paragraph
- A bit shorter, just a sentence
- Much longer, expecting an essay
- Assign a Point Value. Consider making questions with longer responses worth more points that shorter ones
or simpler question types.
- Click Save to save the question.
Note: While students can submit as much or as little text as they want in the response
boxes, the size of the box displayed communicates to students the rough length you
want to see in their answer. Make sure to choose the Custom Response Box Size that best matches your expectations.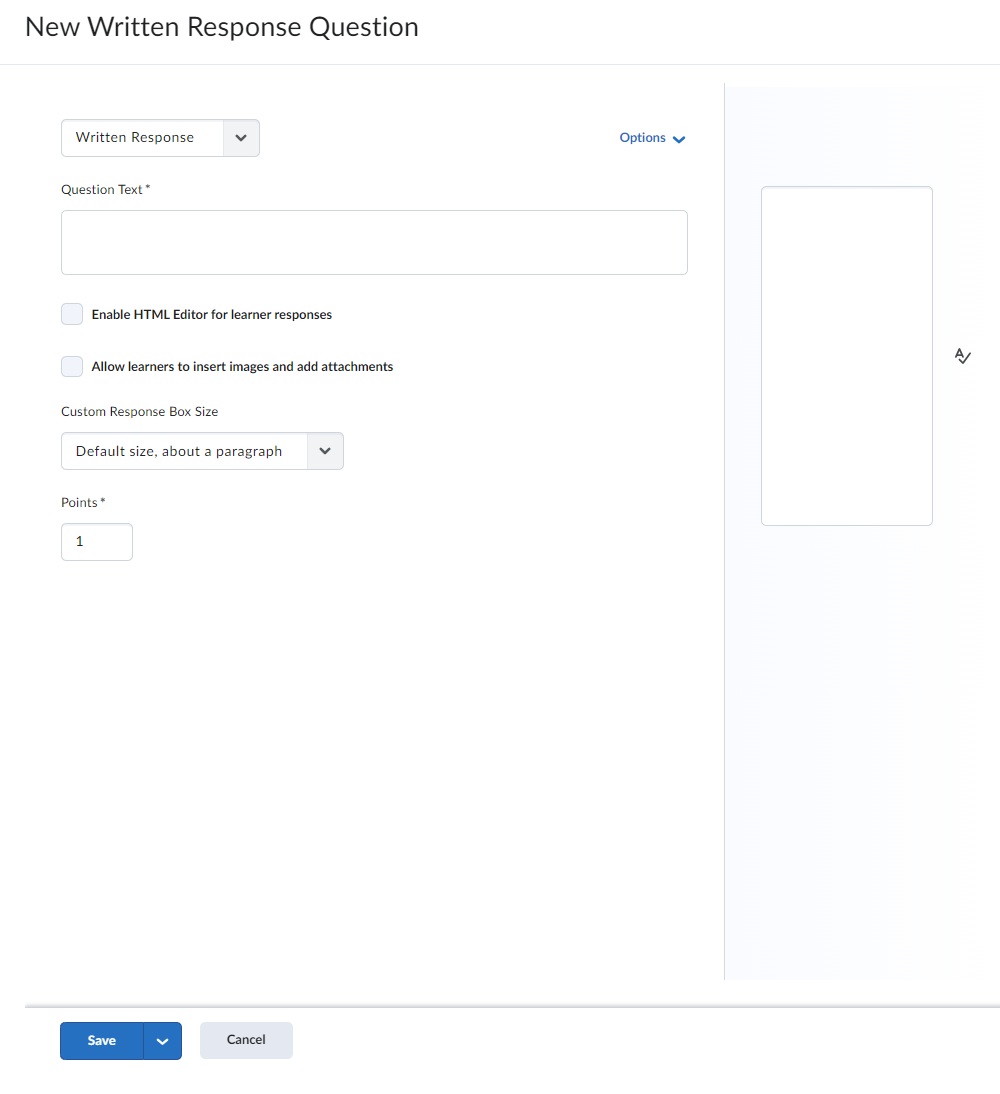
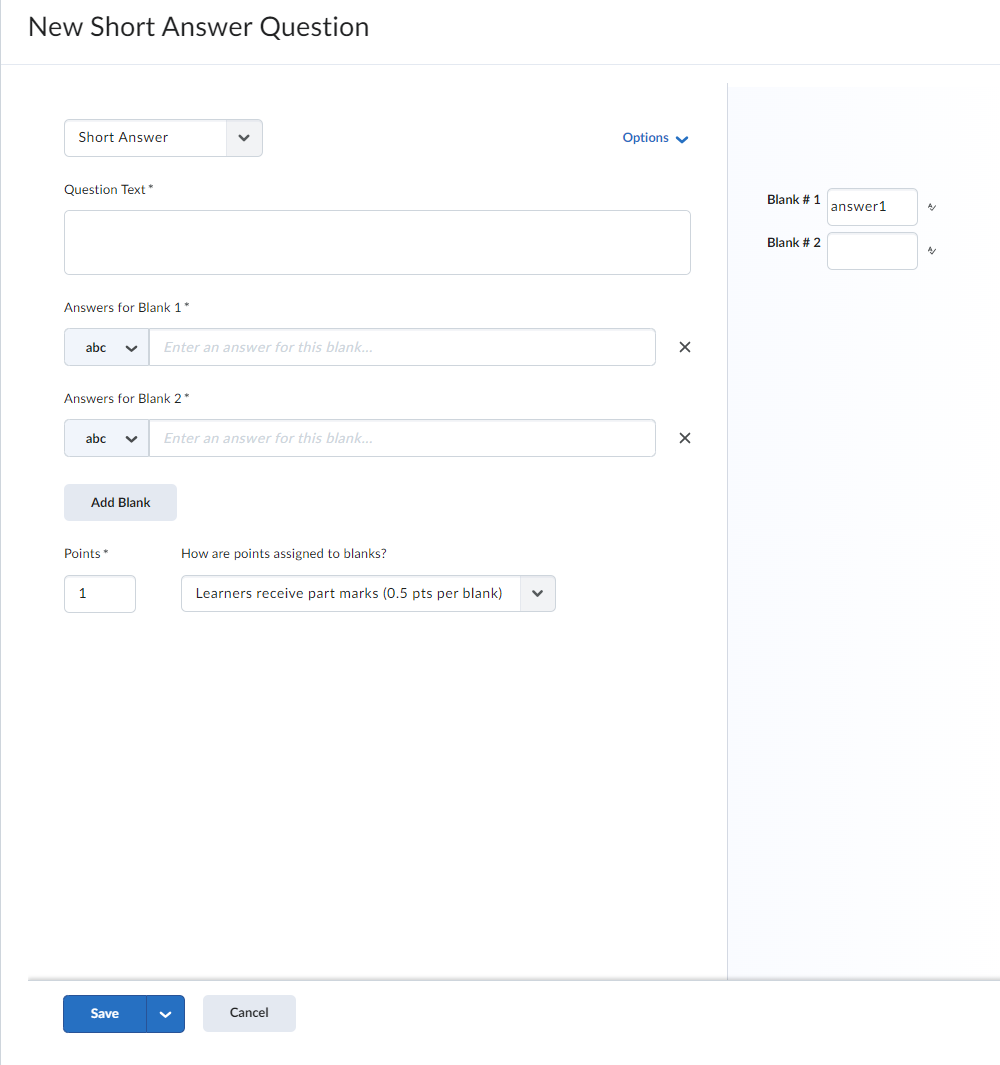
This format requires learners to produce brief one-word or short-phrase answers in response to an open-ended question. Short Answer questions can be auto-graded. The auto-grader searches for a matching character pattern in the submitted text.
- Provide the Question Text.
- Provide acceptable responses in the Answers for Blank 1 space. You can provide multiple possible correct answers in a single blank.
- Select the abc dropdown to customize how the auto-grader will evaluate responses. Your options are:
- Text - This is the default option and does not require students to match the exact capitalization of the answer key to receive credit.
- Case Sensitive Text - This option requires students to match the exact capitalization of the answer key to receive credit. This is not recommended unless capitalization is an essential part of the response.
- Regular Expression - These expressions use alpha-numeric and meta-characters to create a pattern that
describes one or more strings that must be identically matched within a body of text.
This is an advanced feature if you want to incorporate auto-grading of responses but
also want to allow for a variety of possible responses or response patterns from students.
- Optionally, click Add Blank to add additional response spaces. This can be helpful if your open-ended question
requires students to respond with more than one answer.
- Assign a Point Value to this question.
- If you have multiple blanks in a single question, click "How are points assigned to blanks?" to make a selection. Your choices are:
- Learners receive part marks - This distributes the point value evenly across all blanks and awards partial points for each current response. This is the default option.
- Learners must answer all blanks correctly - This is the all or nothing option. Students cannot receive partial points and must
answer all blanks correctly to receive credit for the question.
- Click Save to save the question.
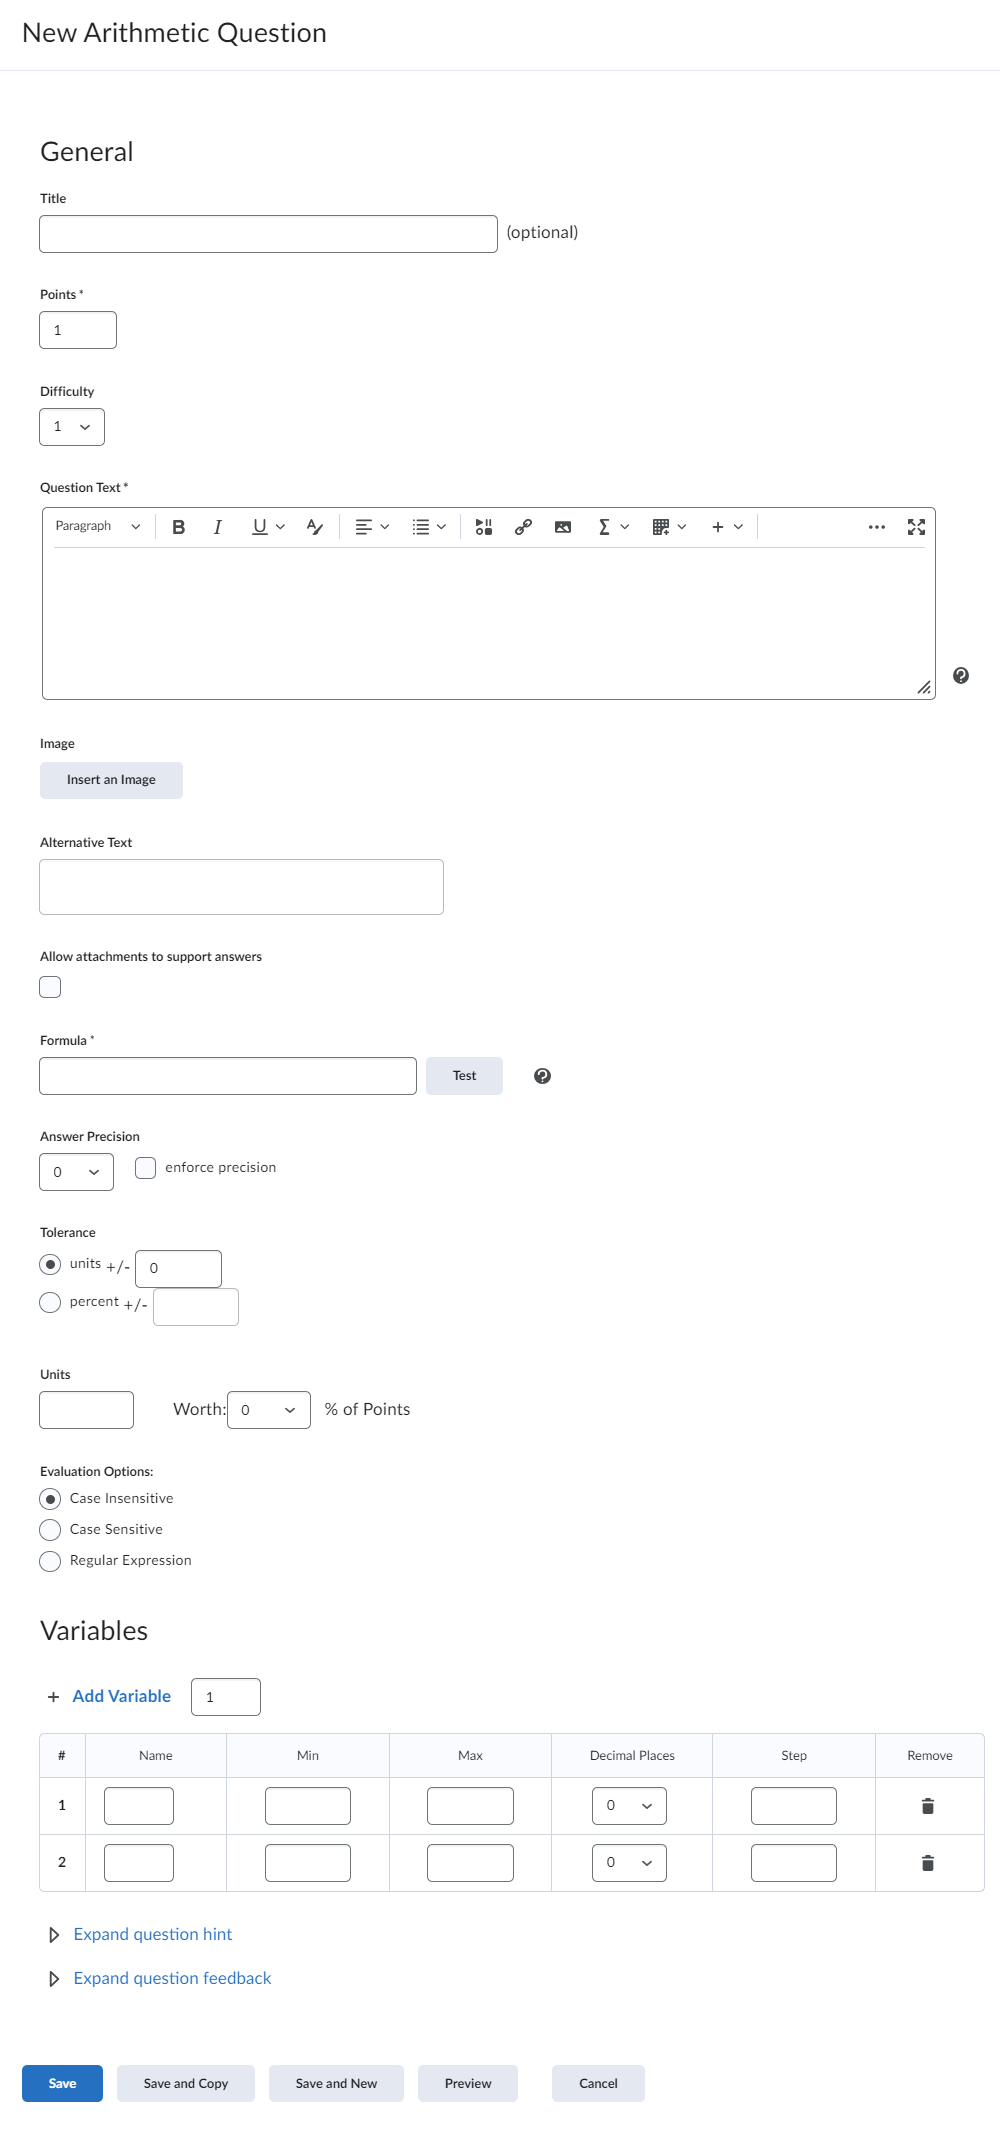
This format enables you to assess users' knowledge and comprehension of mathematics and number theory. You can ensure each respondent receives a unique question by including variables enclosed with curly braces that randomly generate numbers within the problem.
- Assign a Point value.
- Provide the Question text. You can use variables enclosed in curly brackets (e.g. {x}) to create unique question
text for each learner.
- Optionally, you may provide a Title, select a Difficulty, upload an Image, and provide alternative text for that image.
- Optionally, you may select the Allow attachments to support answers checkbox if you want your learners to provide an attachment with their submitted
answer. By default, this is disabled.
- Enter the Formula. This is the mathematical expression that describes the problem being solved by your students and is what the quiz uses to calculate correct answers for each question. If you are using variables in your question text, you should use those same variables here. Note: You must enclose variables in curly brackets in your formula (e.g. {x}).
You have more optional settings for arithmetic problems
- Answer Precision - use the dropdown to select the number of acceptable decimal places allowed in a
response.
- Enforce Precision - select this checkbox to require that many decimal places in learner responses.
- Tolerance - can be set to +/- units or +/- percent. This will allow respondents a margin of
error for their potential responses.
- Units - evaluate if learners provide answers with the correct unit type. Input the desired
unit in the box, and then determine how providing the correct or incorrect unit will
affect the Point percentage.
- Evaluation Options – determine how the auto-grader will assess a learner’s provided unit:
- Case Sensitive - This option requires students to match the exact capitalization of the answer key to receive credit. This is not recommended except for some rare circumstances where capitalization is an essential part of the response.
- Case Insensitive - This is the default option and does not require students to match the exact capitalization of the answer key to receive credit.
- Regular Expression - These expressions use alpha-numeric and meta-characters to create a pattern that describes one or more strings that must be identically matched within a body of text. This is an advanced feature if you want to incorporate auto-grading of responses but also want to allow for a variety of possible responses or response patterns from students.
Define the Variables used in the question text and the formula:
- Type the letter representing that variable in the Name.
- Set parameters for the minimum and maximum value.
- Determine the number of decimal places used.
- Define the Step (increment) used by the number generator.
- Create additional variables by clicking the Add Variable button.
- Remove variables by selecting the trash can icon beside the variable you wish to remove.
- Click Save to save the question. You can also Preview the question to see how it will appear to students.
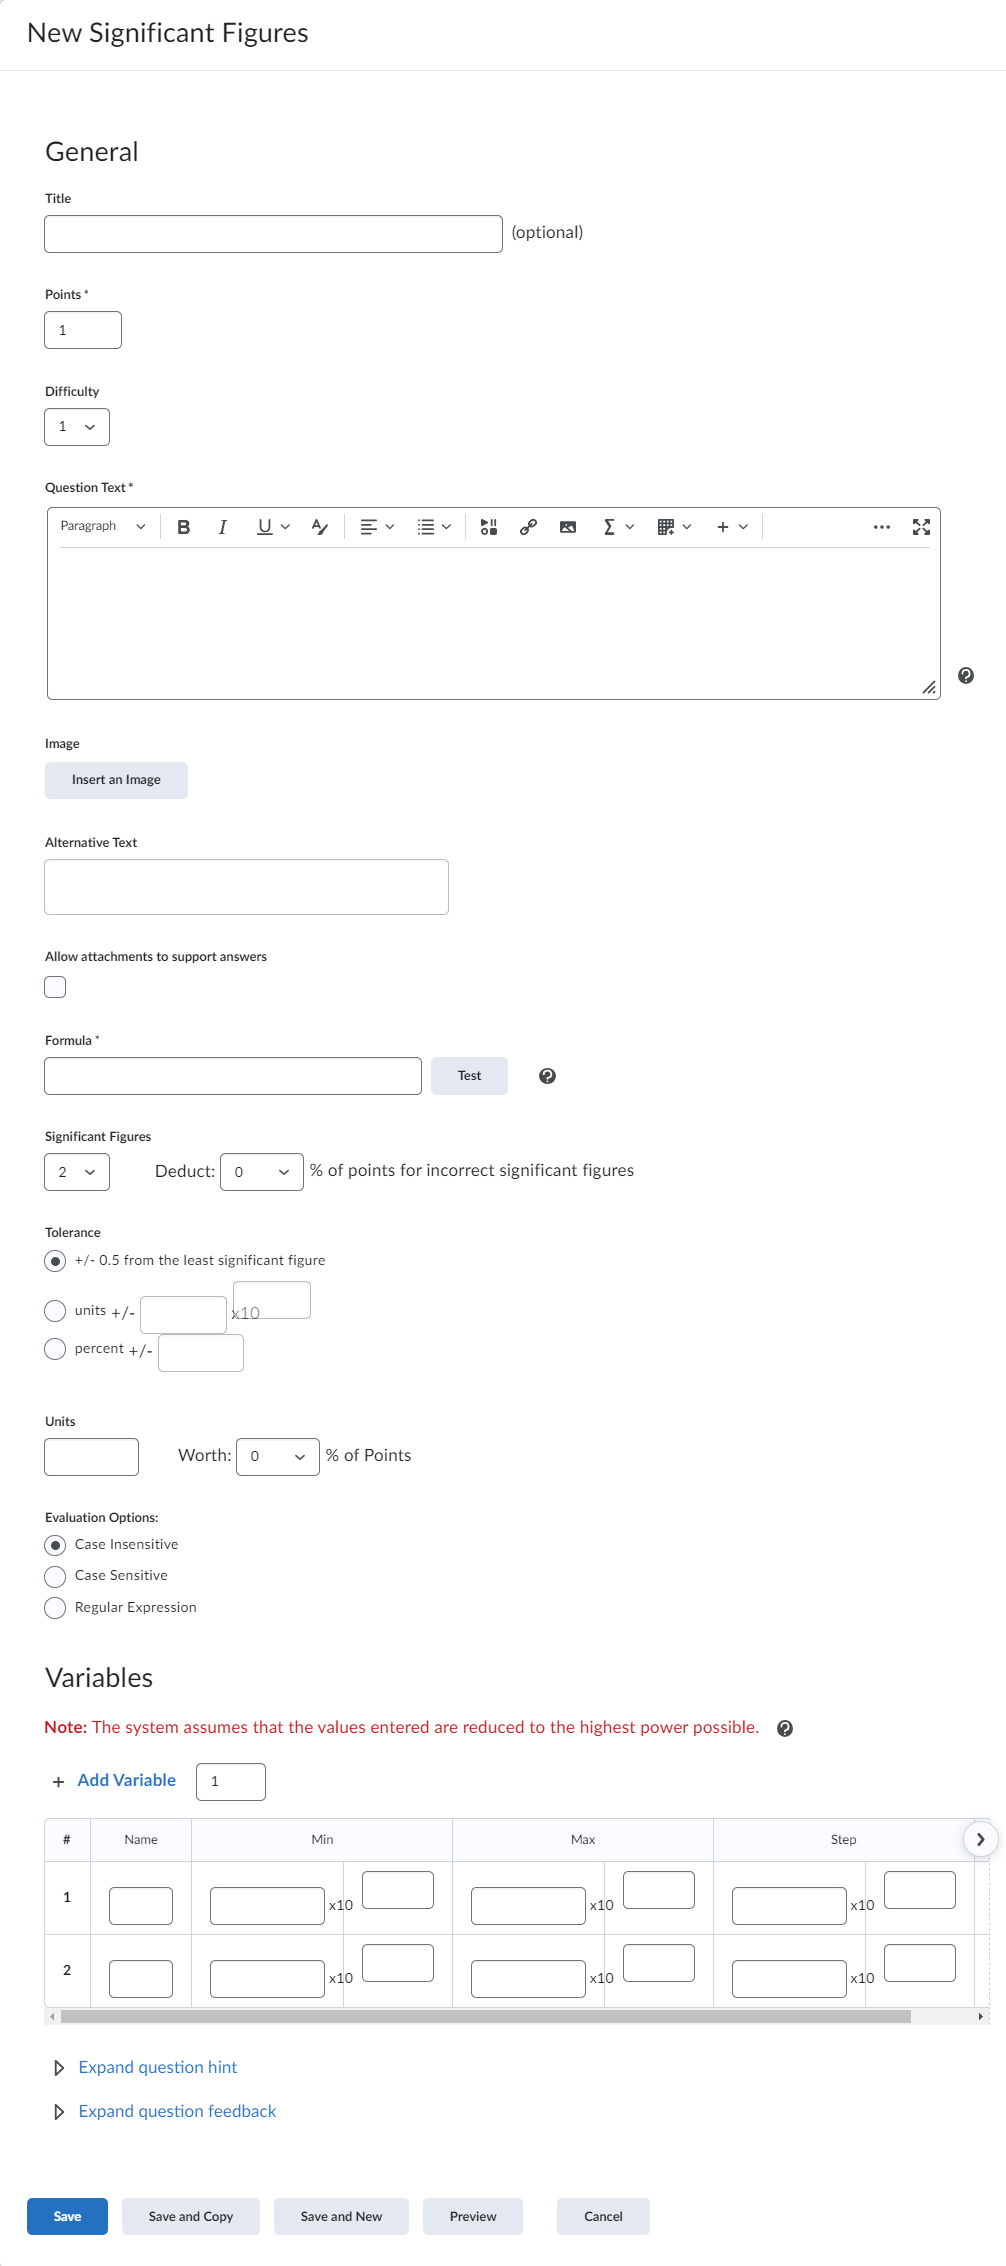
This format enables you to assess users' knowledge and comprehension of mathematics and number theory. You can ensure each respondent receives a unique question by including variables enclosed with curly braces that randomly generate numbers within the problem.
- Assign a Point value.
- Provide the Question text. Remember that you can use variables enclosed in curly brackets (e.g. {x}) to create
unique question text for each learner.
- Optionally, you may provide a Title, select a Difficulty, upload an Image, and provide Alternative Text for that image.
- Enter the Formula. This is the mathematical expression that describes the problem being solved by your students and is what the quiz uses to calculate correct answers for each question. If you are using variables in your question text, you should use those same variables here. Note: You must enclose variables in curly brackets in your formula (e.g. {x}).
You have more optional settings for arithmetic problems:
- Significant Figures - use the dropdown to select the number of significant figures that answers should containt. You may choose to deduct a set percentage of points for correct answers with the incorrect number of significant
figures.
- Tolerace - can be set to +/- units or +/- percent. This will allow learners a margin of error
for their potential answers.
- Units - evaluate if learners provide answers with the correct unit type. Input the desired
unit in the box, and then determine how providing the correct or incorrect unit will
affect the Point percentage.
- Evaluation Options - deetermine how the auto-grader will assess a learner's provided unit.
- Case Sensitive - This option requires students to match the exact capitalization of the answer key to receive credit. This is not recommended except for some rare circumstances where capitalization is an essential part of the response.
- Case Insensitive - This is the default option and does not require students to match the exact capitalization of the answer key to receive credit.
- Regular Expression - These expressions use alpha-numeric and meta-characters to create a pattern that describes one or more strings that must be identically matched within a body of text. This is an advanced feature if you want to incorporate auto-grading of responses but also want to allow for a variety of possible responses or response patterns from students.
Define the Variables used in the question text and the formula:
- Type the letter representing that variable in the Name.
- Set parameters for the minimum and maximum value in terms of base coefficient and exponent.
- Set the Step (increment) used by the number generator.
- Add additional variables by selecting the Add Variable button.
- You can remove variables by selecting the trash can icon beside the variable you wish to remove.
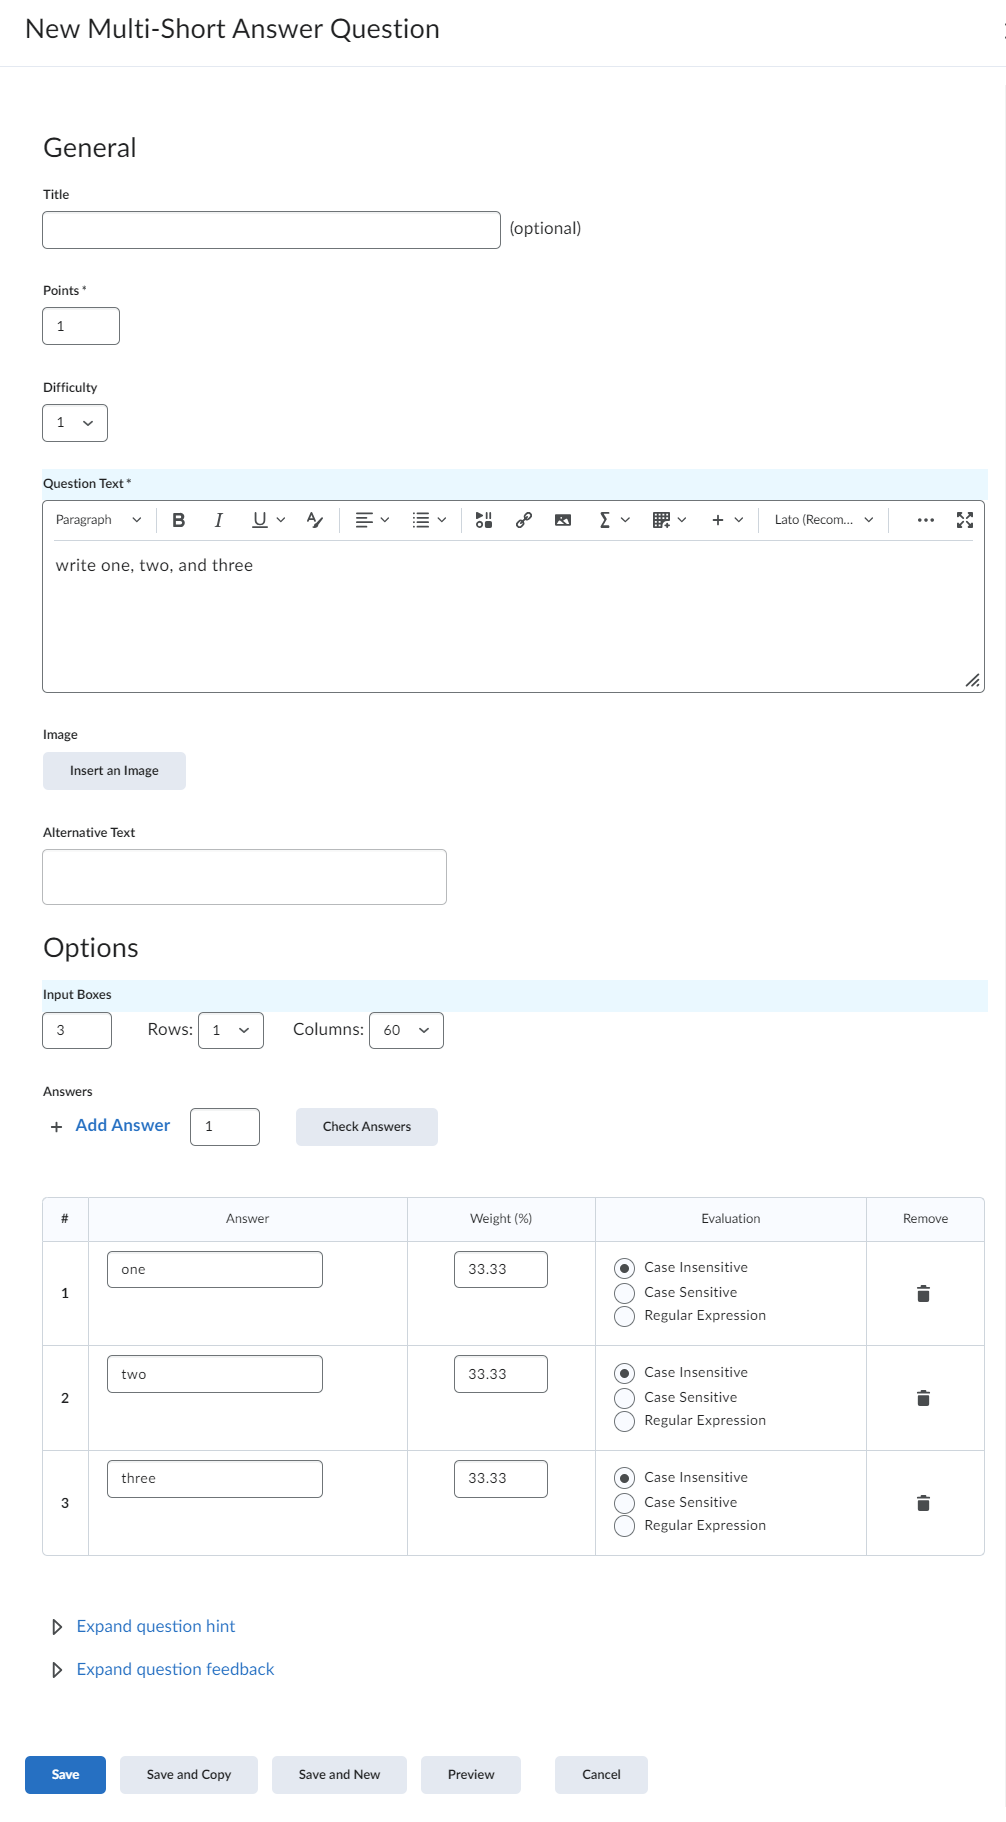
This format requires learners to produce multiple one-word or short-phrase answers in response to a single question. MSA questions can be auto-graded. The auto-grader searches for a matching character pattern in the submitted text.
- Assign a Point Value.
- Provide the Question Text.
- Optionally, you may provide a Title, select a Difficulty, upload an Image, and provide alternative text for that image.
- Determine the number of Input Boxes by selecting the dropdown. You have display options:
- Rows controls how tall each answer box will appear to students
- Columns controls how wide each anser box appears to students.
- Type the correct answers into the Answer boxes.
- Click Add Answer to create additional boxes.
- Click the trash can icon besie an answer box to remove it.
- Assign a Weight (%) for each answer. By default, weight is evenly distributed across three answer choices.
- Choose an auto-grading Evaluation option for each answer:
- Text - This is the default option and does not require studenst to match the exact capitalization of the answer key to receive credit.
- Case Sensitive Text - This option requires students to match the exact capitalization of the answer key. This is not recommended unless capitalization is an essential part of the response.
- Regular Expression - These expressions use alpha-numeric and meta-characters to create a pattern that
describes one or more strings that must be identically matched within a body of text.
This is an advanced feature if you want to incorporate auto-grading of responses but
also want to allow for a variety of possible responses or response patterns from students.
- Click Save to save the question. You can also Preview the question to see how it will appear to students.