Course Image and Banner
Courses in eLC are automatically assigned a decorative image. That image will be displayed as the banner inside your course, and as the thumbnail icon on the eLC dashboard.
Learn about:
Changing the Course Image and Banner
To change the course image and banner of any course, you must hold an Instructor or TA role within that course.
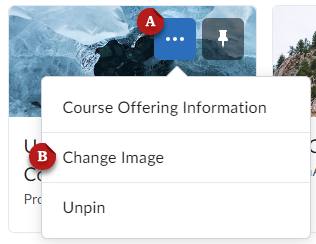
- Click the three dots button [A] on the image you want to change.
- Select Change Image [B].
- Search for an image you like and select Use This Image.

Uploading Your Own Image
You may upload your own file to use for the course image and banner. D2L recommends images of size 2400 pixels by 960 pixels for course images. The image automatically scales for different devices. As a result, we recommend that you avoid using images that contain text.
- Navigate to the Change Image menu (shown above).
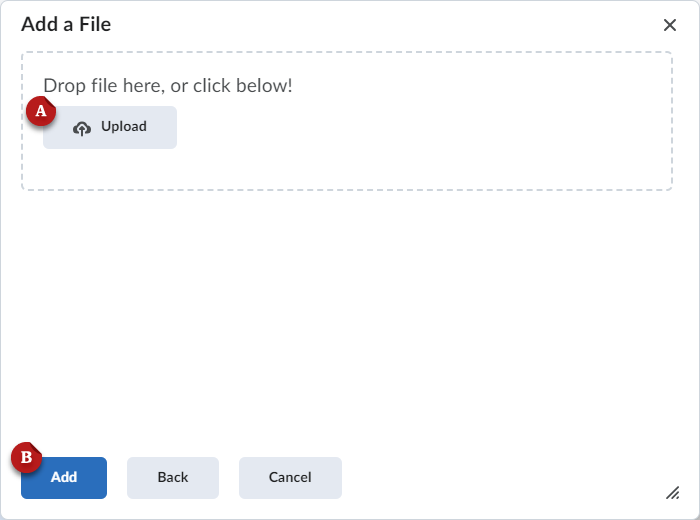
- Click Upload.
- Select My Computer.
- Click Upload [A].
- Browse your computer to find the image you want to upload.
- Click Add [B].

Removing the Course Banner
You can remove the banner image from your course if you would like.
- Navigate to the course homepage.
- Click the three dots button [A] on the banner.
- Select Remove This Banner [B].

Restoring the Course Banner
If you want to display the course banner again after choosing to remove it, you will need to restore it.
- From the course nav bar, click Course Admin.
- Find and click Course Offering Information.
- Find and select the option to Display the image in a banner.
- Click Save.
Last Updated: 10/18/2024
