Quizzes: Grading and Reports
After students have completed a quiz, questions can be auto-graded or manually graded.
This section can help you learn about:
- Grading Quizzes
- Correcting Quiz Questions and Scores
- Generating Reports for Quizzes
- Viewing and Exporting Quiz Statistics
- Incomplete and unsubmitted quizzes
Grading Quizzes
This tutorial covers how to grade a quiz, showing both auto-graded questions and manually graded questions.
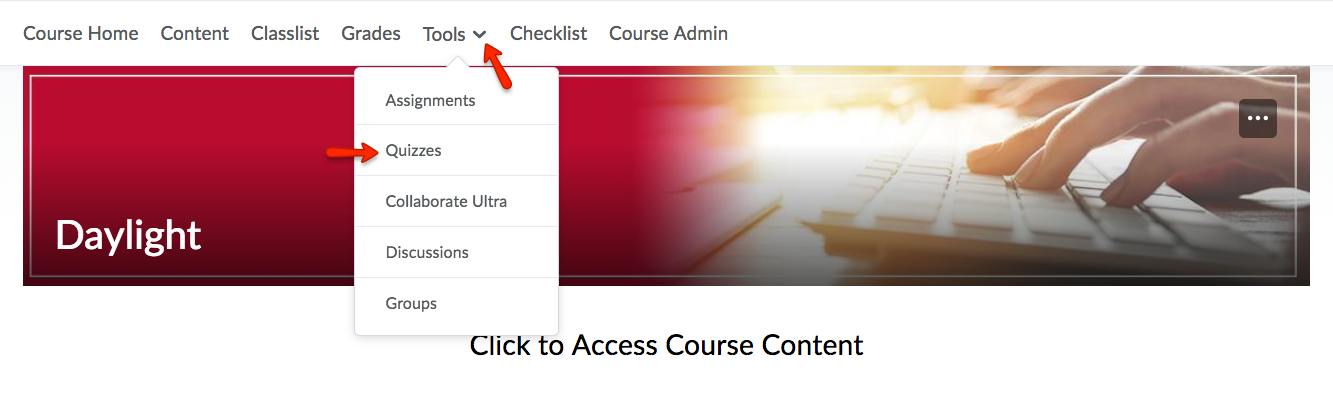
1. First, to access the Quiz tool, from your course navbar, click Tools and select Quizzes.
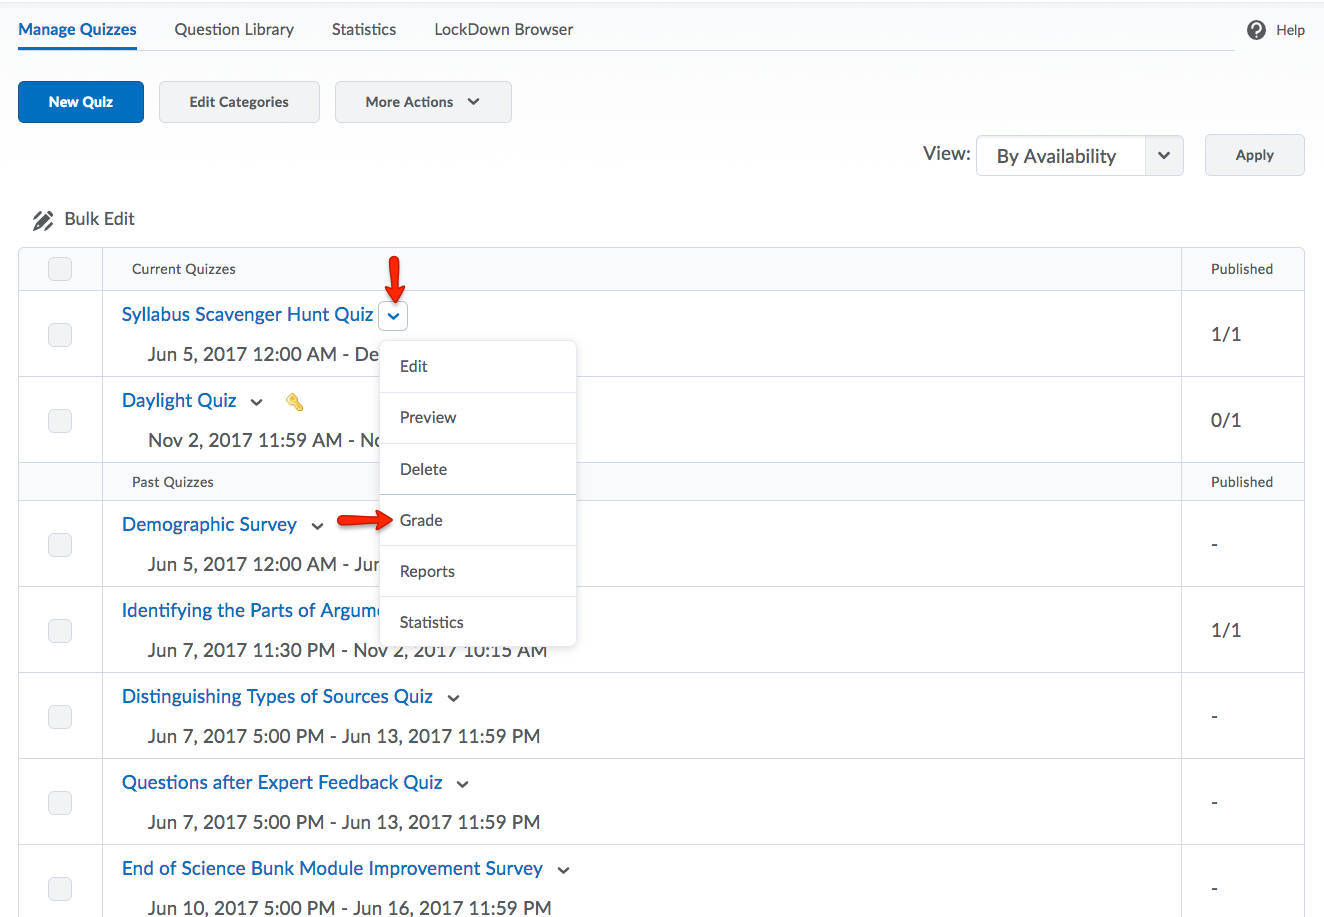
2. Locate the quiz you wish to grade, and, to the right of the desired quiz name, click the arrow and select Grade from the dropdown menu.
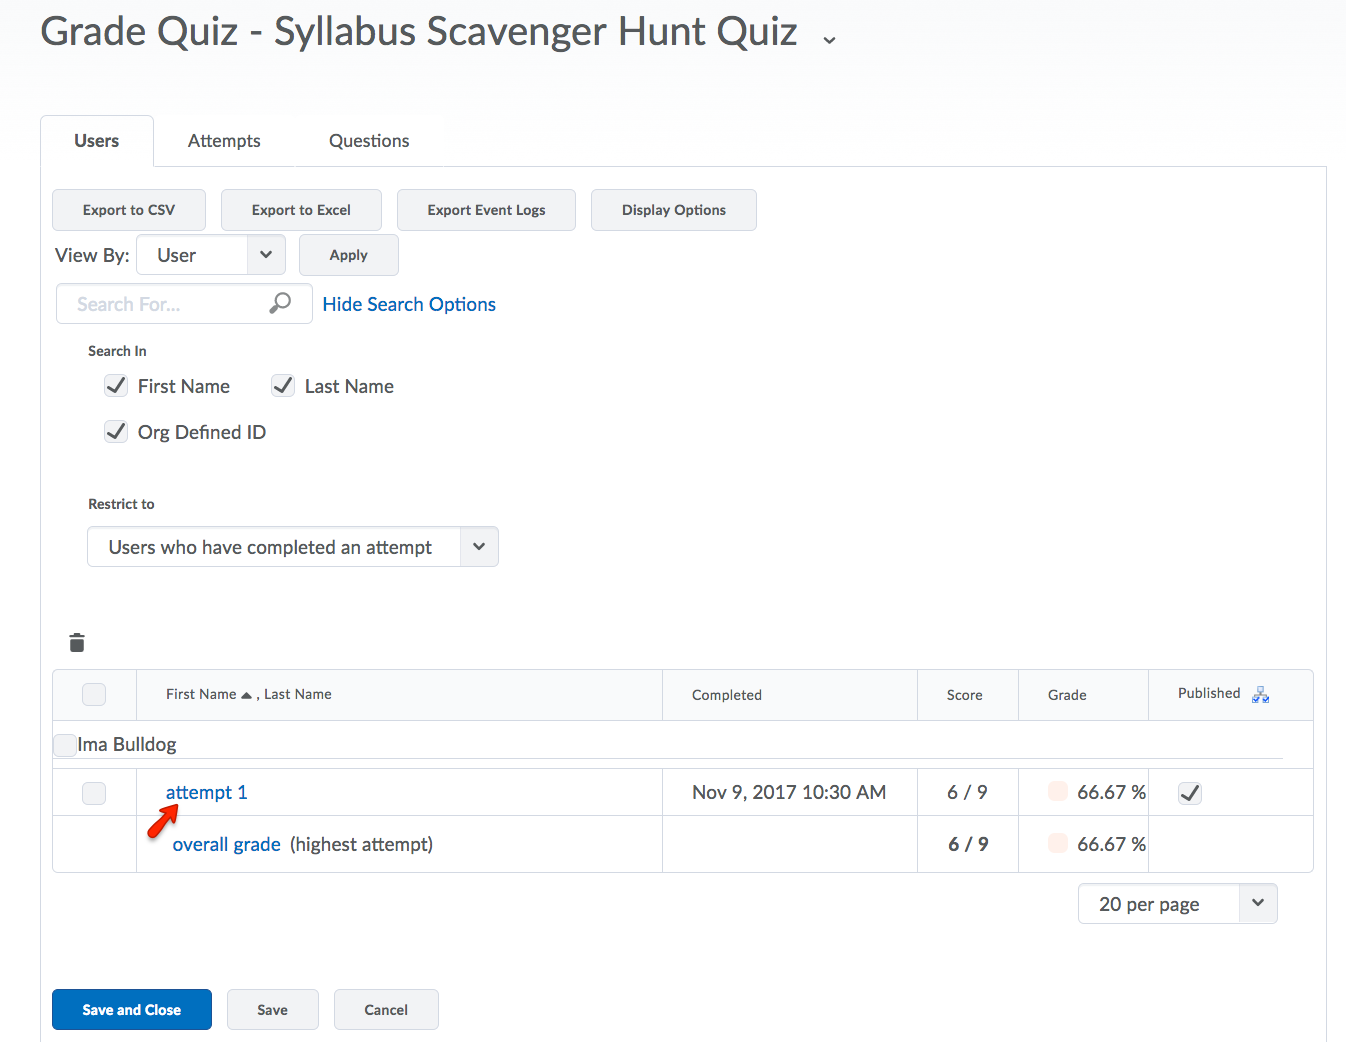
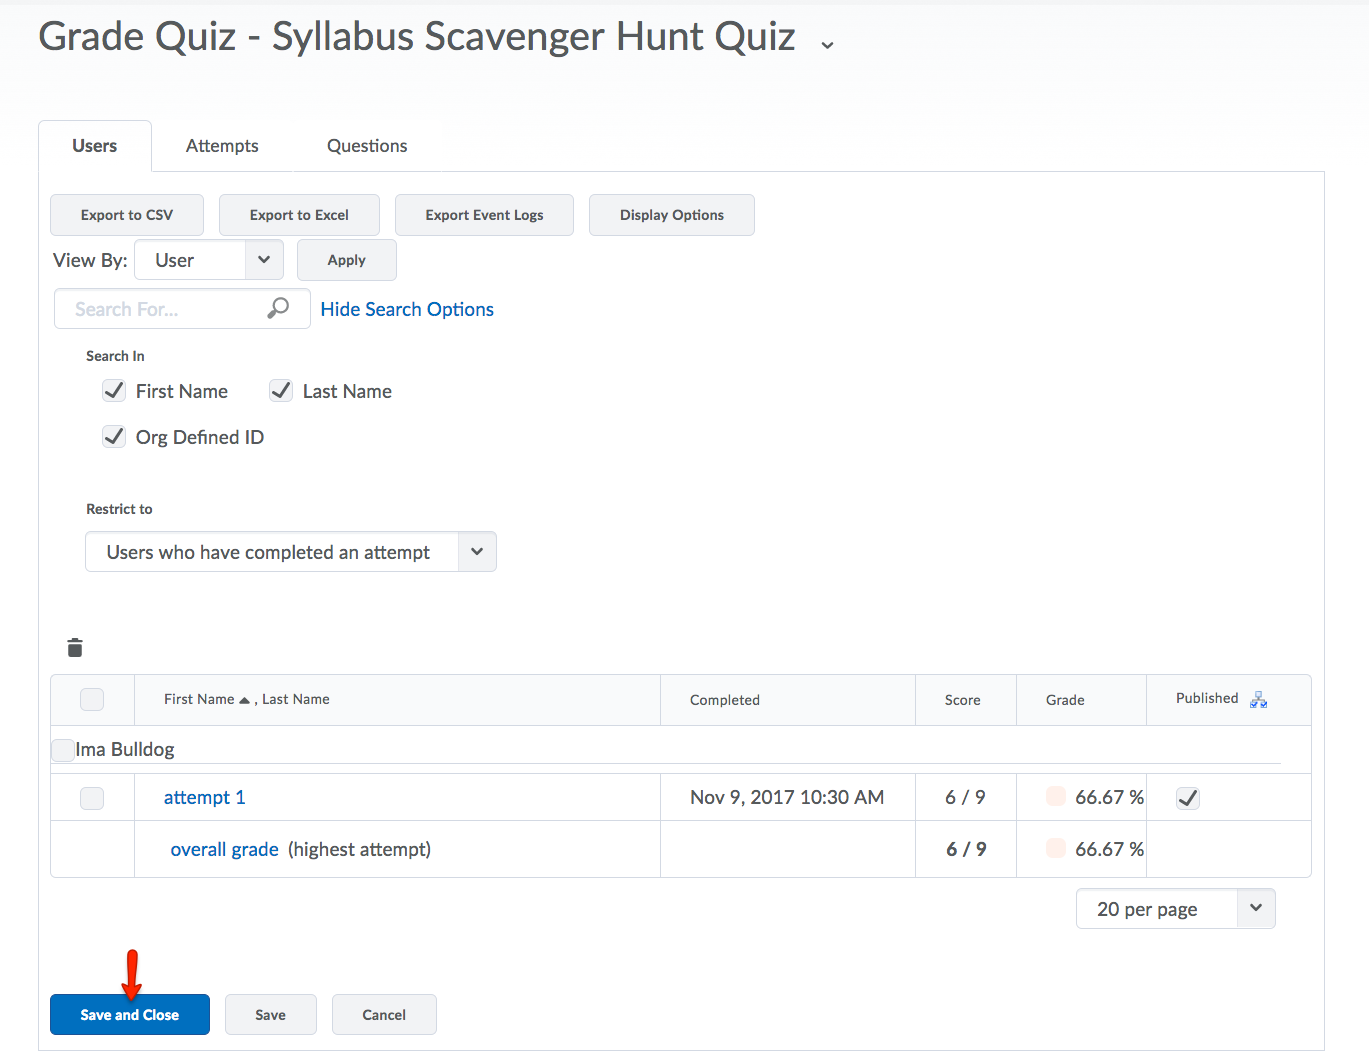
3. Select the Submission (attempt 1, attempt 2, etc.) you wish to grade under each student's name.
4. Make sure all auto-graded questions were graded accurately. Any grades that were not auto-graded can be corrected manually.
5. Certain question types, such as long answer or essay questions, are not auto-graded and must be entered manually. You may manually enter a grade in the Score field. The Feedback field is optional.
6. When you have completed grading the quiz, return to the top of the page and click the Save and Close.
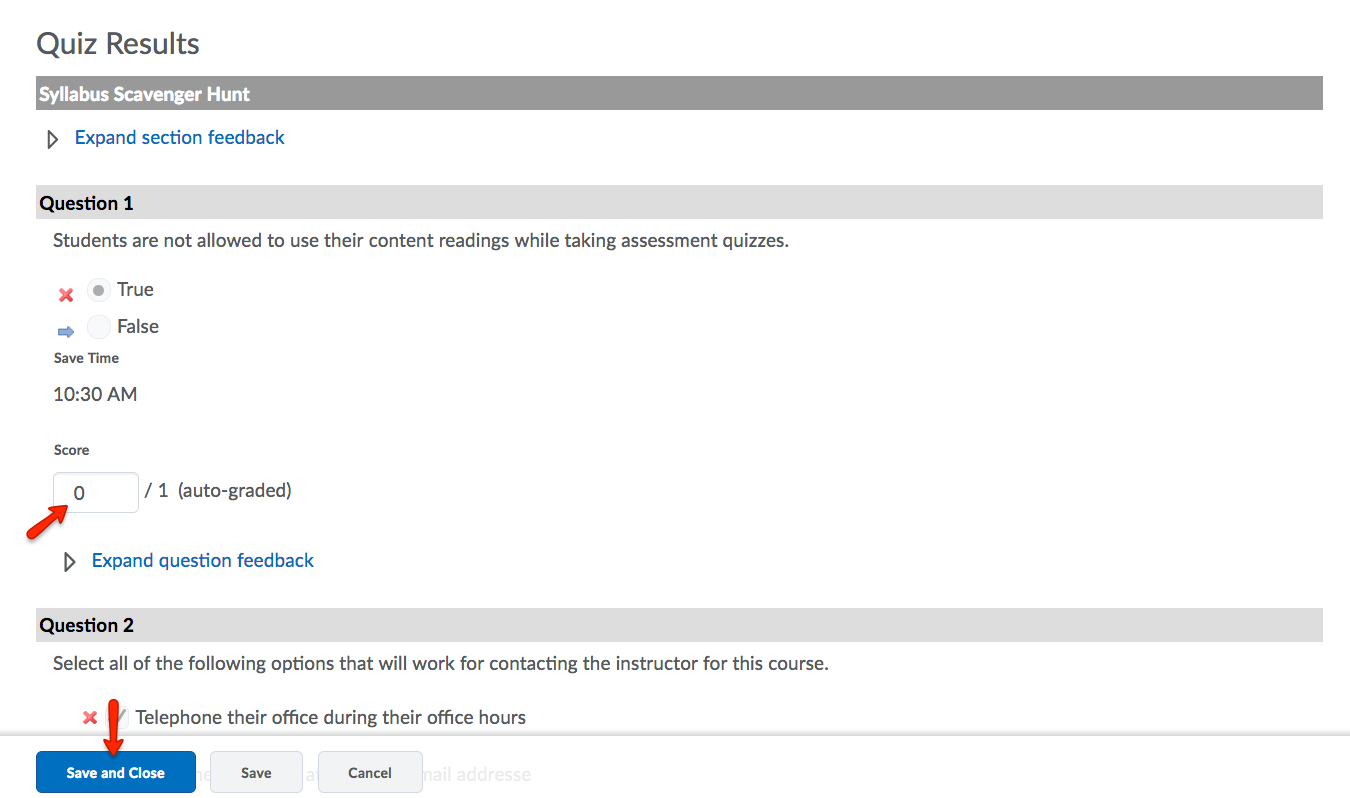
7. When you have completed the grading process, click Save and Close.
Correcting Quiz Questions and Scores
If a mistake has been found in a quiz that has already been administered, it is possible to correct the scoring for that quiz. Scoring can be changed on the incorrect question and all student grading on that specific question can be automatically corrected. This is a two-stage procedure: First, the question gets regraded, and then the question is corrected in the quiz question library so that it will be correct for future use. This tutorial covers the steps necessary to both regrade the incorrect question and correct the question in the Question Library.
Regrading a Quiz Question
1. First, to access the Quiz tool, from your course navbar, click Tools and select Quizzes.
2. To the right of the desired quiz name, click the arrow and select Grade from the dropdown menu.
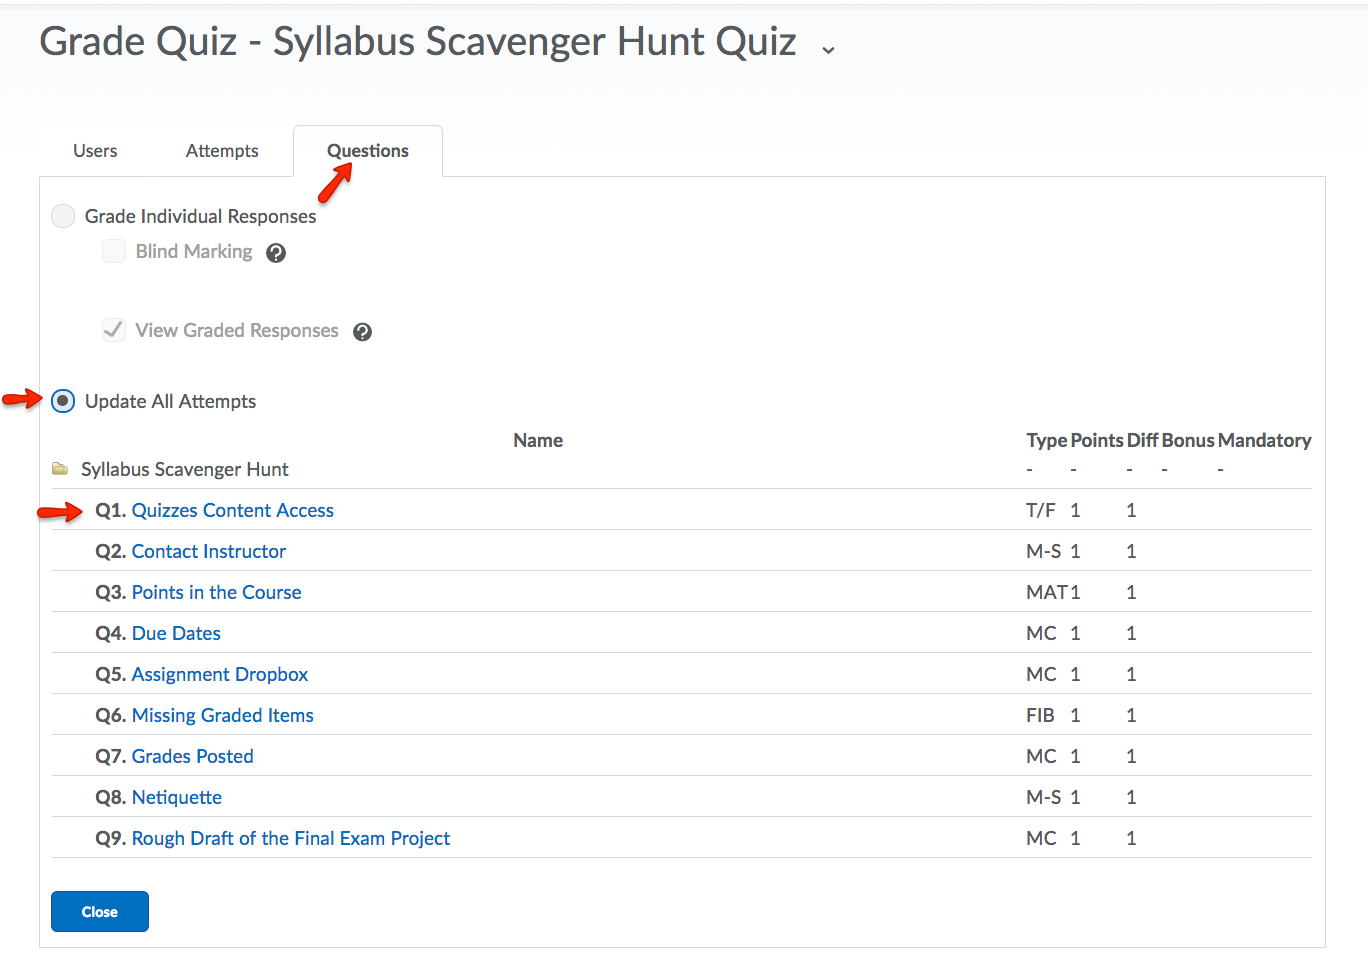
3. Click the Questions tab.
4. Click on the Update All Attempts radio button. This insures that once you make your changes to the question, the grades of all students will be adjusted accordingly.
From the list of questions, select the one(s) you wish to edit.
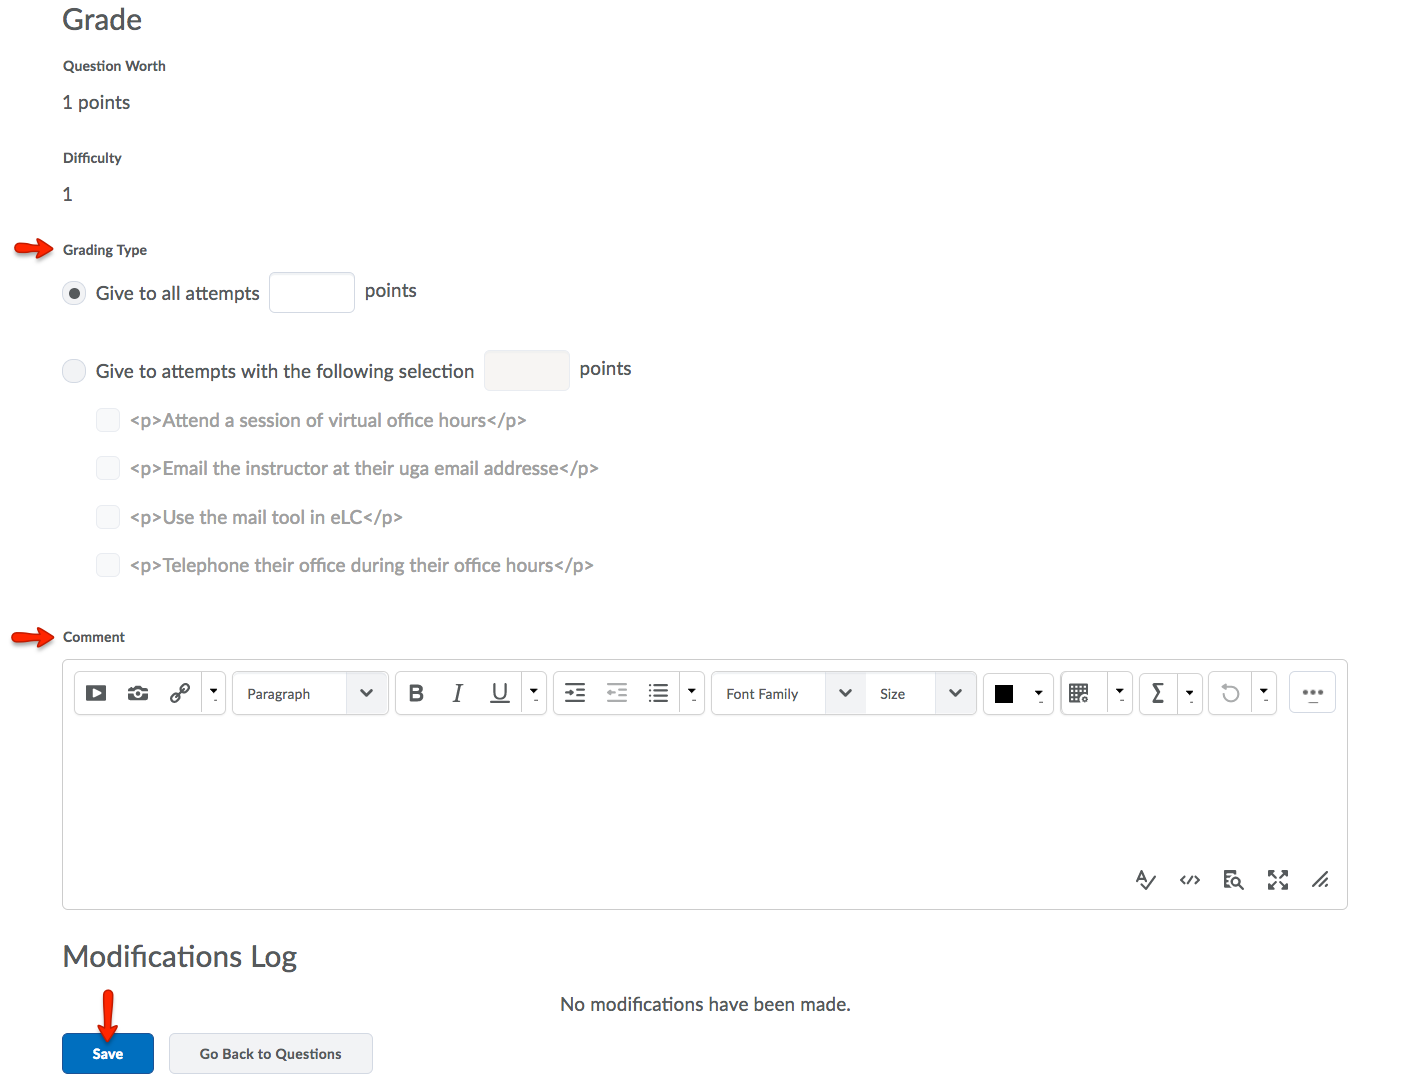
5. Under the Grade section, select from the following two options:
- Give all students the same number of points for the question.
- Give the students who selected a specific answer the desired number of points.
For either option, you may type an explanation in the Comment field.
6. When you have finished, click Save.
Editing a Quiz Question
1. First, to access the Quiz tool, from your course navbar, click Tools and select Quizzes.
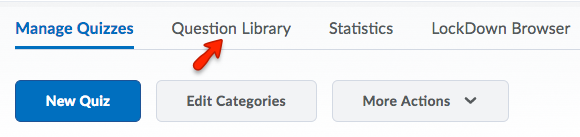
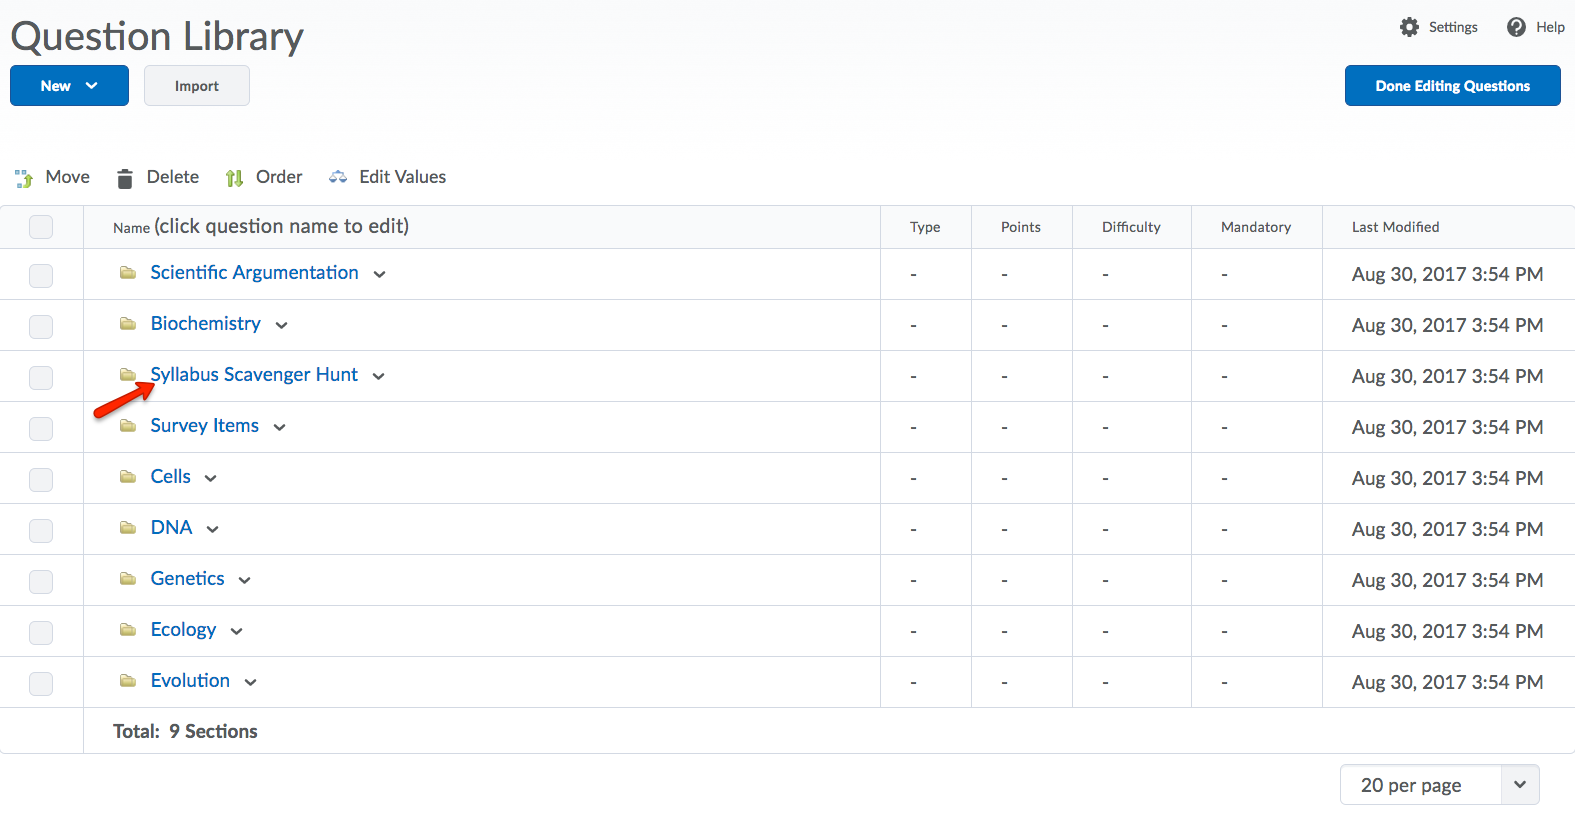
2. From the quiz navigation menu, select the Question Library tab.
3. First select the Question Section that houses the question you wish to edit. Then, select the question you wish to edit.
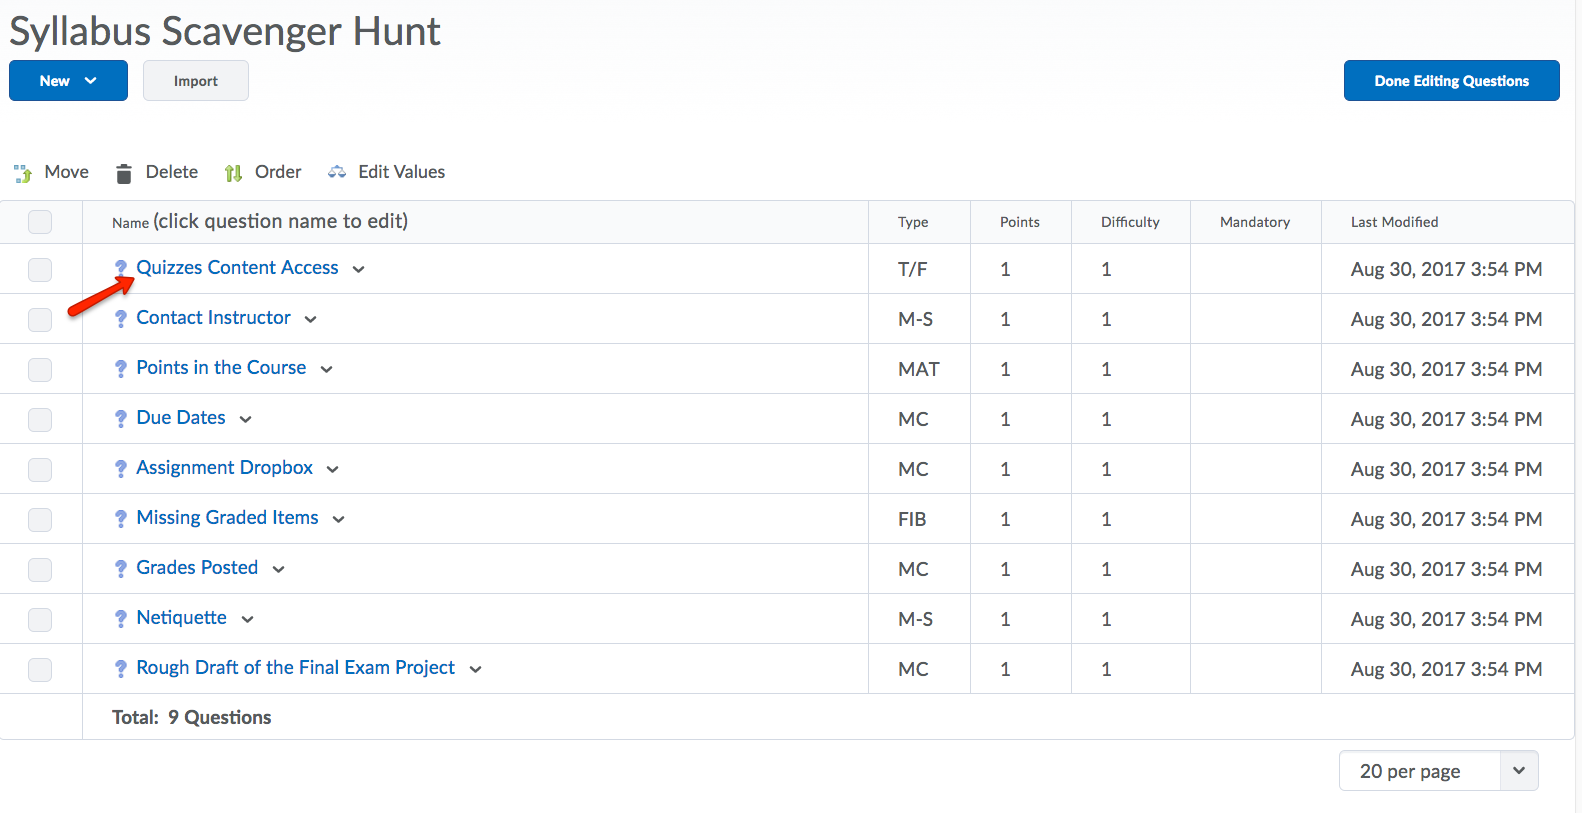
4. Make the necessary corrections in the appropriate fields.
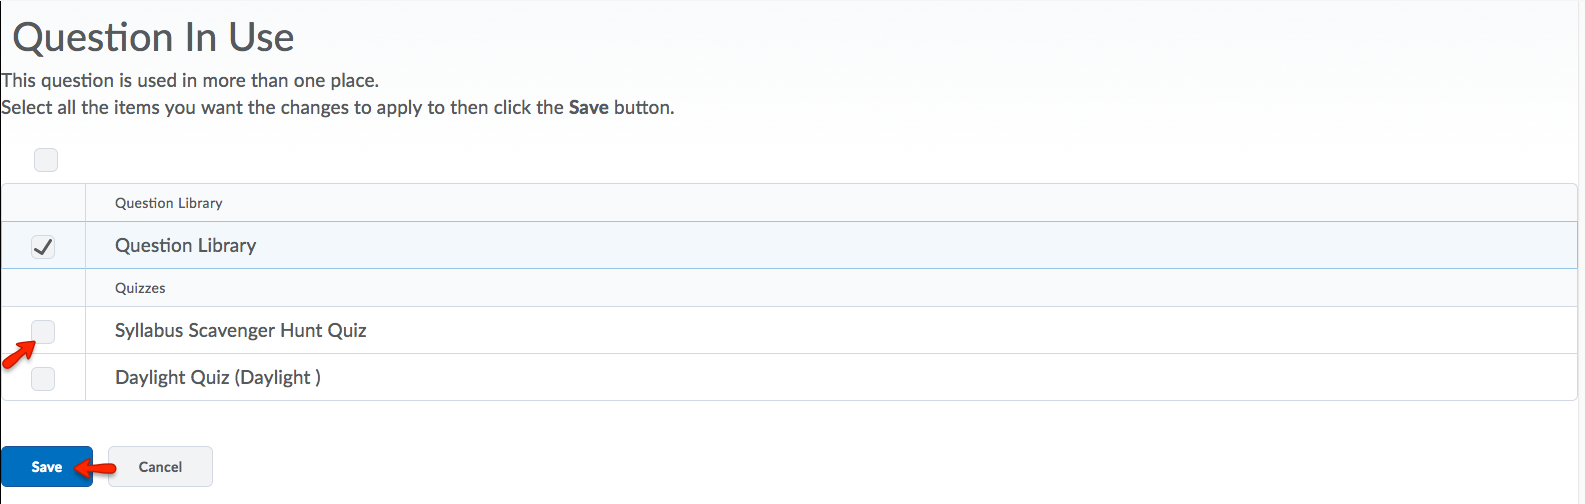
5. In the Questions in Use window, choose all the items to apply the change(s). Then, click Save. The incorrect version of the question will be removed from the library and any other assessments you have chosen, replaced by the new, edited version.
Generating Reports for Quizzes
You can generate reports about how students interact with course material using the Reporting Tool. All of the activities within eLC automatically generate reports and statistics, so you can always see what's going on within your course.
1. To begin the process of generating a report for a quiz, you must first access the Quiz tool. To do this, click Tools and select Quizzes.
2. Then, click the name of the quiz for which you would like to generate a report.
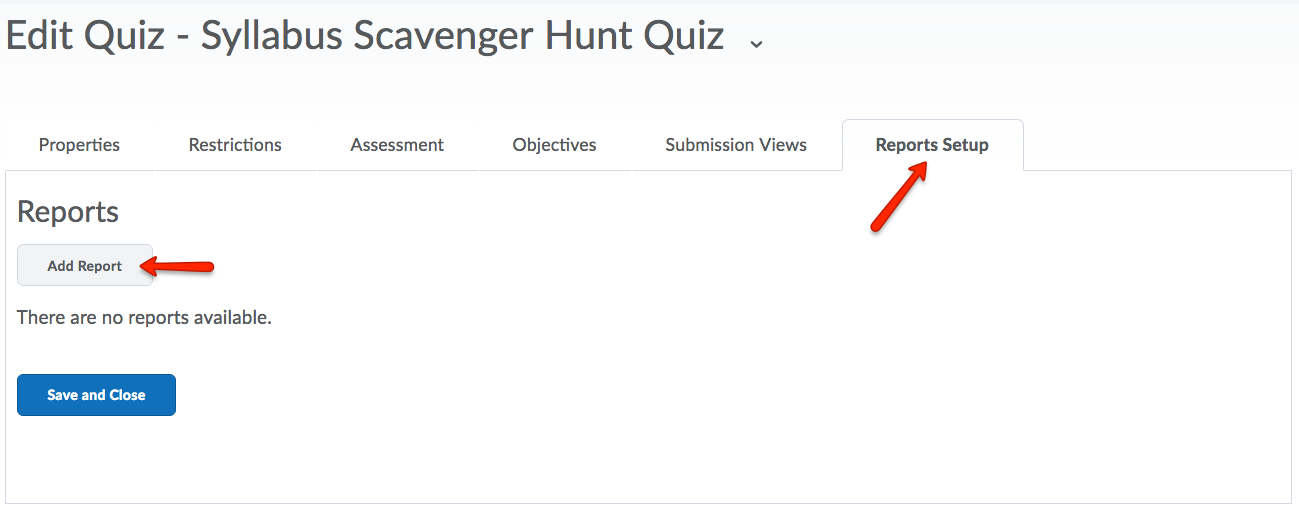
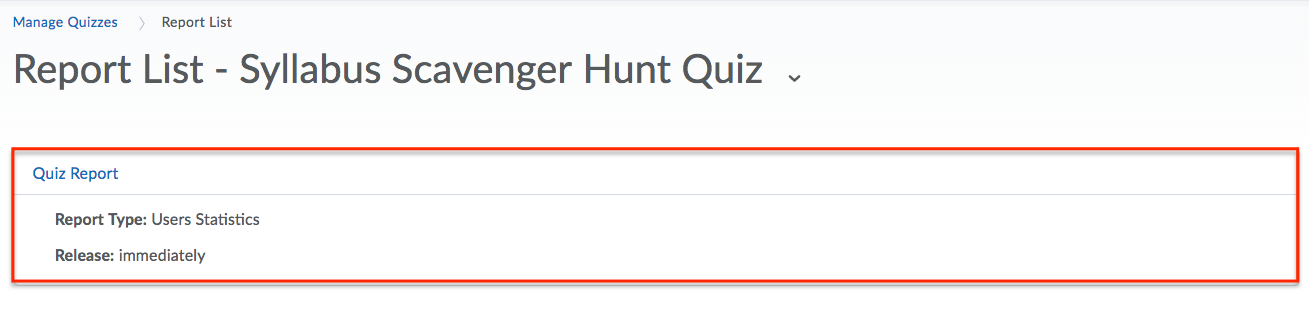
3. Select the Report Setup tab. Then, click Add Report.
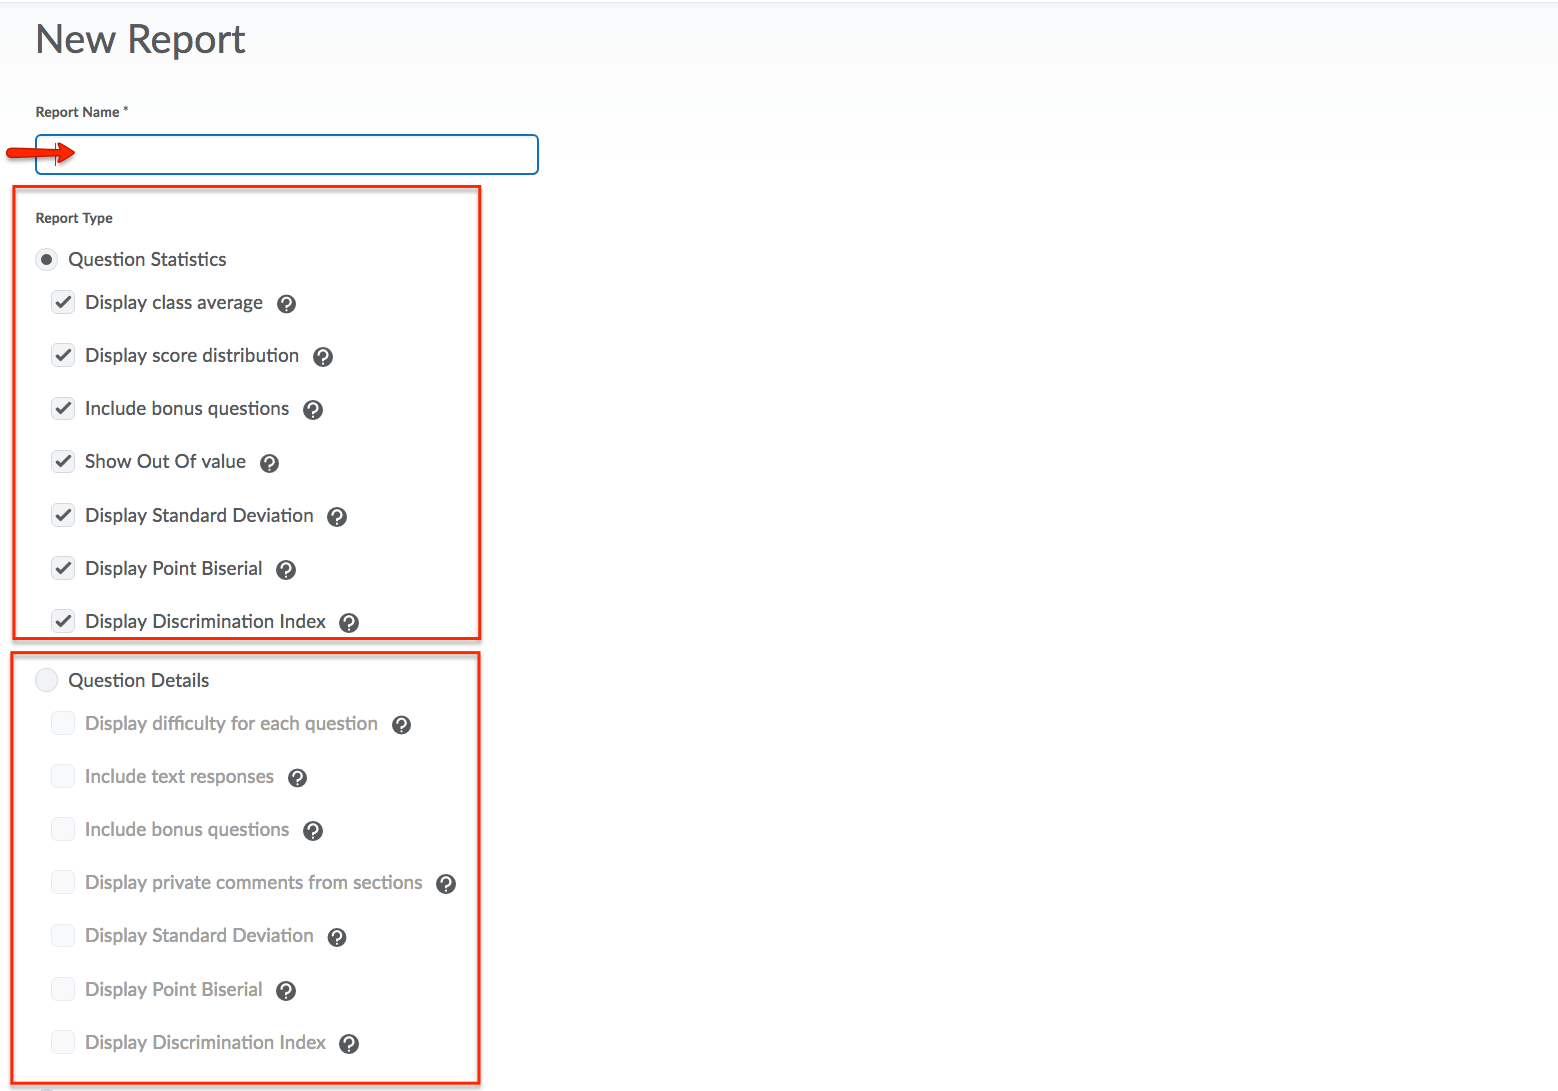
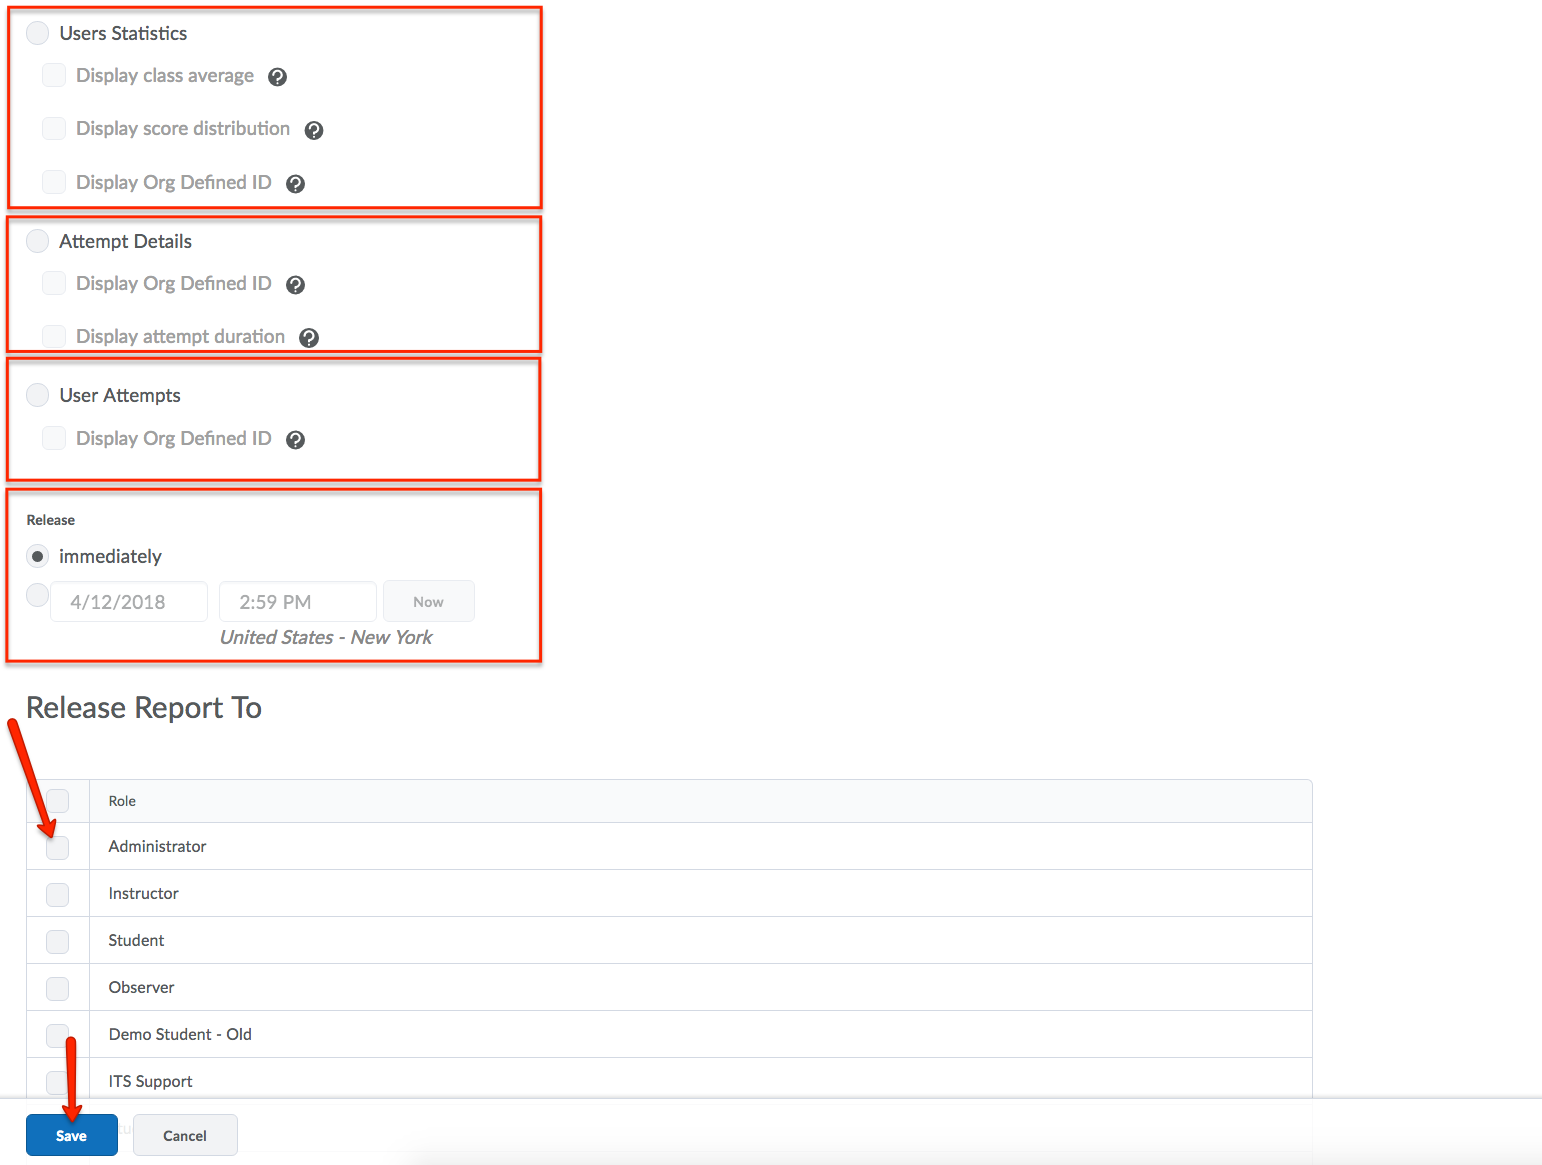
4. Give the report a name. Then, under Report Type, select what Question Statistics, Question Details, Users Statistics, Attempt Statistics, Attempt Details, User Attempts. Under Release, select immediately or a date and time for a later release. Under Release Report To, select the roles you would like to recieve the report. When you have customized the report, click Save.
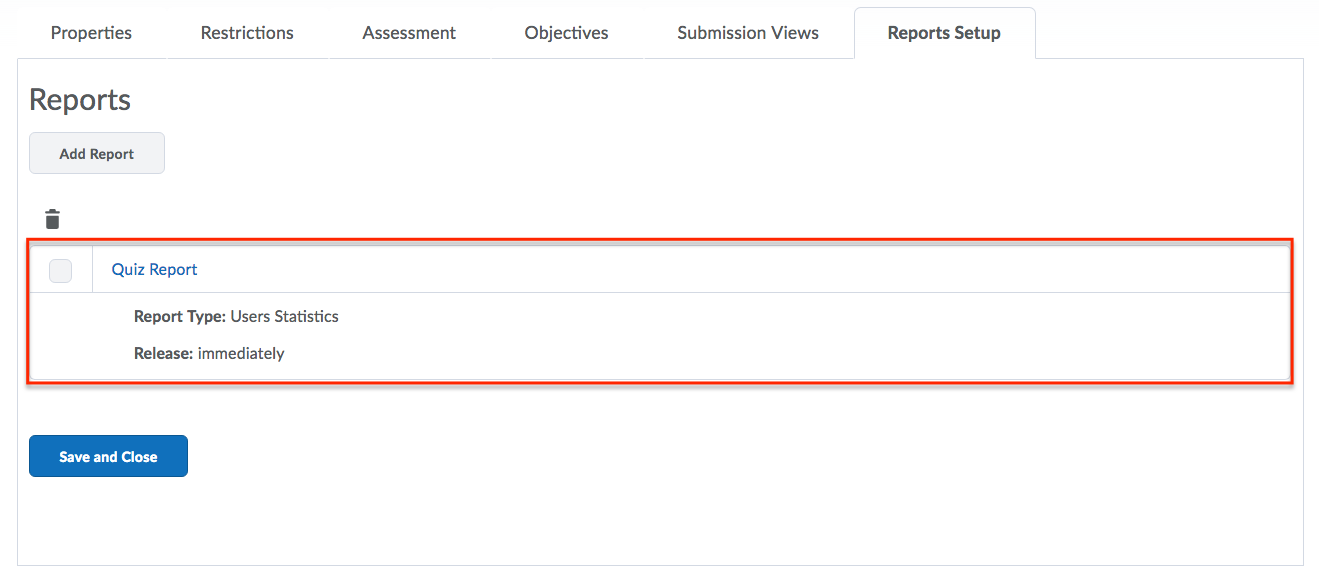
5. Your report will now be displayed within the Reports Setup section.
6. You can access these reports again at any time by, first, selecting Tools and then Quizzes. Next, click the dropdown menu of the quiz in question and selecting Reports.

7. All generated reports will be listed on the Report List.
Viewing and Exporting Quiz Statistics
As an instructor, you have the ability to view and export quiz statistics and reports to a CSV file for data analysis. The CSV file contatins all pertinent information on the quiz so that can query, sort, and evaluate the data without being connected to eLC.
All quiz statistics are calculated based on a user's first attempt of the quiz. If a question is changed after attempts have occurred, then only attempts on the newest version of the question are included in the statistical calculations
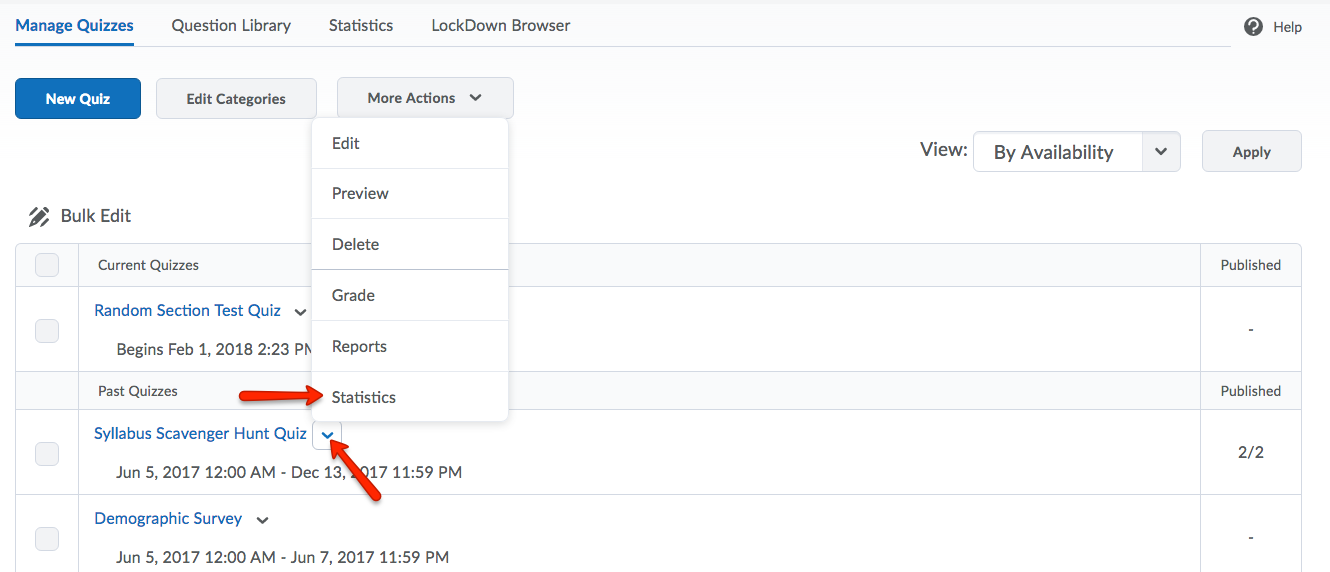
1. To begin the process of viewing and exporting quiz statistics, you must first access the Quiz tool. To do this, click Tools and select Quizzes.
2. Then, from the dropdown menu of the quiz in question, select Statistics.
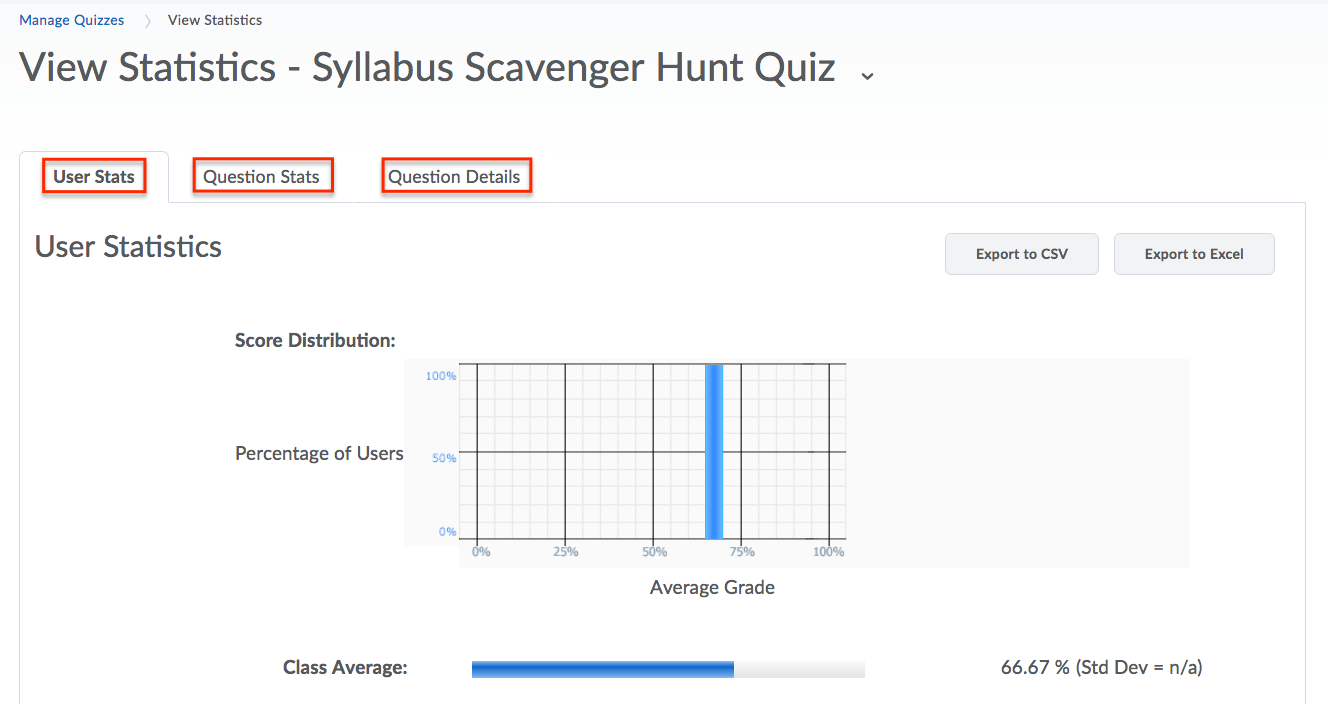
3. On the View Statistics page, click the Users Stats, Question Stats, or Question Details tabs to view statistics broken down by user and by question.
- User Stats - The class average and standard deviation, score distribution, and the grade of each user; You can choose to include or exclude the class average, score distribution, and Org Defined ID.
- Question Stats - The average score on questions by points and percentage; You can choose to include or exclude the class average, score distribution, bonus questions, the Out Of value, standard deviation, point biseral, and discrimination index.
- Question Details - All of the answers provided for each quiz attempt, how many users chooe each possible answer, the total number of responses, and the average score on each question; You can choose to include or exclude the level of difficulty, text responses, bonus questions, private comments added to the report, standard deviation, point biserial, and discrimination index.
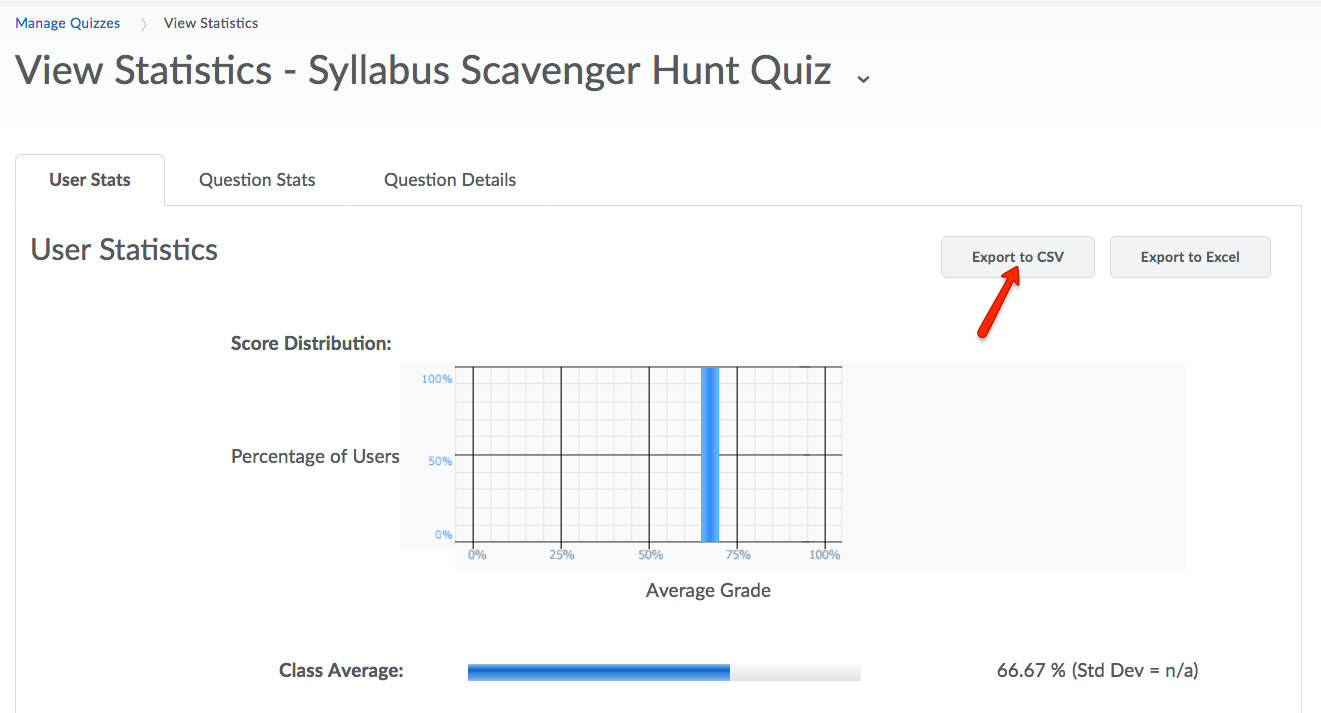
4. Click Export to CSV file if you want to save the quizzes satistics to your computer.
Incomplete and Unsubmitted Quizzes
As instructors, you may sometimes be faced with cases of quizzes that are not submitted by students even after the enforced time period despite starting the quiz attempt. In these cases, eLC has equipped instructors with the ability to manually submit the incomplete/unsubmitted quizzes so that they can be graded. The following steps may be followed in this scenario:
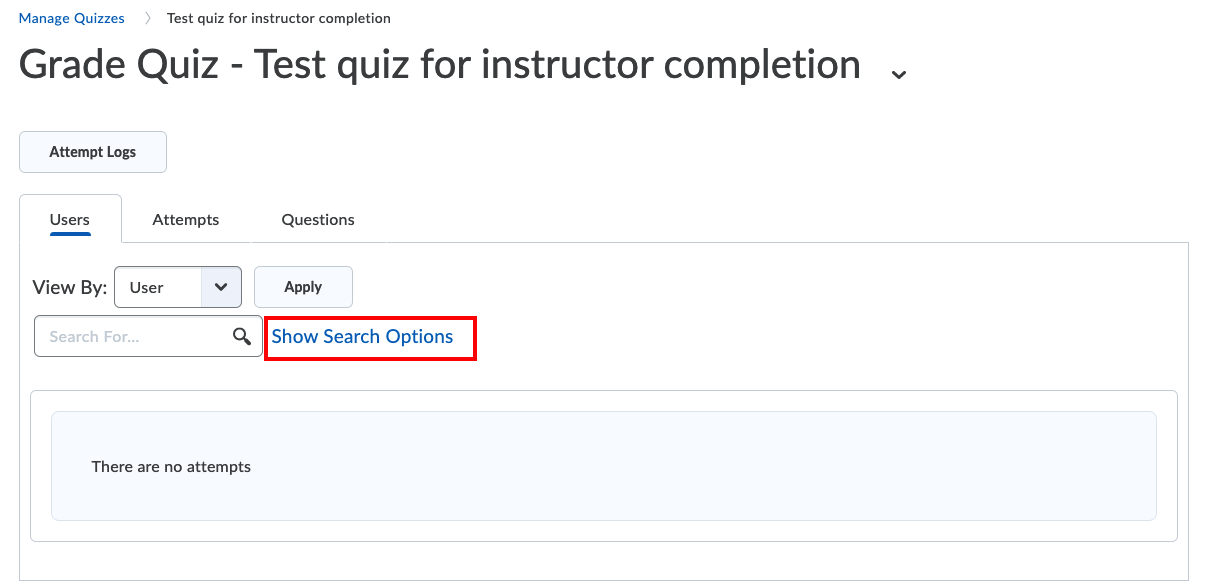
1. Click on the arrow next to the quiz and select ‘Grade’.

2. In the next window, click on ‘Show Search Options’.
3. In the dropdown for the ‘Restrict to’ option, select ‘Users with attempts in progress’ and click on the search icon.

4. All users with ongoing attempts will show up in the list with (in progress) written next to it.
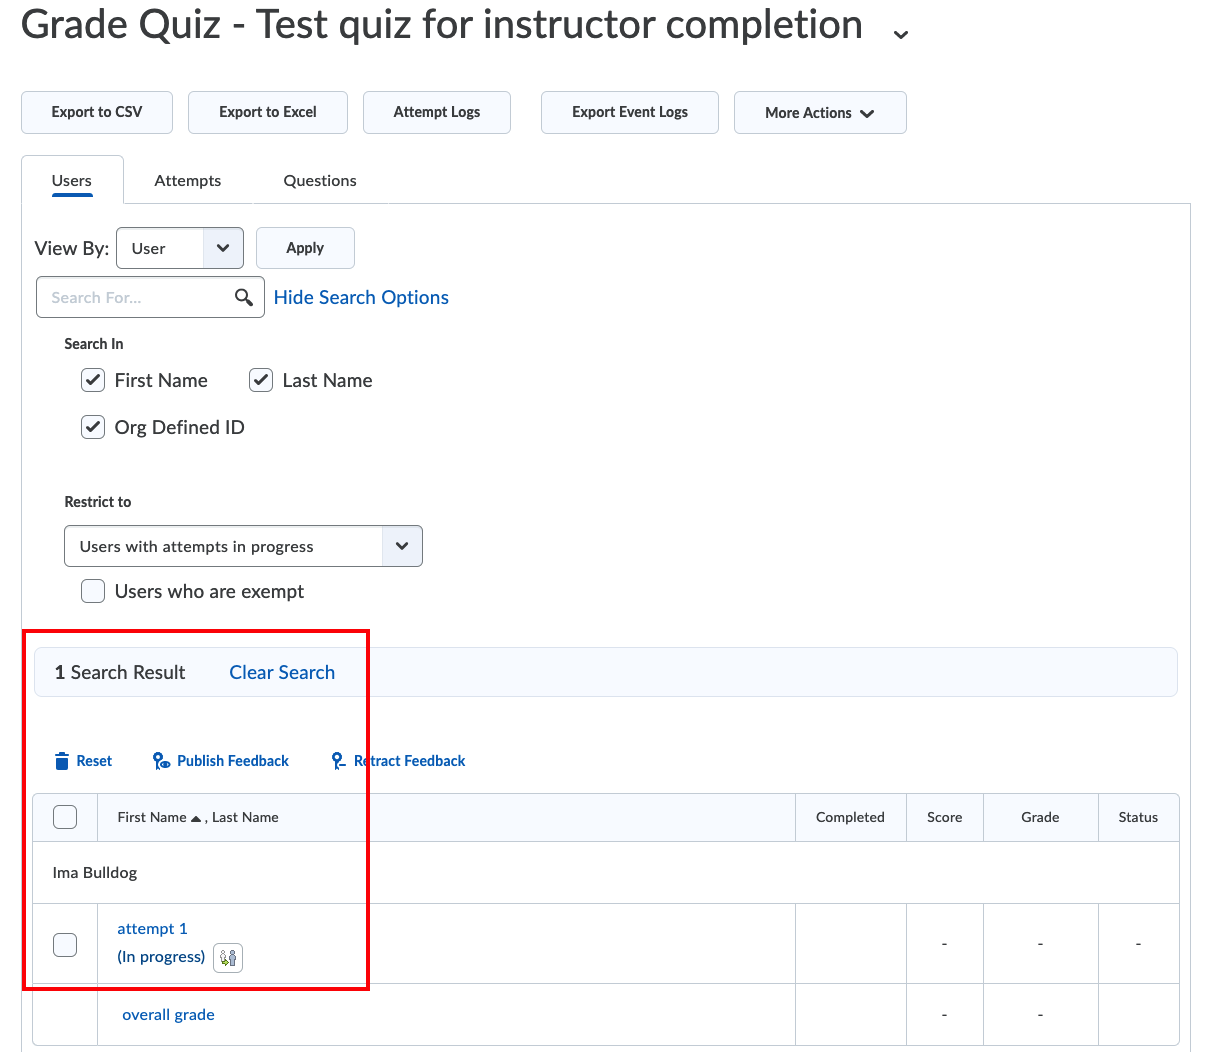
5. Click on the ‘Enter quiz as user’ icon next to the ongoing attempt.
eLC will display a prompt asking for confirmation.
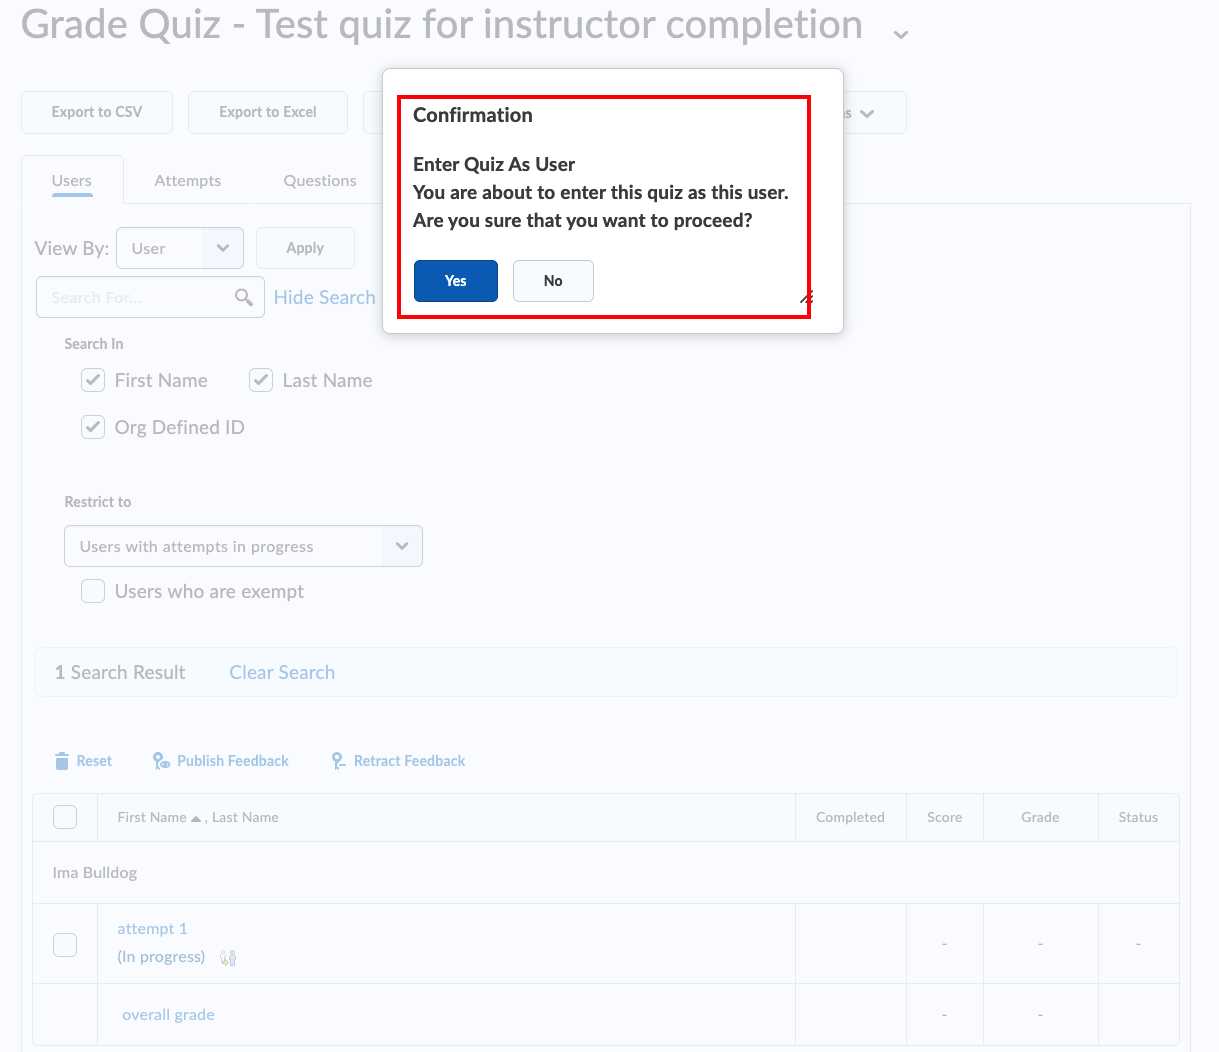
6. Click on ‘Yes’. You will now be redirected to the quiz. Click on ‘Submit Quiz’. You will be asked for confirmation. Click on ‘Submit Quiz’.
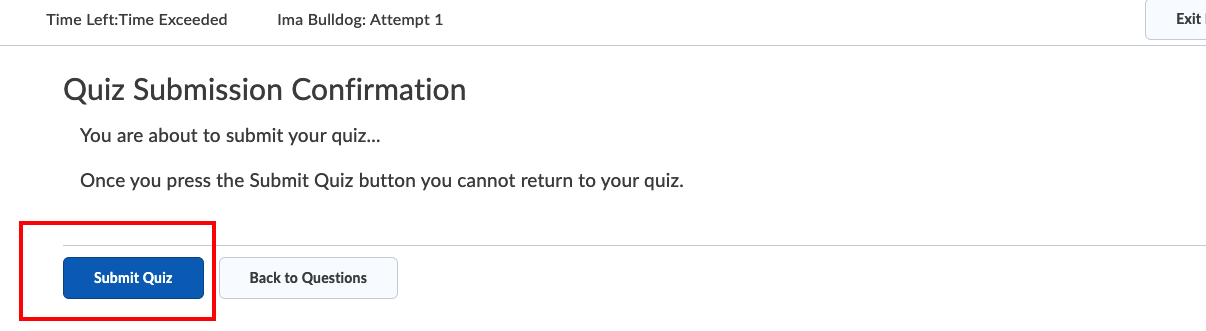
7. This will complete the attempt which will start showing in the list of completed attempts.