Creating Assignments
The Assignments section in eLC serves as a centralized hub where instructors can create, distribute, and manage coursework for their students. Often referred to as the "dropbox", this tool allows students to access assignment instructions, submit their work electronically, and track deadlines with ease. Instructors can provide feedback, grade submissions, and monitor student progress directly within the platform, streamlining the evaluation process and enhancing overall academic performance.
Follow the instructions below to create an Assignment Dropbox for use in your course.
Learn about:
- Creating an Assignment Dropbox
- Availability Dates & Conditions
- Submission & Completion Options
- Evaluation & Feedback Options
- Copy Assignments to Other Courses
Creating an Assignment Dropbox
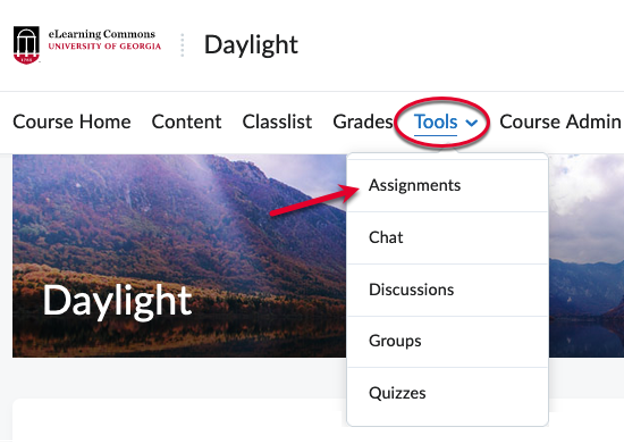
- From your course navbar, click Tools and select Assignments.
- On the Assignments page, click New Assignment.

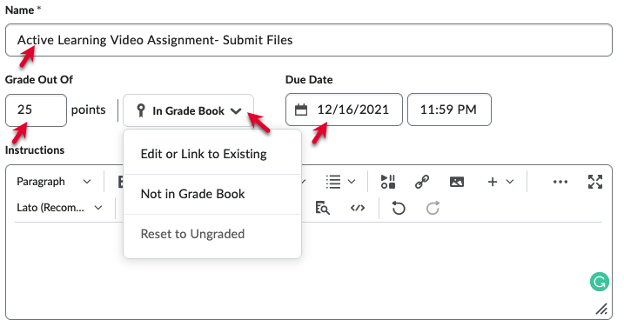
- Name your Assignment Dropbox. If this assignment will not be graded, skip to step 6.
- Click on the Grade Out Of box (which initially says Ungraded as the default). Fill in the Grade Out Of box with the number of points associated with this assignment.
- Use the In Grade Book drop-down to choose whether to:
- Edit or Link to Existing: Link your new dropbox to an existing gradebook item.
- Not in Grade Book: Omit it from the Gradebook.
- Reset to Ungraded: Remove the current grade value and set back to the default setting of Ungraded.
- Enter a Due Date and time of day. The default time is 11:59 p.m. in your time zone. You can adjust this based on need.
This option will not prevent late submissions, but submissions will be time stamped.
- Write the assignment instructions in any level of detail you prefer.
- Add any supplemental files associated with your assignment prompt. You can add resources, more details about your assignment, and rubrics.
- Record an audio file directly into eLC and add it in the assignment dropbox files.

- Click on the Hidden button and change it to Visible. This will make the assignment visible to students.
- Click Save or Save and Close.

Availability Dates & Conditions
Availability Dates & Conditions allow you to identify a Start and/or End Date for your assignment, to set release conditions for the assignment, and to manage special access.
- Start Dates indicate when an assignment will be made visible to students, and End Dates close access to the Dropbox (that is, students will not be able to make submissions after this date). To create a Start Date and/or End Date for your assignment, simply fill in the blocks with your desired date and time.
- Release Conditions allow you to create a custom learning path for students to proceed through your course materials. For example, below are 3 common use-cases where release conditions are beneficial:
- Students need to submit assignments in a specific order, and you want to automate this process.
- You would like an assignment to become available after they take a Quiz, automatically.
- You would like to restrict an assignment to a specific group of students.
Release Conditions can be set using a condition type based on 10 different areas in eLC. These areas are: Assignments, Awards, Checklist, Classlist, Competencies, Content, Discussions, Grades, Quizzes, and Surveys.
- Manage Special Access allows you to restrict availability to only a select group of users or individualized due dates for certain users. There are two options here: Allow users with special access to submit outside the normal availability dates for this folder and Allow only users with special access to see this folder.

Submission & Completion Options
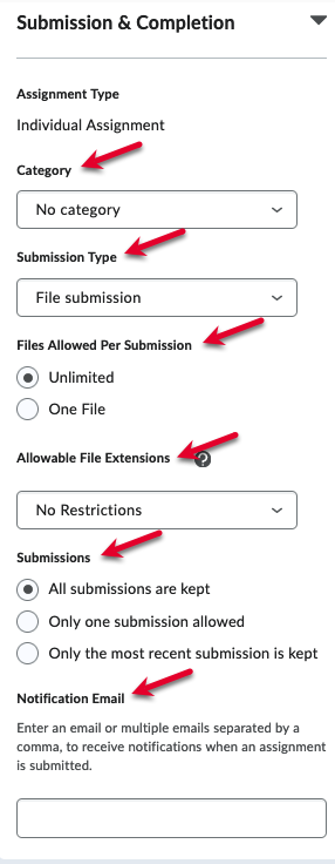
Submission and Completion options include the ability to categorize your assignments and control the number and type of submissions students can make.
- Category allows you to categorize your assignment types. This can be a useful way to organize course materials for students, graders, and instructors. For example, you might create a category for homework assignments, one for quizzes, and one for major projects.
- Submission Type allows you to choose between 4 different options.
- File Submission – students upload and submit a file to the assignment.
- Text Submission – students post text and/or images in a text box.
- On paper Submission – No file upload is required to complete the assignment. Instead, students submit a physical copy of their assignment directly to their instructor, who provides feedback and a grade using the Assignments experience.
- Observed in person – No file upload is required to complete the assignment. Instead, instructors observe learners as they perform tasks (e.g., in-class presentations), and evaluate them using Assignments.
- Files Allowed Per Submission allows you to choose how many files students can submit (unlimited or only one). The advantage of using the Unlimited option is that it is easier for students to upload new files if they mistakenly upload the wrong file.
- Allowable File Extensions option lets you restrict the file types that students can upload. When you use this
option and students try to upload a file not listed, they will get an error saying
it is restricted by security settings. Your options here include the following:
- No Restrictions
- Annotatable Files
- Files that can be previewed without conversion (e.g., .HTM, .HTML, .MHT, .MHTML, and .BMP)
- Images and Videos (e.g., files such as .JPG, .JPEG, .PNG, .BMP, .TIF, .TIFF, .SWF, .MPG, .MPEG, .RM, .MP3, .MP4, .M4V, .AVI, .ASF, .MOV)
- Custom File Types
- Compatible with Turnitin
- Submissions determines how many of a student's submissions to an assignment are retained. Your
options include:
- All submissions are kept.
- Only one submission allowed.
- Only the most recent submission is kept.
- Notification Email allows you to designate a specific email address (or addresses) to receive notifications when assignments are submitted.
Evaluation & Feedback Options
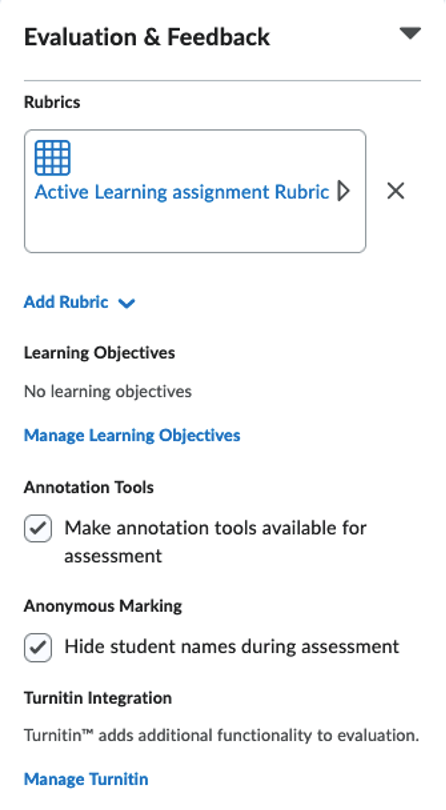
Your options here allow you to add a rubric, activate annotation tools for the assignment, activate anonymous marking, and leverage our integration with Turnitin
- Rubrics: To add a rubric click Add Rubric ( if you have created one to be used with this assignment) or Create Rubric in New Window (to create a rubric now). More information can be found in our documentation on Rubrics
- Learning Objectives: Manage Learning Objectives is not used at UGA.
- Annotation Tools: If you would like to use the annotation tools to edit the assignment with your feedback after students submit files then select this option.
- Anonymous Marking: This option anonymizes submissions to help prevent bias in grading. If this option is chosen, then you will want to instruct your students not to include their names on their assignments or in the assignment names. The option can be activated by selecting the checkbox next to it.
- Turnitin Integration: Turnitin is a tool that can be used for plagiarism and/or AI detection. By clicking on Manage Turnitin here you will enable its use for this assignment. Please Note: To use Turnitin's peer-review functions called PeerMark, you instead need to go to Content and add PeerMark (Turnitin) under Existing Activities.
Copy Assignments to Other Courses
- Navigate to Assignments. Once there, click the chevron next to the assignment to be duplicated, and select
the desired option. To create a copy of the assignment within the same course shell,
choose Copy Assignment. To copy the assignment into another course, choose Copy to Other Courses. Please note: to copy an assignment into another course shell, you must have a role in both courses
that allows you to copy material (e.g., you are an Instructor or Exporter/Reviewer
in both courses).

- When copying the assignment within the same course, you will have the opportunity
to edit any and all details for the copied assignment. Click Save and Close when you have checked and finalized your options.
- When copying an assignment to another course, you will first need to select the course(s)
to which the assignment will be copied, then click Next and confirm your selections by clicking Copy. In this case all assignment properties/attributes will be copied except the following:
- Instruction quicklinks and any files you have attached to the assignment (those files will need to be copied over to the new course separately, and re-attached to the new version of the assignment).
- Any images in the assignment instructions that were inserted Insert Image (and so relies on files specific to the original course).
- Availability Release conditions and special access settings.
- Evaluation and Feedback information, including Turnitin associations, competency, and outcome associations.
- Content topic associations (for example, if the assignment is linked from content).