Grades Setup
As an instructor, you can determine how to set up your grade book to best reflect your approach to evaluation, including the grading system and grade scheme that is most appropriate for your course. You can choose to make the grades visible to students or keep them hidden, select how grades display to students, in the grade book, and display settings related to ungraded items.
Learn about:
- Gradebook Terminology
- Gradebook Setup Wizard
- Creating Grade Categories
- Creating Grade Items
- Associating Graded Activities with Gradebook Items
- Creating Bonus Items
- Creating a Custom Grade Scheme
Gradebook Terminology
The gradebook in eLC is comprised of:
- Grading System (Points, Weighted, Formula)
- Grading Scheme
- Grade Categories
- Grade Items
There are three types of grading systems in eLC:
- Points – Each assignment is worth a certain number of points, and they add up to be the student's grade in the class.
- Weighted – Everything adds up to 100%, and you can have grade items that are weighted at different percentages.
- Formula – Allows you to define a custom formula to determine a final grade.
Note: Once you have entered grades, it is not advisable to change this grading system.
Gradebook Setup Wizard
The following will guide you through the process of creating and populating a weighted gradebook.
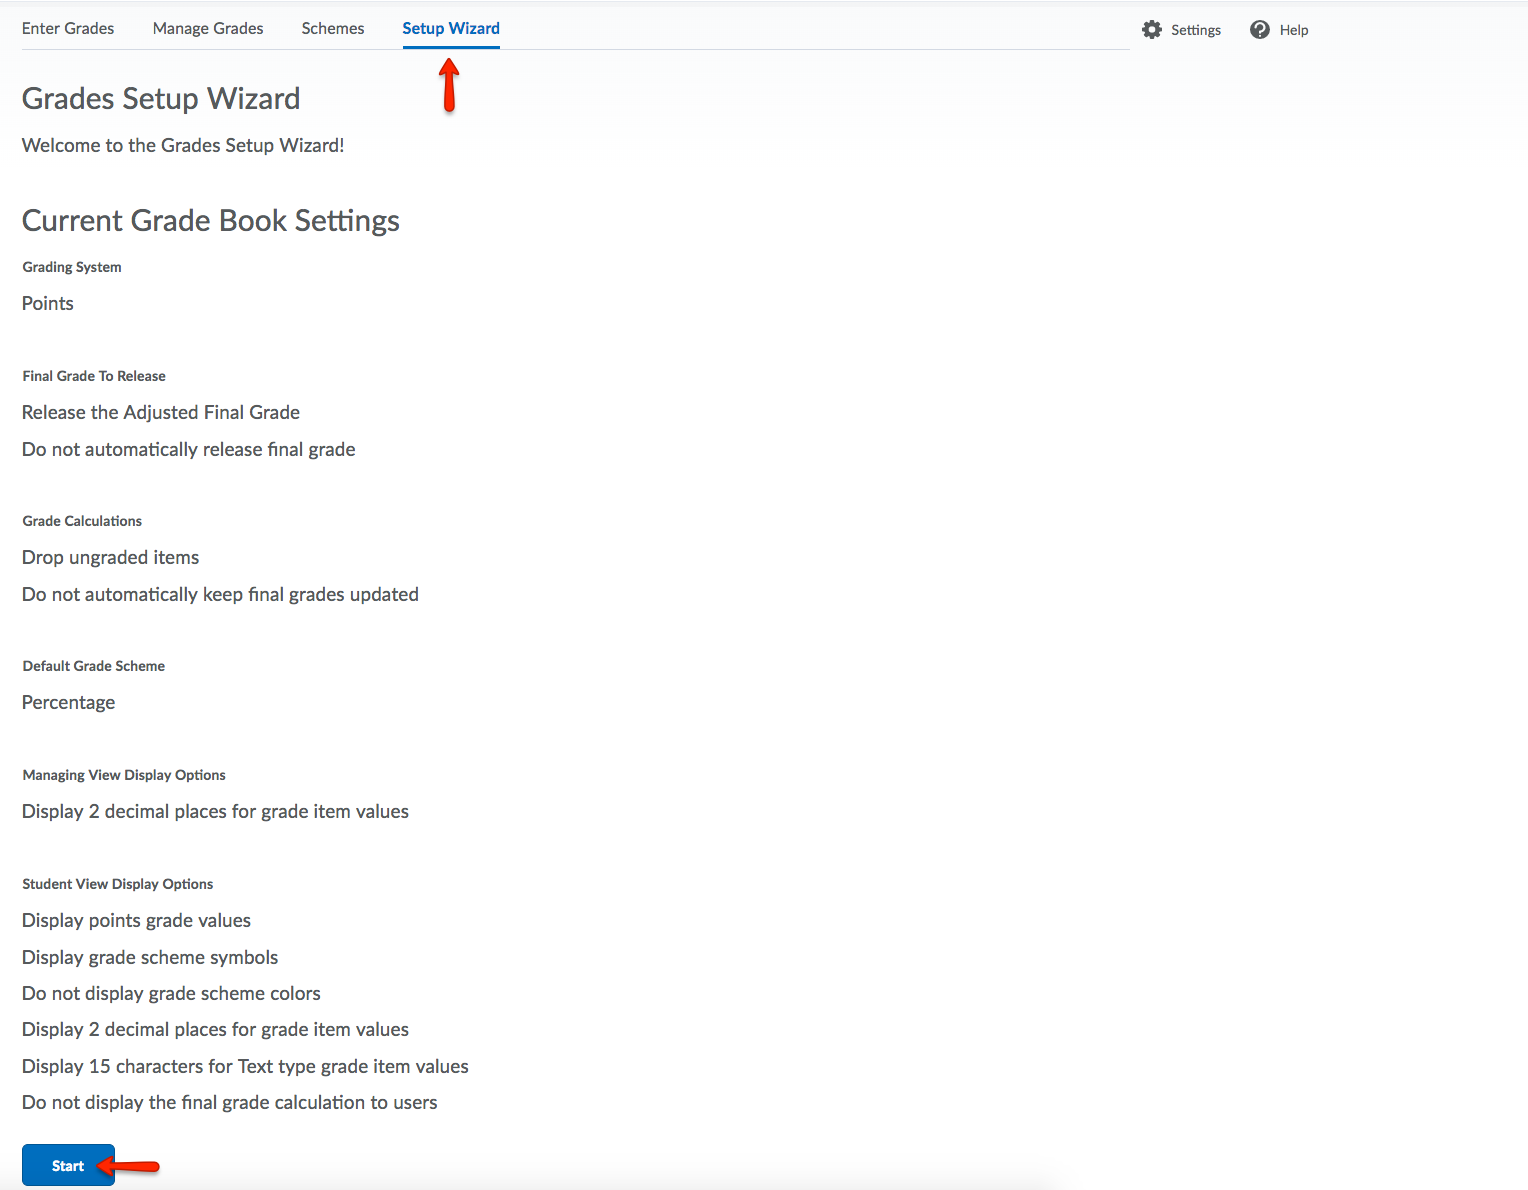
- To begin, select Grades from your course navbar.
- Select Setup Wizard from the Grades navbar, then click Start to begin the Gradebook Setup Wizard.
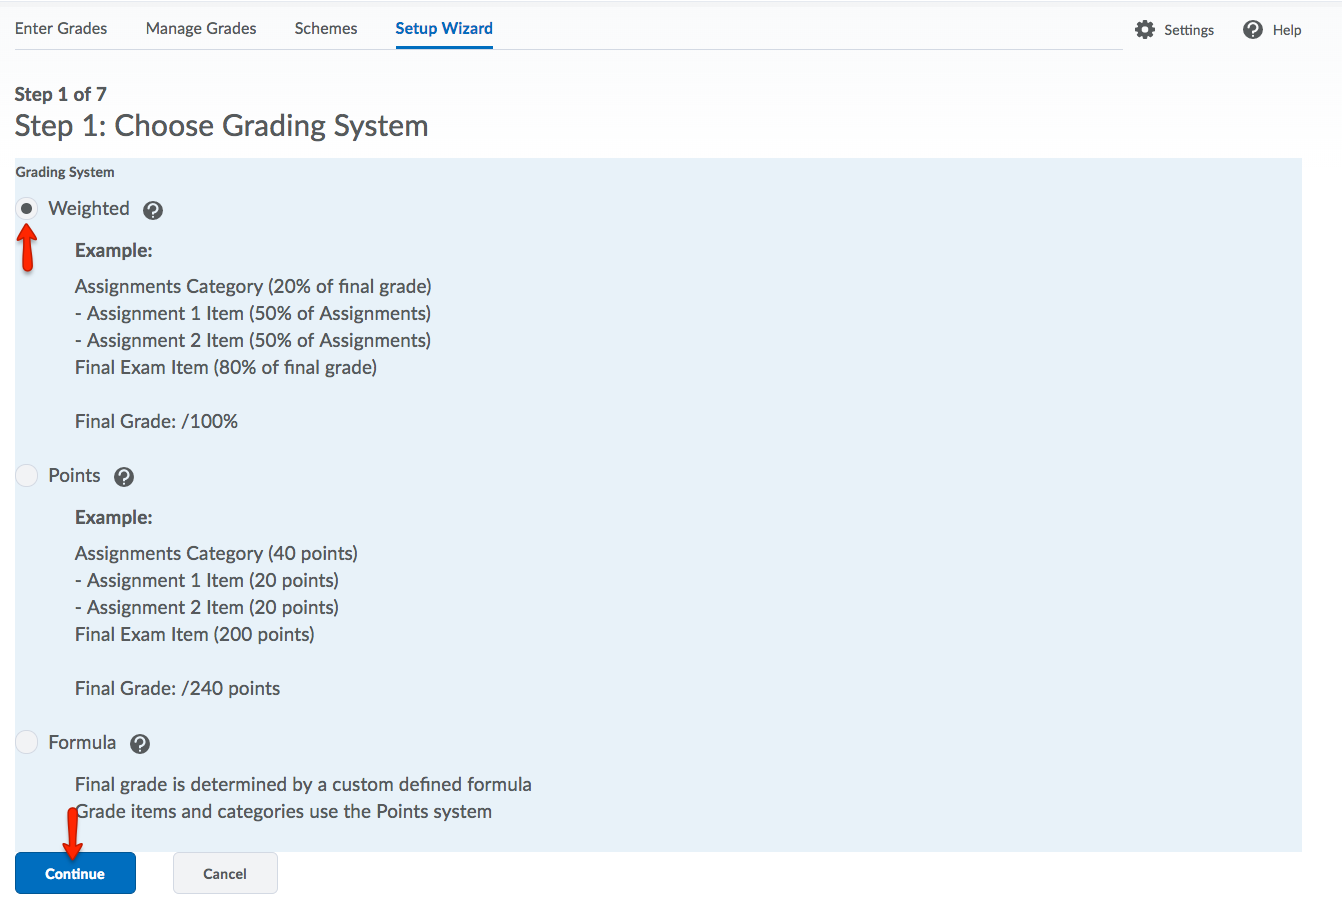
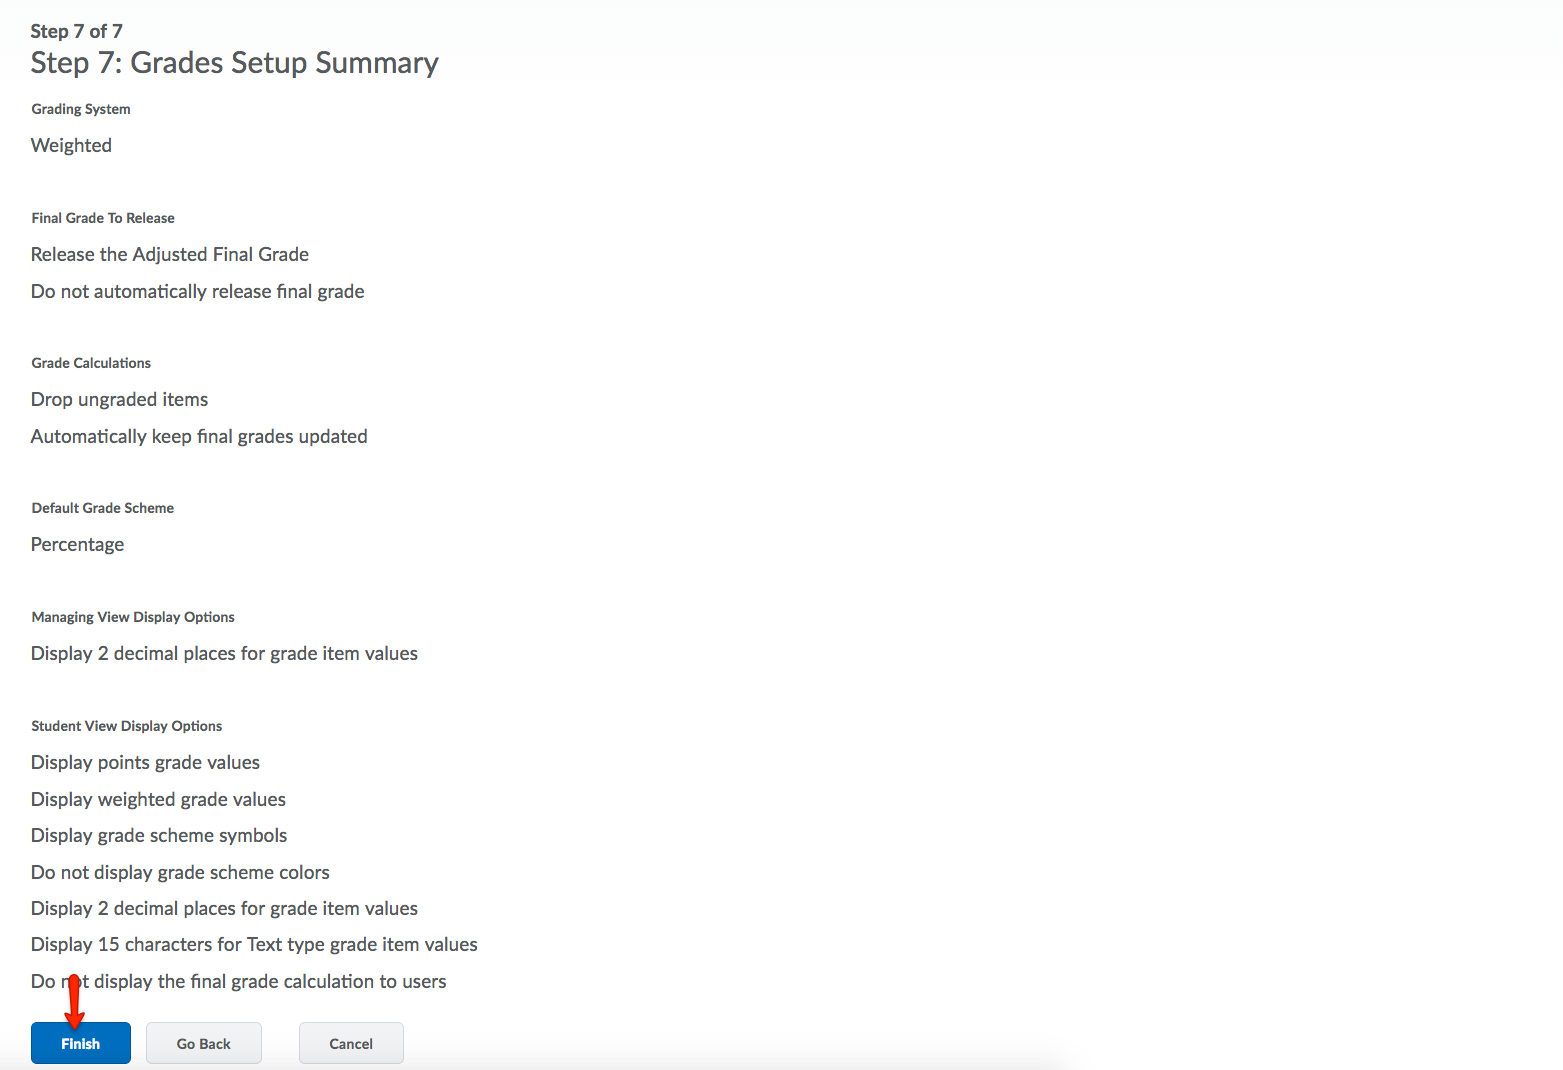
- For this demonstration, Weighted is selected for the grading system. Click Continue.
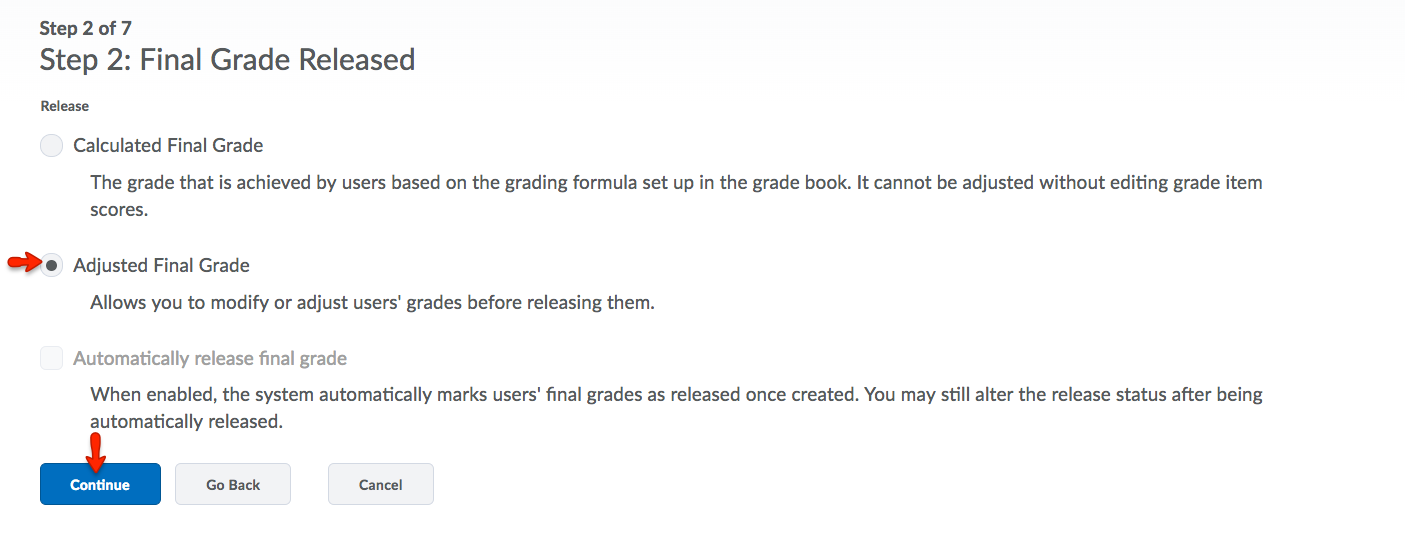
- Choose between Adjusted Final Grade and Calculated Final Grade. Adjusted Final Grade is recommended because it gives the instructor greater flexibility
to change grades at the end of the semester. Click Continue.
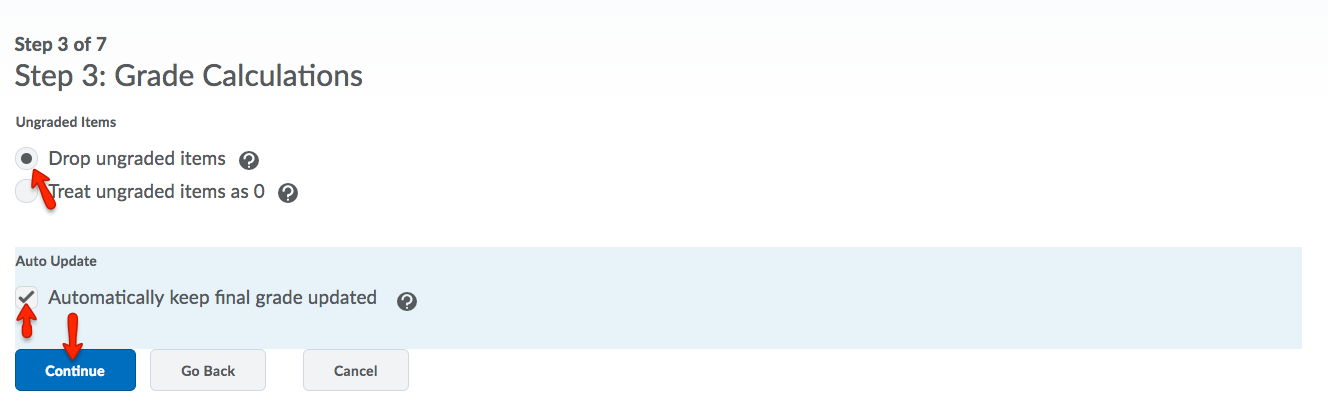
- Choose between Drop Ungraded Items or Treat Ungraded Items as 0. For this example, Drop Ungraded Items and Automatically keep final grade updated are chosen. Click Continue.
- Choose a Default Grading Scheme. For this example, Percentage is chosen. The other grade scheme options show grade items as letter grades or without
+ and -. Click Continue.
Note: You can create new schemes or copy and customize the institution schemes, if desired.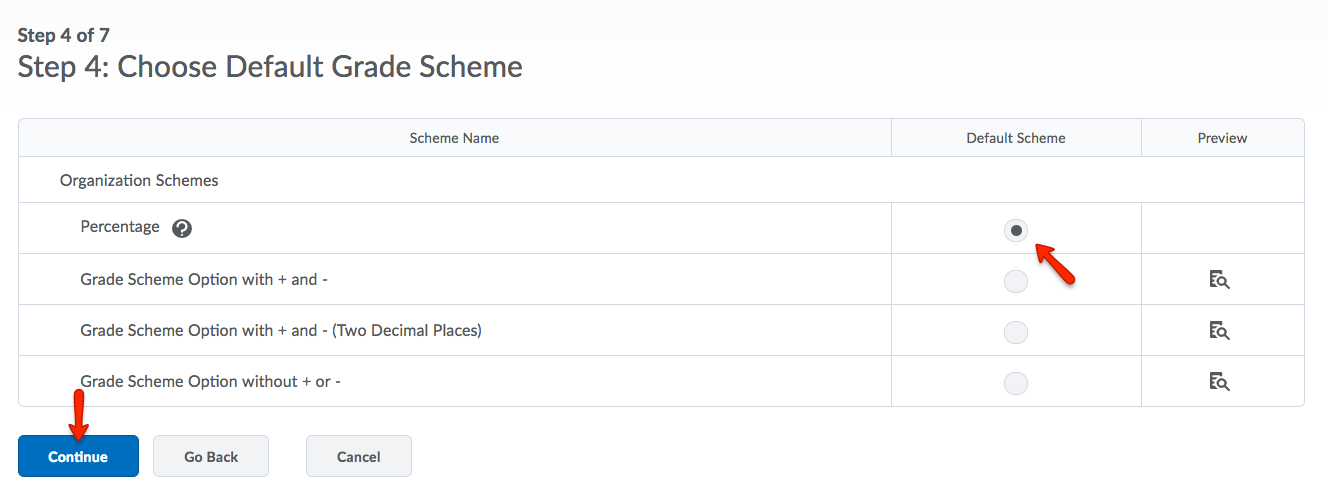
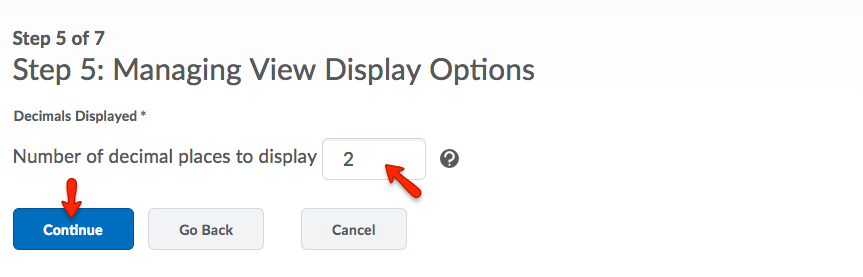
- Choose the number of decimals to display in the Managing View (this is the Instructor
View.). Click Continue.
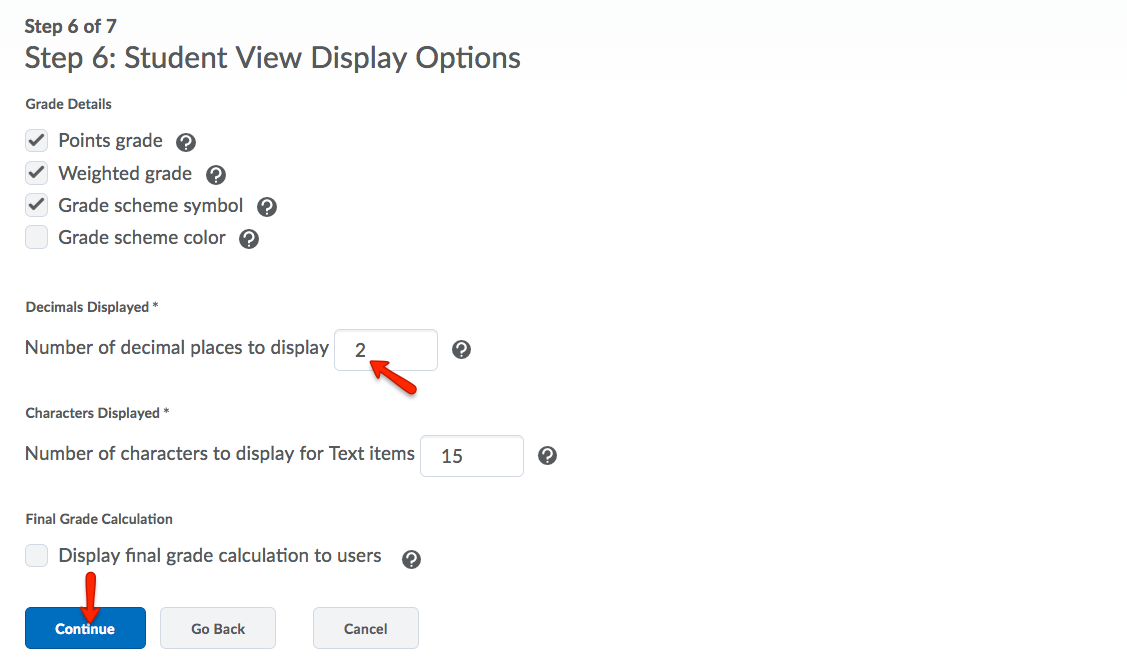
- Select the Submission View Display options (this is the student view.). Make sure you display the same number of decimals
in this view as you did in the Managing View. Click Continue.
- The next screen will show you a summary of your choices. Click Finish to save your settings.
Creating Grade Categories
Categories help to keep your grade items organized and also allow for dropping the lowest item(s) in the category.
For this demonstration, three new grade categories will be created: Quizzes, Papers, and Exams.
Please note that in the video, the Points option is used in the Wizard set-up, and so all categories follow this set-up. However, in the steps shown below, the option of Weighted grades is explained.
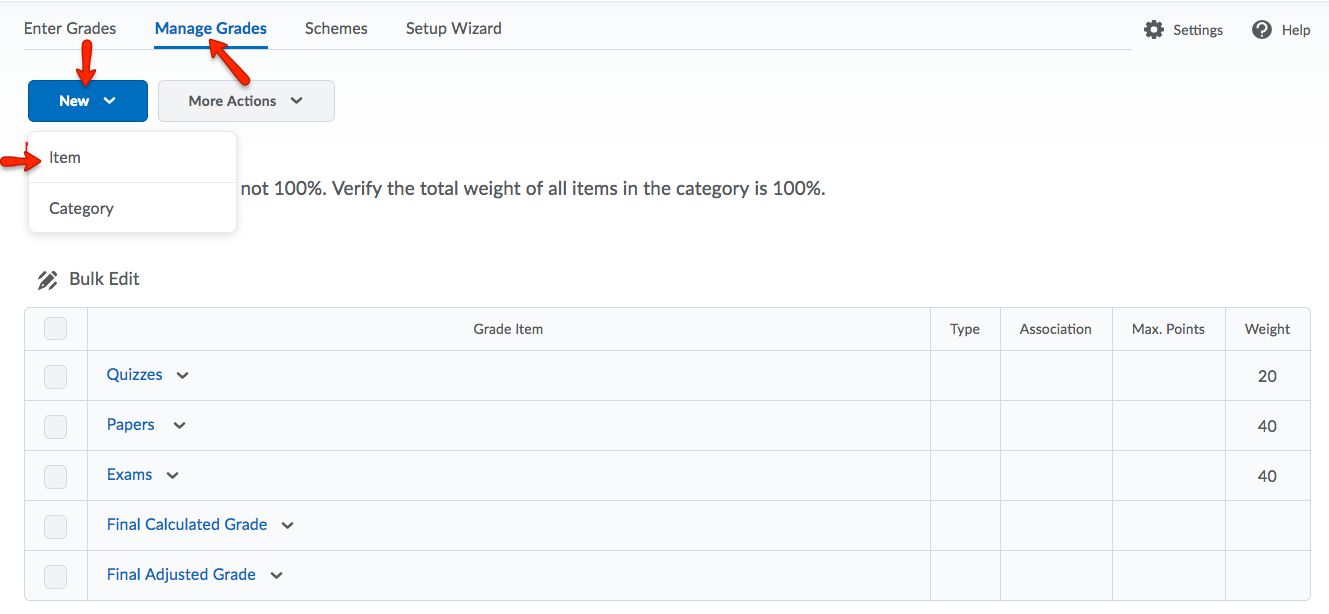
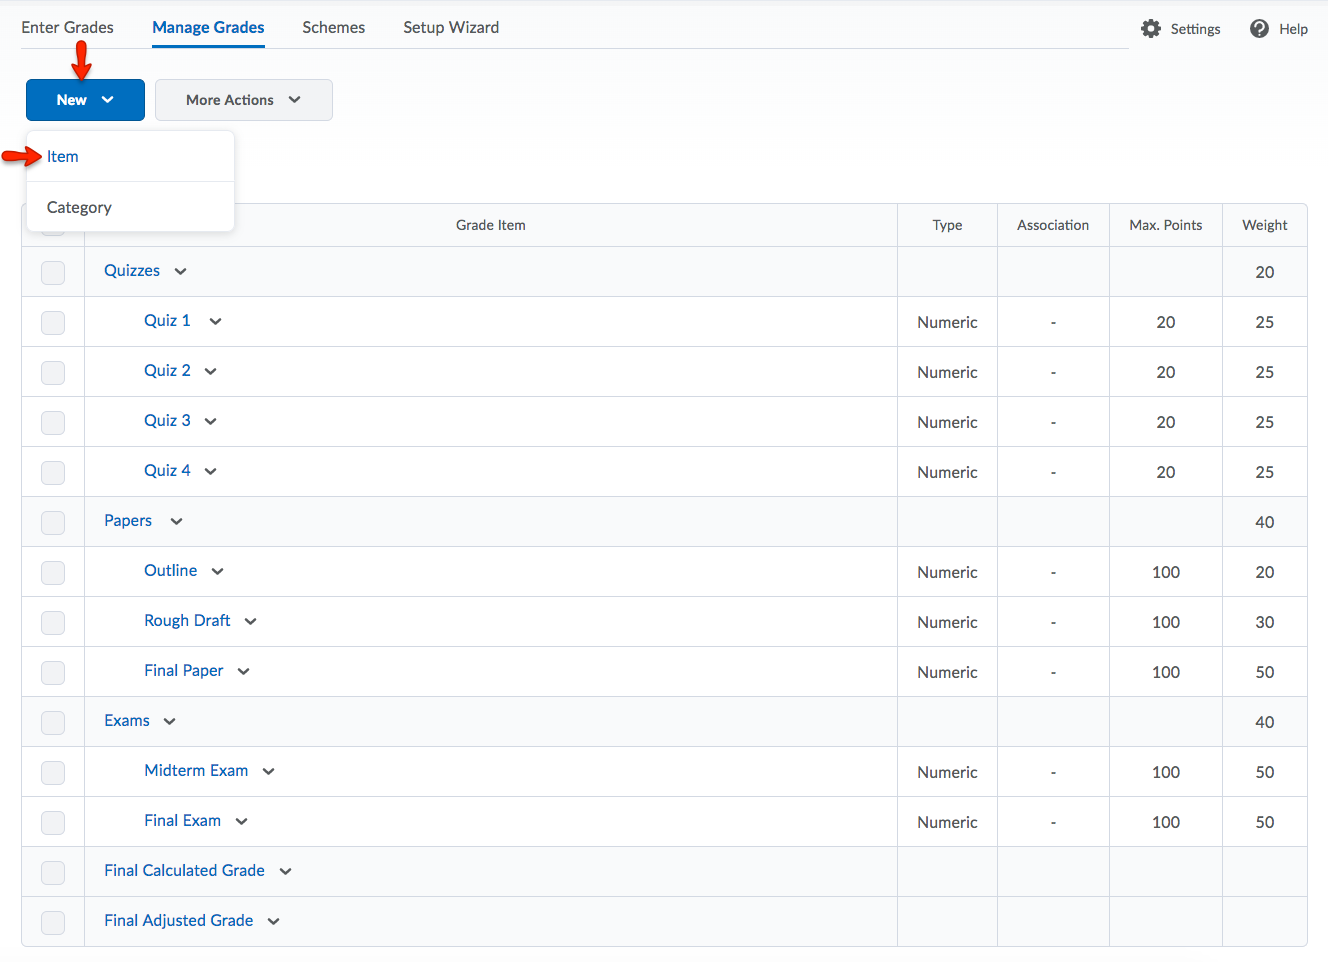
- To begin the process of creating a grade category, select Manage Grades from the Grades navbar. Then, click New. From the drop-down menu, choose Category.

- For the first category, the following settings will be used:
- Name: Quizzes
- Weight: 20
- Distribution: Distribute weight evenly across all items
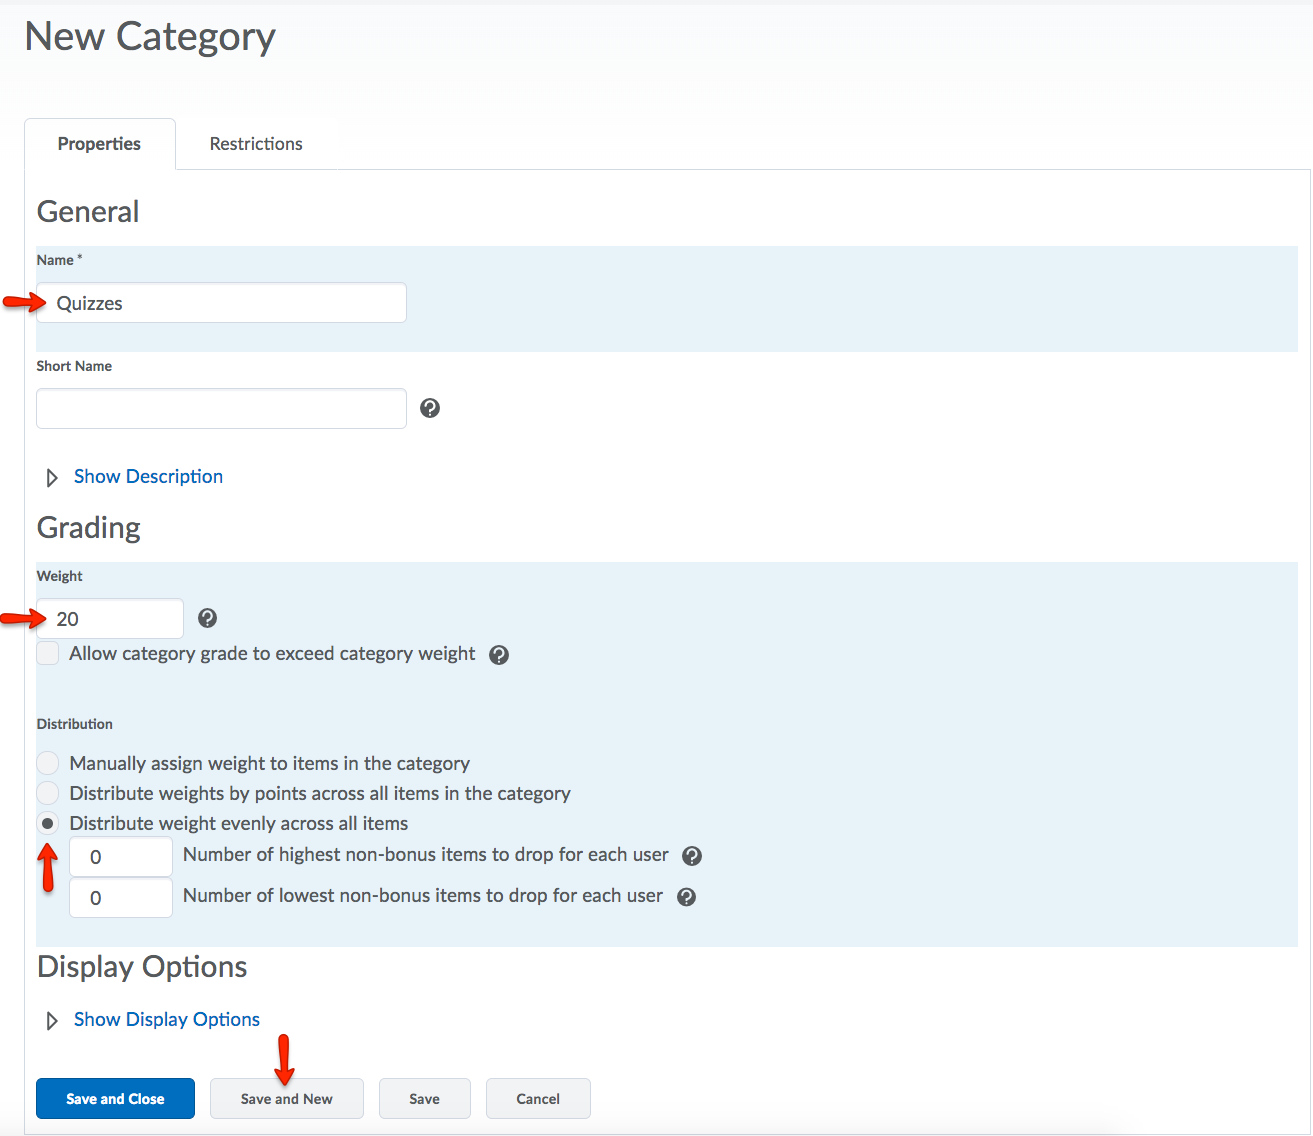
- Click Save and New, and below are the steps for creating two more grade categories with the following
settings:
- Name: Papers
- Weight: 40
- Distribution: Manually assign weight to items in the category
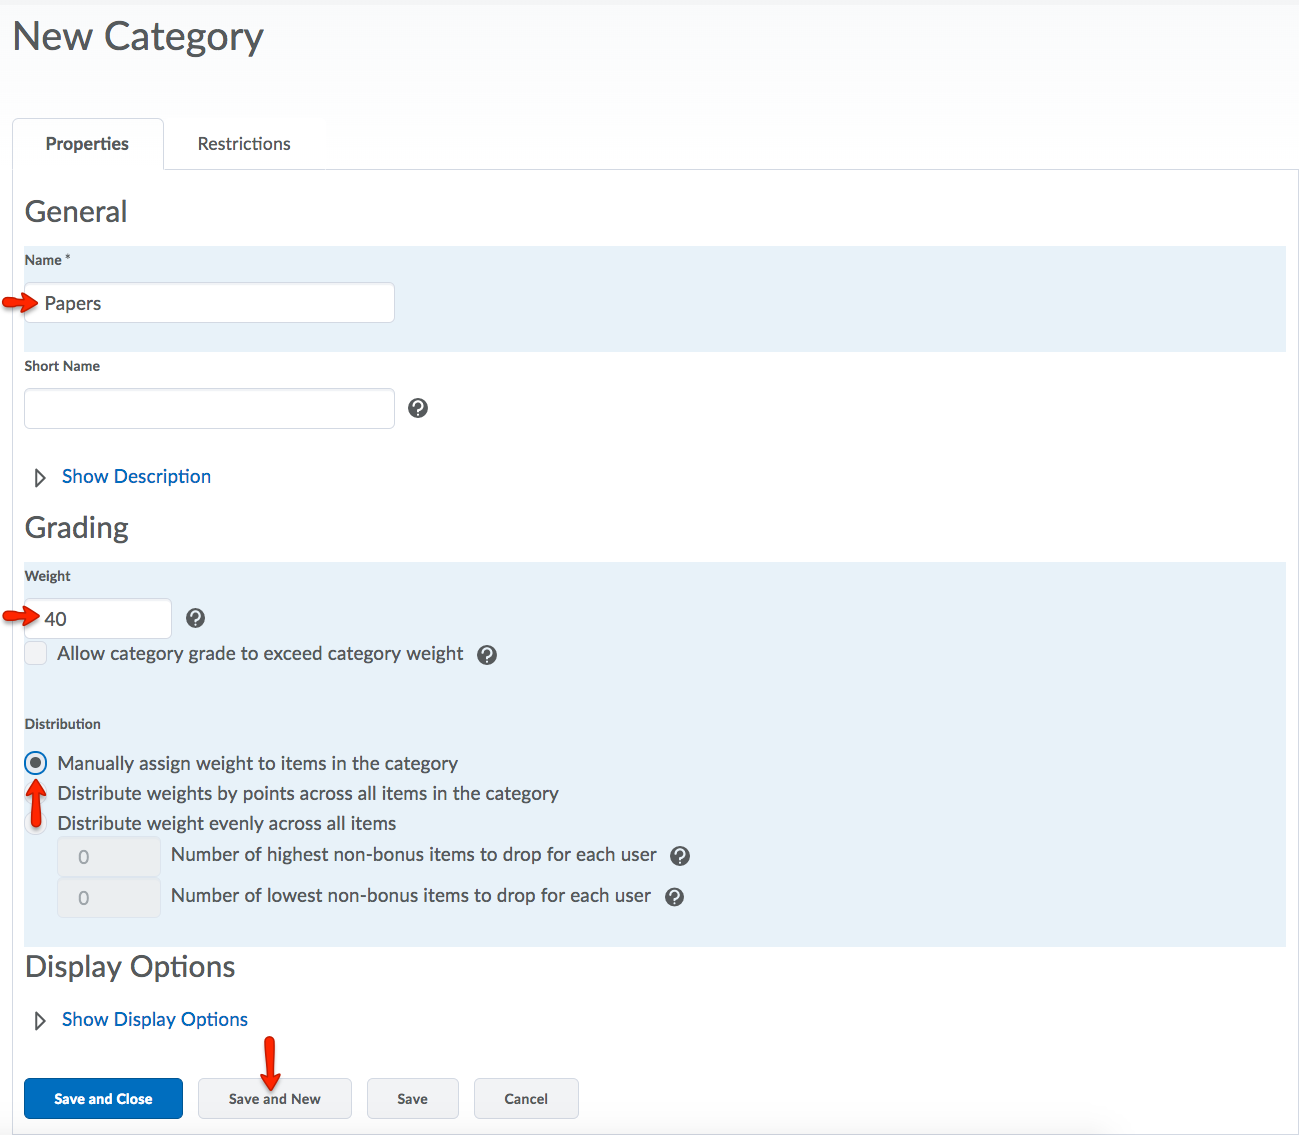
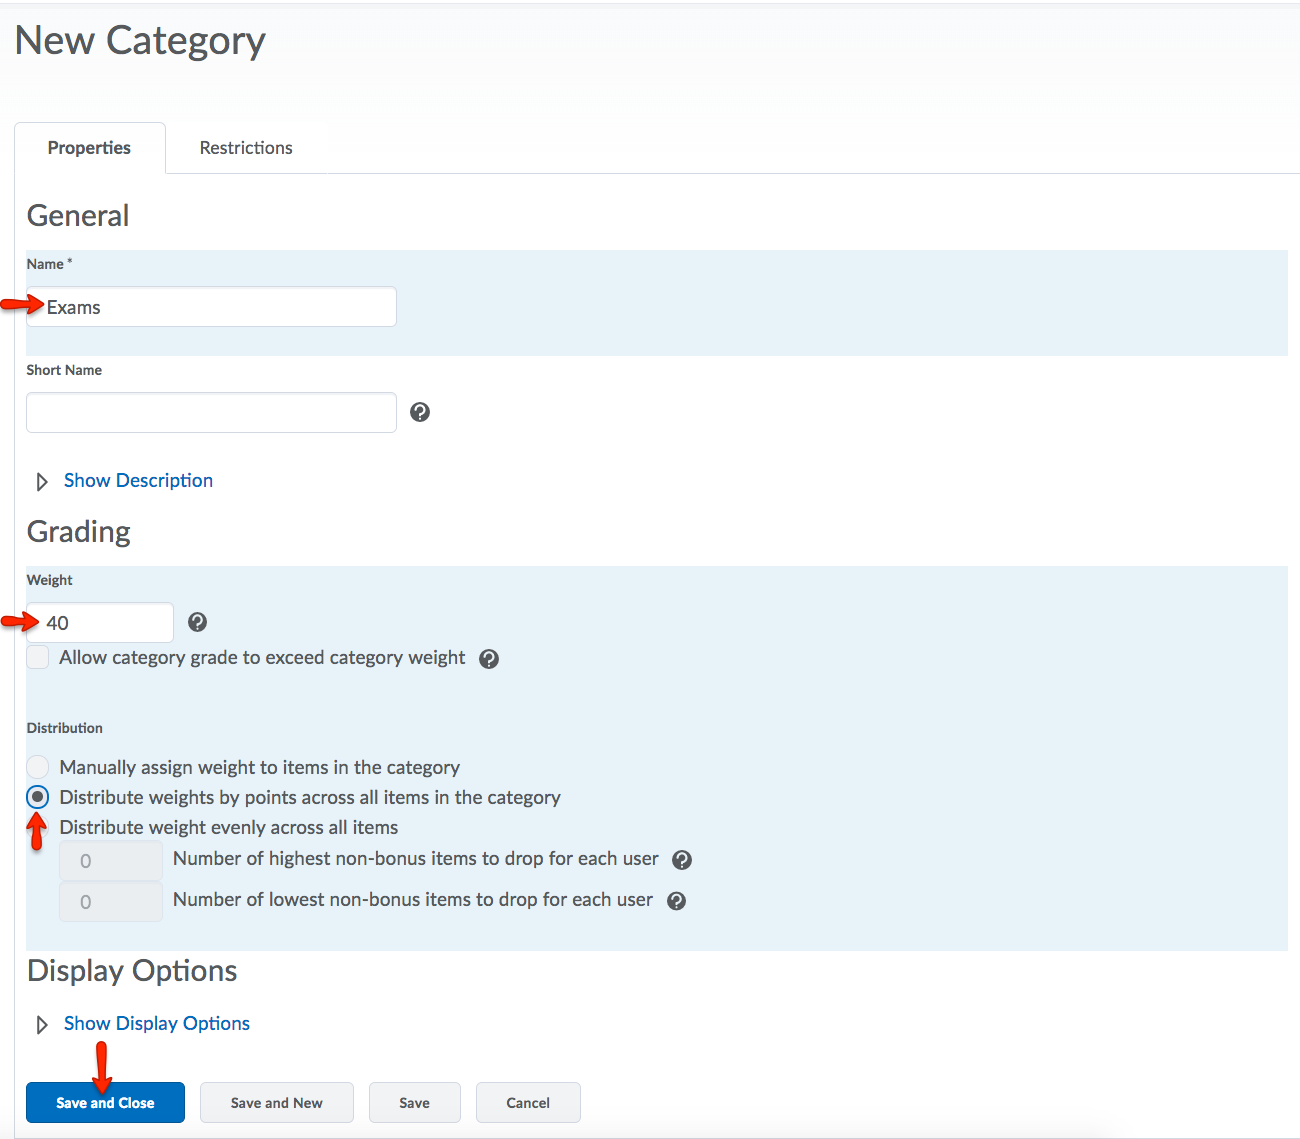
- Name: Exams
- Weight: 40
- Distribution: Distribution weights by points across all items in the category
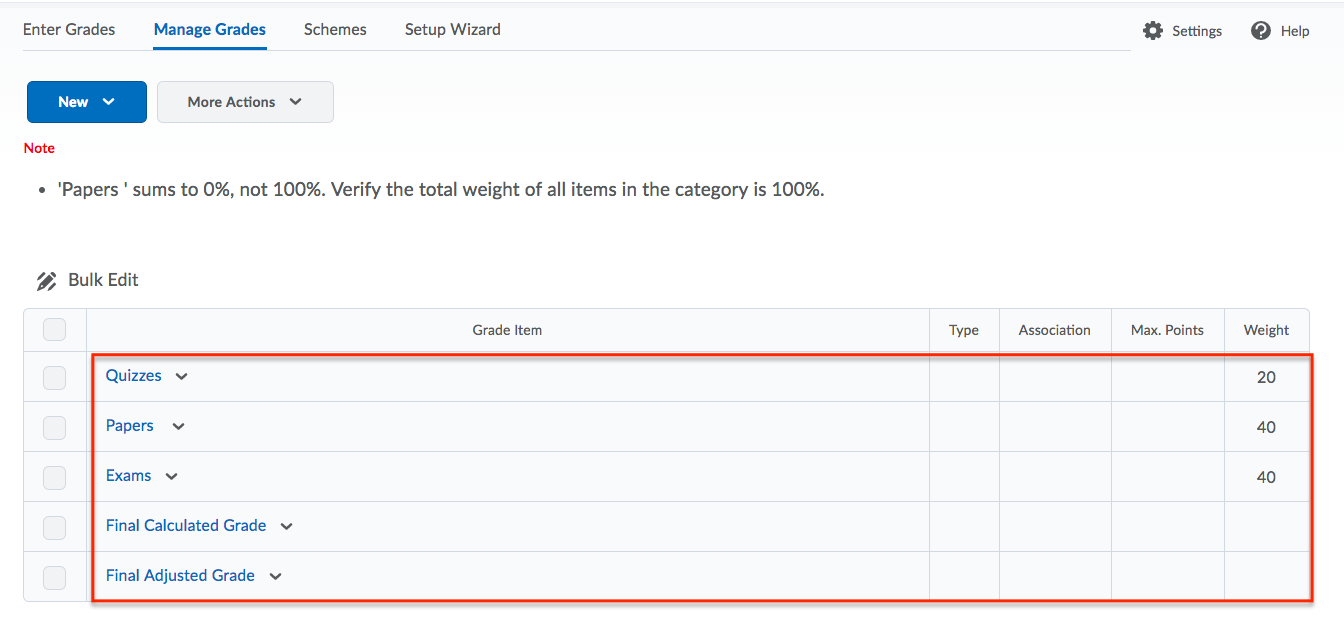
- Now the grades list has three categories, a final calculated grade and a final adjusted
grade.
Creating Grade Items
The next step is to add grade items (columns) to each category. The grade items can be associated with specific activities in eLC, such as Assignments or Quizzes. Or, you can enter grades manually.
For more resources on adding grade categories and items, please visit the Brightspace Community page on Grade Categories.
- To begin the process of creating a grade item, select Manage Grades from the Grades navbar. Then, click New. From the drop-down menu, choose Item.
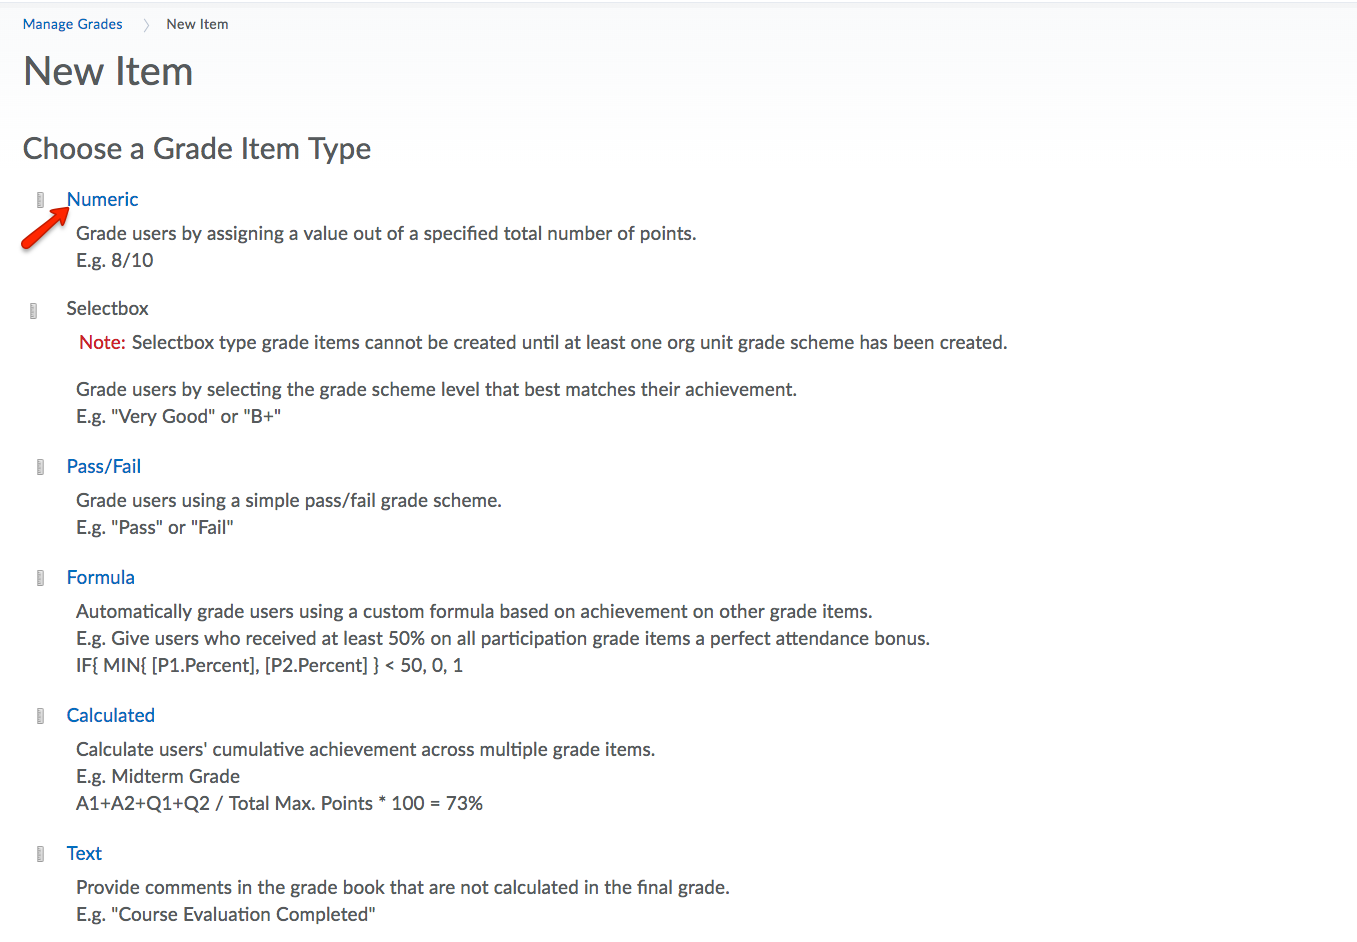
- There are many Grade Items to choose from. Usually, the choice will be Numeric. For
this demonstration,Numeric will be selected for the Grade Item Type.
- This demonstration will begin with Quizzes. A numeric Grade Item will be created with
the following settings:
- Name: Quiz 1
- Category: Quizzes
- Max Points: 20
- Weight: Automatically populated (because the category was set to automatically weight all items evenly).
- Grade Scheme: Default Scheme – Percentage
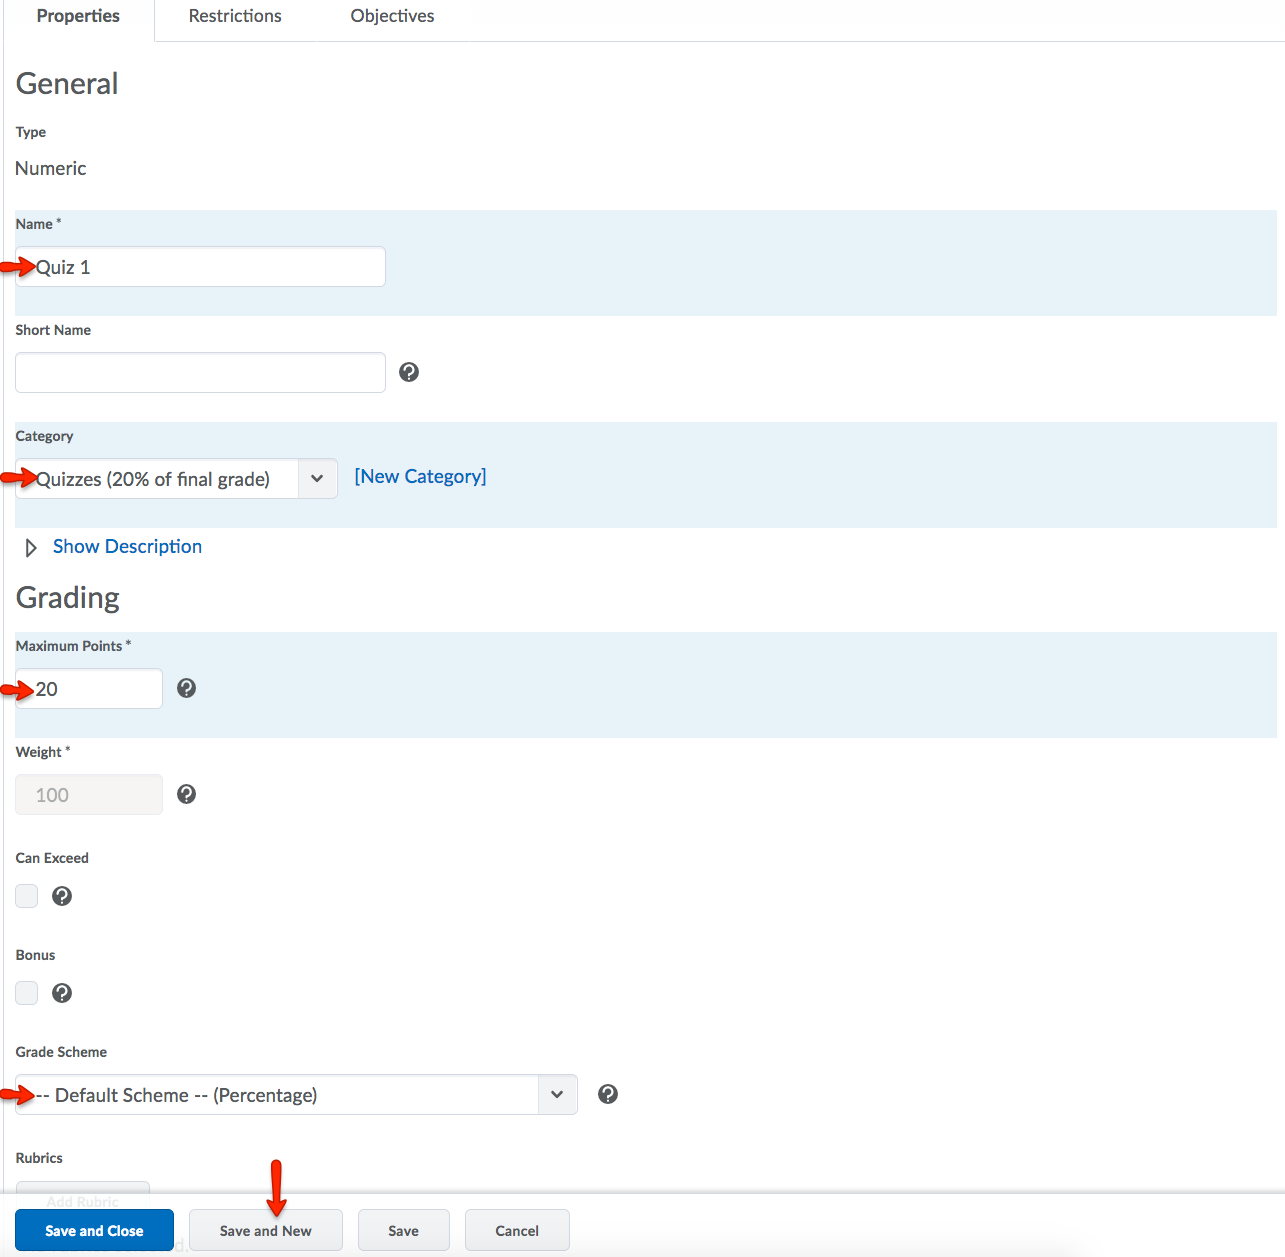
- Click Save and New.
- You can repeat this process for all grade items needed. For this demonstration, three more quizzes were created (Quizzes 2, 3, and 4).
- Click on Grades List to see your gradebook. Now, four quizzes are listed.
Note: The Quizzes category is weighted at 20%, but each quiz within the category is weighted at 25% (25% of the Category Weight.)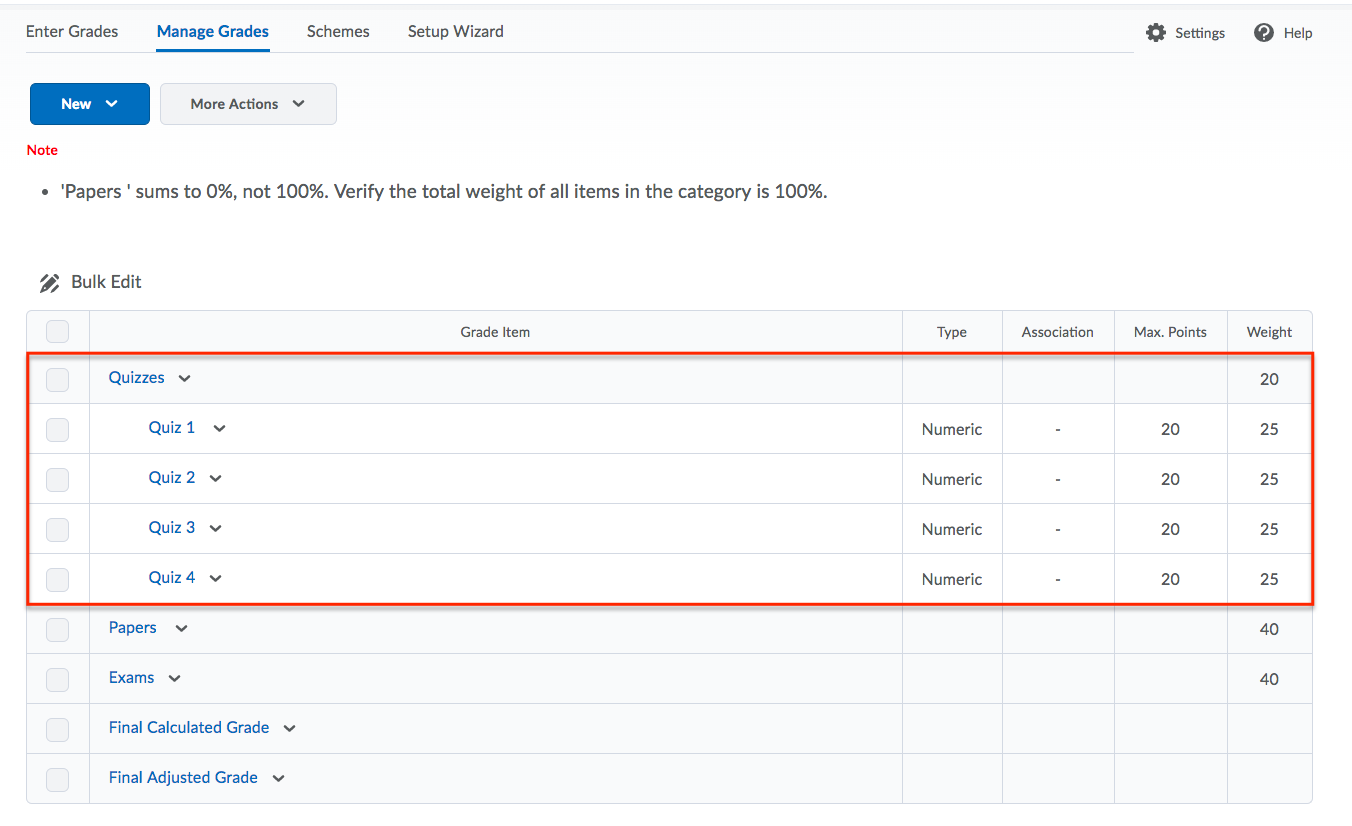
Associating Graded Activities with Gradebook Items
Creating Bonus Items
A bonus item is a separate grade item which students can elect to complete. Points earned on a bonus item can only improve a student's grade and are added to the final calculated grade.
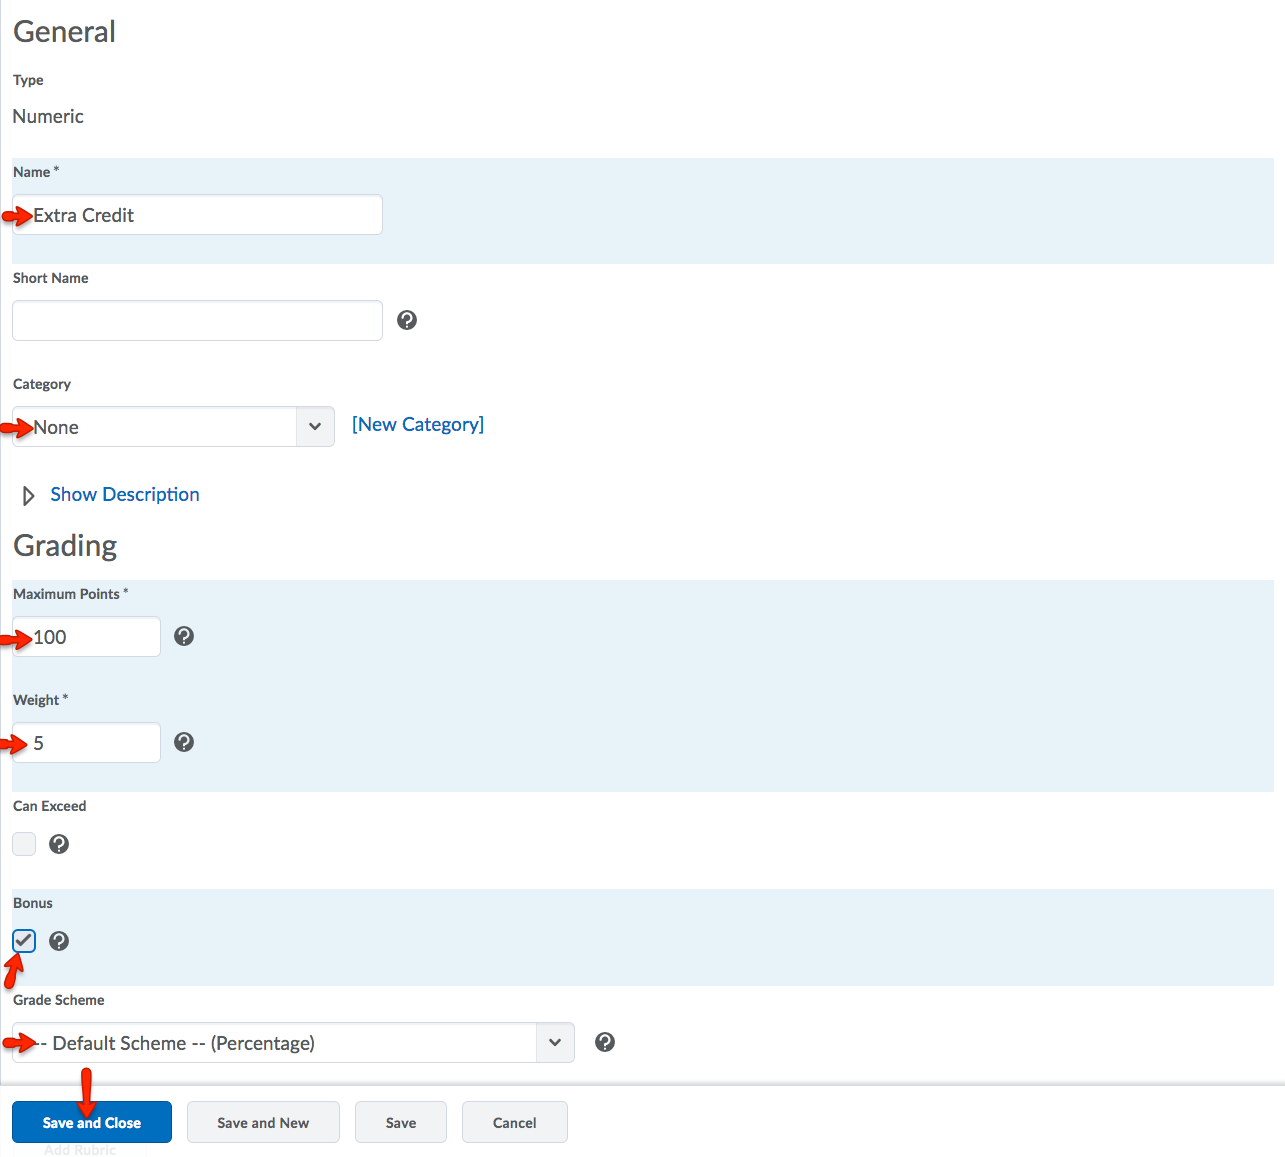
In this tutorial, an extra credit item that is worth 5% of the final grade will be created.
Please note that in the video above, Points are used in the Wizard set-up. However, in the steps shown below, setting up bonus items using Weighted grades is explained.
- To create a bonus item, click New, then select Item.
- Choose Numeric for the Grade Item type.
- Create an Extra Credit grade item with the following settings:
- Name: Extra Credit
- Category: None
- Max Points: 100
- Weight: 5 (and check the Bonus setting)
- Grade Scheme: Default Scheme – Percentage
- Click Save and Close.
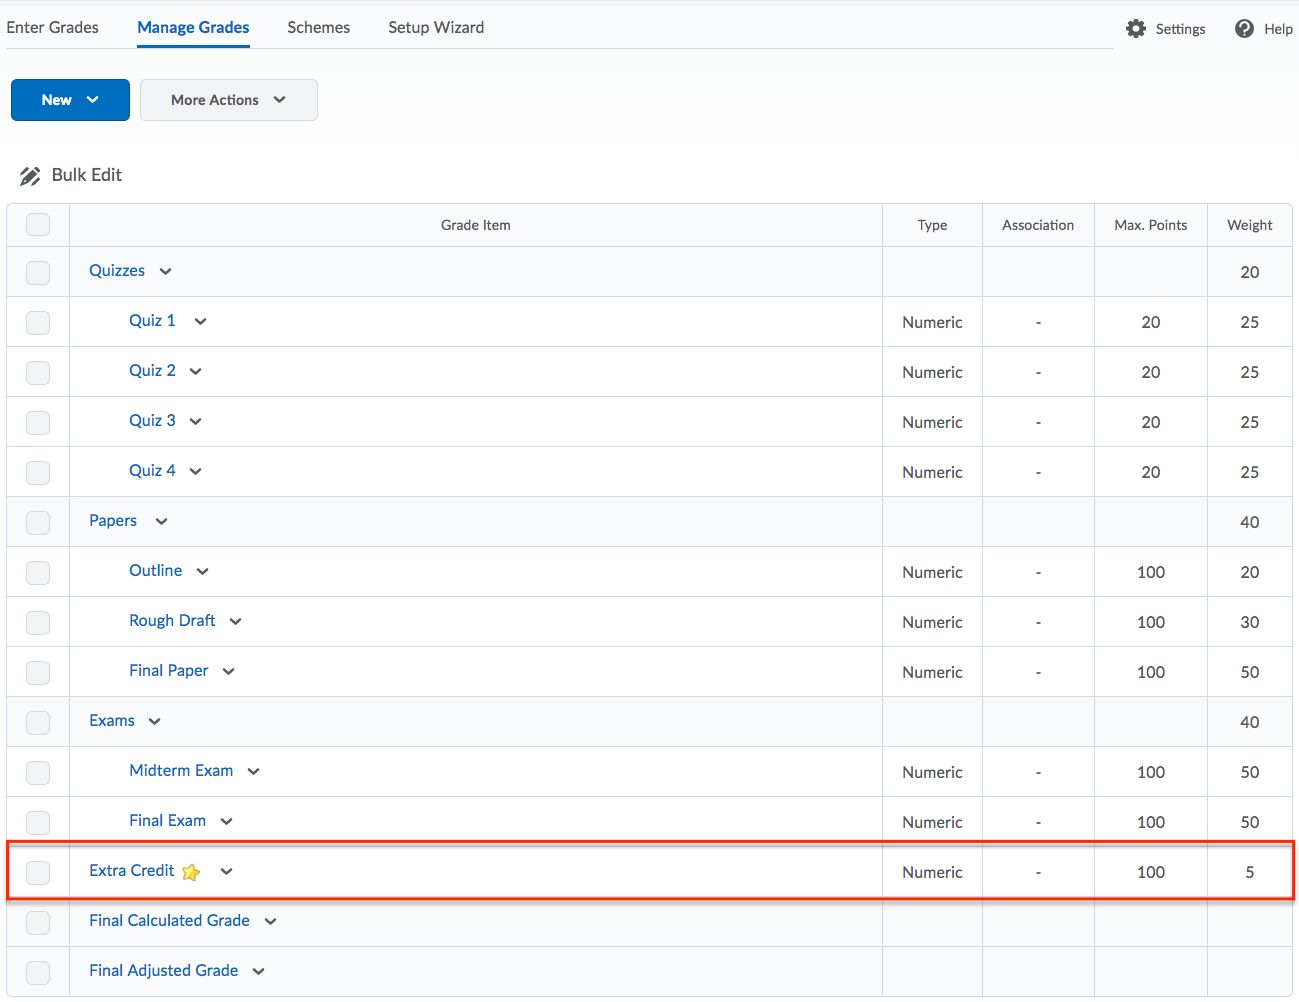
- The Extra Credit item now appears in the Grades list, noted with a star.
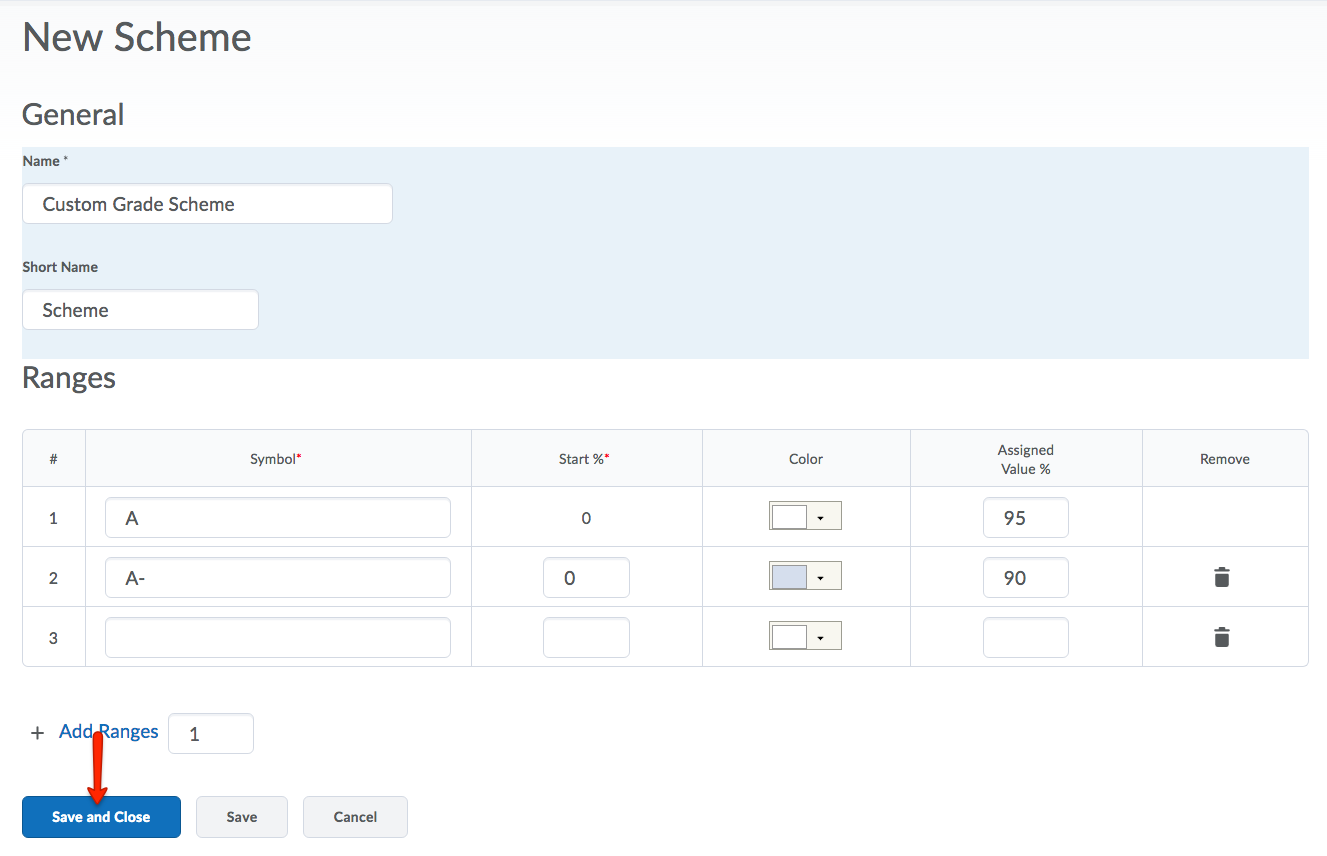
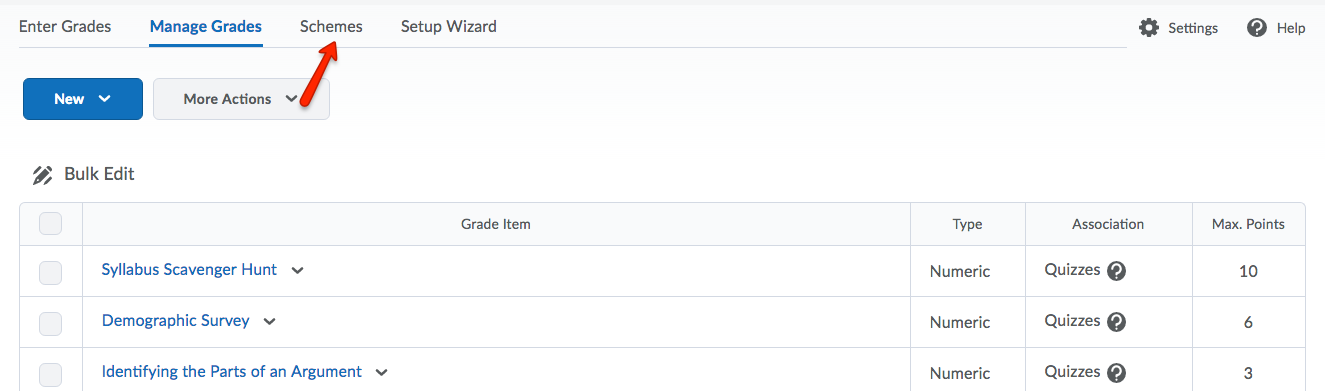
Creating a Custom Grade Scheme
- To begin the process of creating a custom grade scheme, select Grades from the course navbar.
- Click Schemes.
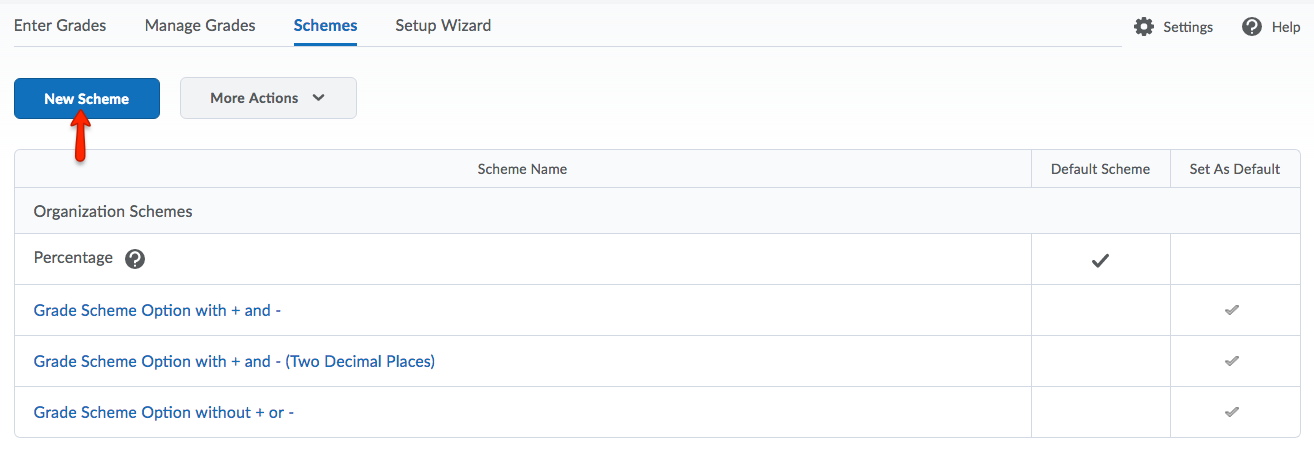
- On the Schemes pages, click New Scheme.
- Enter a Namefor the scheme.
- Enter a Short Name to display in the gradebook.
- Define your grade Ranges
- Enter the symbol you want to display for the grade range in the Symbol column (e.g., "A" or "Excellent" or "4.0").
- Enter the lowest grade to include in the range in the Start % column.< Note: The first range starts at 0 and ends at the next range's Start %
- Select the color you want associated with the range in the Color column.
- Enter the numeric grade you want users to achieve when they are evaluated using the
grade scheme in the Assigned Value %Note: If you do not assign a value, the start percentage is used as the default.
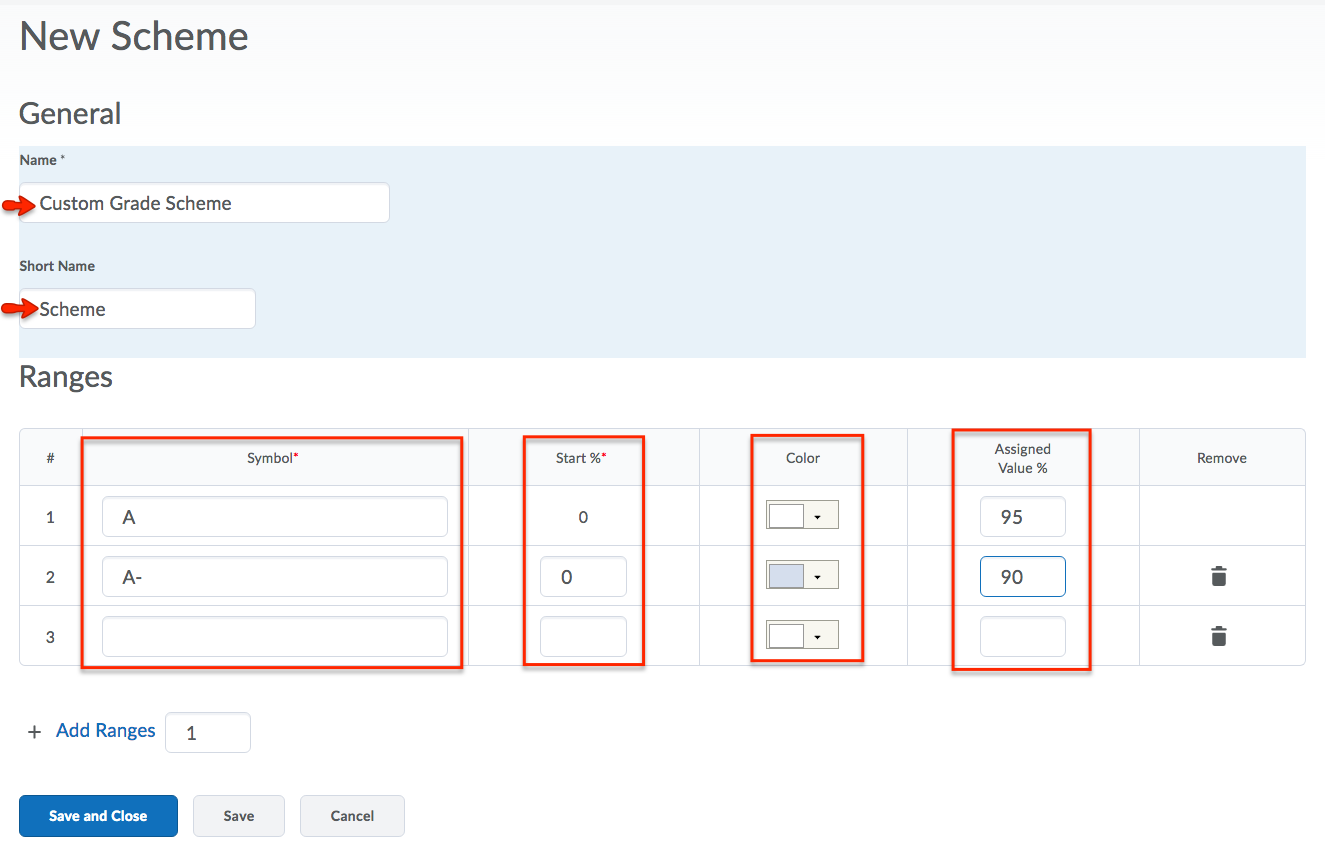
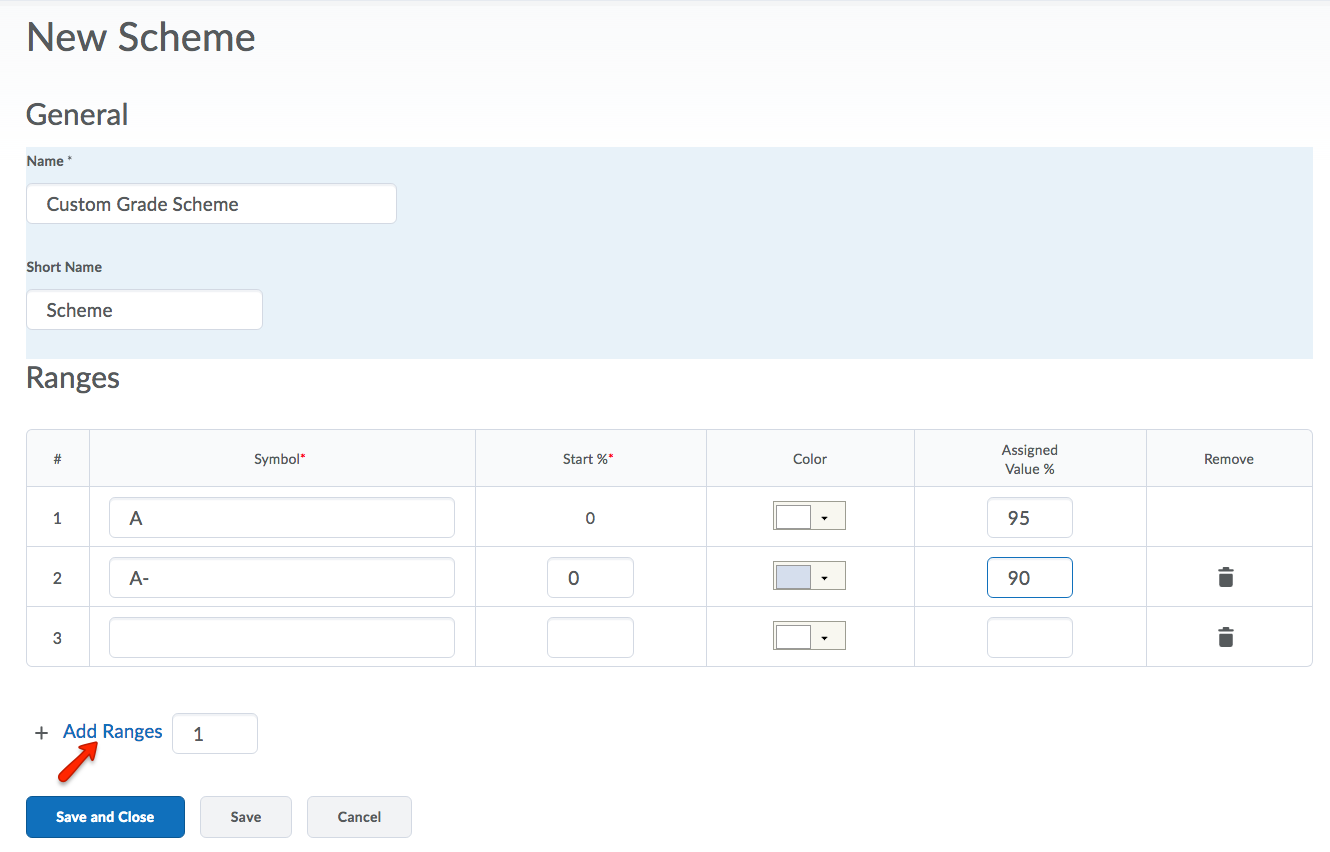
- You can click Add Ranges to add additional grade scheme levels.
- You can click the Delete icon beside a grade scheme level to delete it.
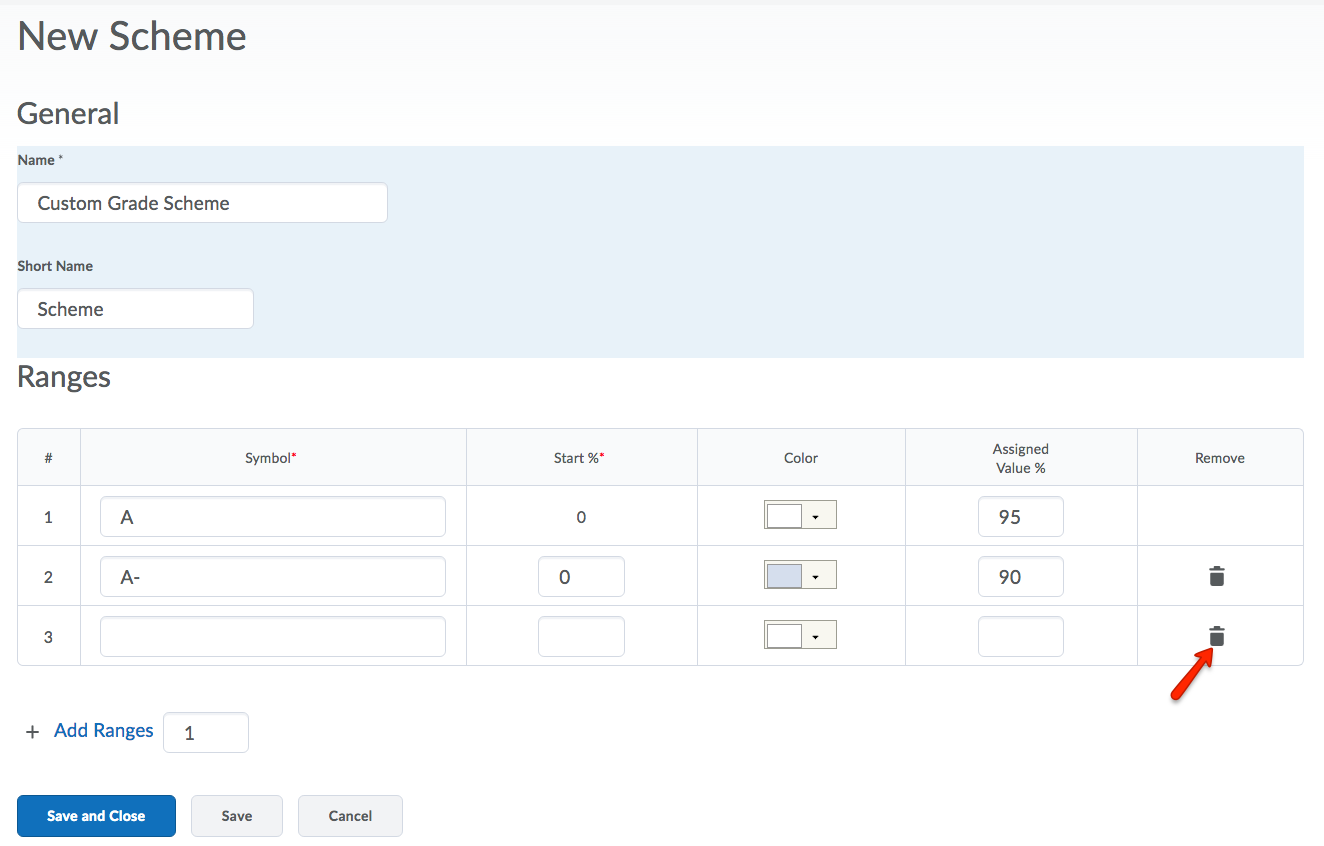
- Click Save and Close.