Creating a Discussion Topic
Discussion Topics are the actual posts, prompts, or questions to which students respond. Topics are organized into different forums. As such, discussion topics will always be placed in a discussion forum.
Learn About:
Creating a Discussion Topic
- From the course navbar, click Tools.
- Select Discussions.
- Click New, and select New Topic from the drop-down menu.
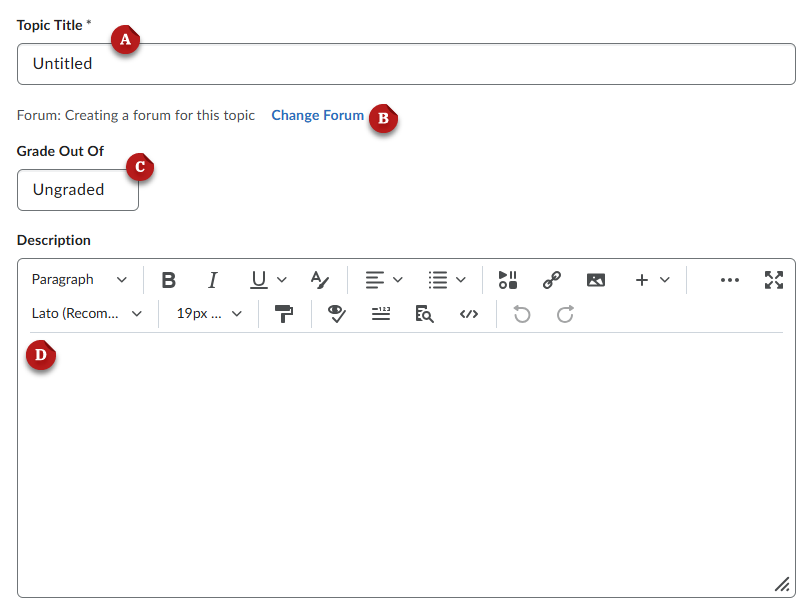
- Enter a Title [A].
- Select a forum. If you are creating a new topic from scratch, eLC will automatically create a forum for the topic. Click Change Forum [B] if you want to assign this topic to a specific forum.
- (Optional) Determine how the discussion post will be graded [C].
- Complete the topic Description [D]. This should contain the post, prompt, starter, or question to which students
will respond in the discussion.

Modifying Topic Restrictions
Discussion topics can have different restrictions that control who can access a discussion, how posting works for students, and how the discussion posts will be graded.
Availability Dates & Conditions
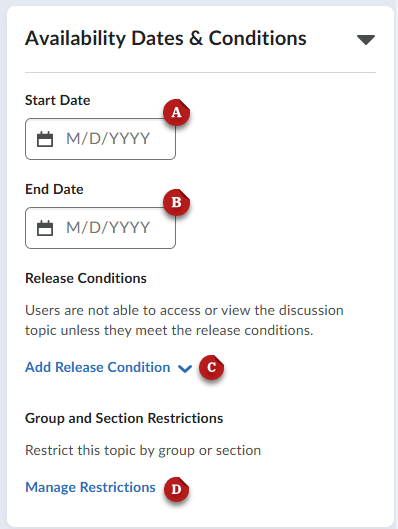
These settings control when the discussion is active and available to students, and allows you to restrict a discussion post to specific students, groups, or sections.
- Start Date [A] - Determines when the discussion opens for students to complete
- End Date [B] - Determines when the discussion post will close
- Release Conditions [C] - Allow a discussion to automatically release to certain students after they meet criteria that you select.
- Group and Section Restrictions [D] - Restricts the discussion topic to students who belong to a chosen group or course section.

Post & Completion
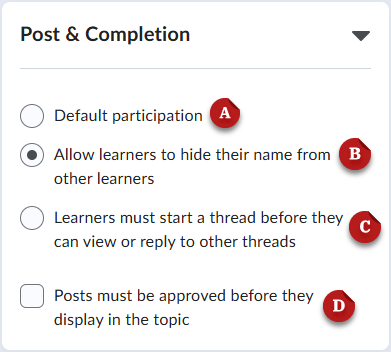
These settings modify how students participate in the discussion and what kind of information is shared with participants.
- Default Participation [A] - Any student can start a thread, and posts are identified by name
- Anonymous Posting [B] - This option gives students the choice to hide their name when posting
- Post Before Replying [C] - Requires students to create their own post before they can read and respond to others.
You can also separately choose to require that posts be approved by an instructor or TA before they display in the topic [D]. This enables manual moderation that you or a TA will have to monitor to make discussion posts appear publicly, so it is not generally recommended.

Evaluation & Feedback
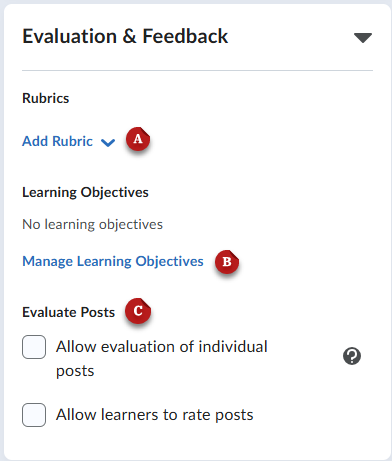
These settings control grading and evaluation options for the discussion post, if you choose to have the post be graded.
- Add Rubric [A] - Attach a rubric to create it in eLC and use it for evaluating this discussion. The rubric will be visible to students and graders.
- Manage Learning Objectives [B] - If you wish, you can set up learning objectives for your course, associate assignments and tasks with those learning objectives, and then monitor student progress toward those objectives. This setting will allow you to associate this discussion with a learning objective, if you have created one.
- Evaluate Posts [C] - These settings allow you to individually evaluate all of a student's posts and responses, then choose how their overall grade will be calculated. You can also choose to allow students to rate each others' posts.

