Modules and Topics are the building blocks that enable instructors to organize course content in eLC. Modules are like folders, used to organize course information. Topics are the files and links to websites or eLC activities that are organized within the Modules and Sub-Modules.

You must have at least one Module in your course before you can begin adding Topics.

Creating a Discussion Forum
+
  1. From the course navbar, select Tools.
  2. Choose Discussions.
  3. Click New, and then select New Forum from the drop-down menu.
  4. Enter a Title and Description for your Forum.
  5. The following settings can be applied under the Options interface:
    • Allow anonymous posts – Select this option if you want to enable users to post anonymously.
    • Users must start a thread before they read and reply to other threads in each topic – Select this option to ensure user participation.
    • A moderator must approve individual posts before they display in the forum – Select this option to ensure that posts are approved by a moderator before they display in the forum
    • Display forum description in topics – Select this option to display a discussion forum description within a discussion topic description.
  6. Click on Restrictions to access more settings:
    • Availability – Select visibility options for your forum, along with a start and end date.
    • Release Conditions – Select conditions governing when your students can access the forum.
  7. Click Save and Close.
Creating a Discussion Topic
+
  1. From the course navbar, click Tools.
  2. Select Discussions.
  3. Click New, and select New Topic from the drop-down menu.
  4. Enter a Title [A].
  5. Select a forum. If you are creating a new topic from scratch, eLC will automatically create a forum for the topic. Click Change Forum [B] if you want to assign this topic to a specific forum.
  6. (Optional) Determine how the discussion post will be graded [C].
  7. Complete the topic Description [D]. This should contain the post, prompt, starter, or question to which students will respond in the discussion.

Discussion Settings
+

The discussion setting enables control over topic accessibility, define interaction behavior upon student posts, and specify grading parameters. The restrictions embedded within the setting allow instructors to create conditions for the availability and/or visibility of discussion topics.

  1. Navigate to Discussions.
  2. Click the drop-down arrow beside the discussion topic you want to reset, then select Edit Topic.
  3. Navigate through the sidebar to apply restrictions to your topic.

Let’s look at each group in the sidebar individually:

  1. Available Dates & Conditions
    • Start & End Dates – Limit access to a date range
      Visible with access restricted – learners can see but not access.

      • Visible with submission restricted – learners can view but not post.
      • Hidden – learners can’t see until the set date.
      • Add availability dates to Calendar: Add the start date and end date of your discussion to the course Calendar.
    • Release Conditions – Have a topic become available after students meet some other criteria
    • Group and Section – Restrict a topic to students enrolled in a specific group or section
  2. Post & Completion
    • Participation Options – Default, hide names, or post before participating
    • Topic Moderation – Posts must be approved by an instructor/TA before they are publicly displayed
  3. Evaluation & Feedback
    • Rubrics – Attach a rubric to this discussion for evaluation
    • Learning Objectives – (Not Recommended) Associate this discussion with specific learning objectives in your course
    • Evaluation Options
      • Individual Post Evaluation
      • Learner Rating
Graded Discussions
+

Instructors can evaluate student discussions and send the scores to the gradebook for final grade calculation.

Adding a Grade Item to a Discussion Topic
  1. Navigate to the Discussions tool.
  2. Click the drop-down icon to the right of the discussion topic you would like to edit and select Edit Topic. Alternatively, create a new discussion topic.
  3. Within the topic editor, select the Assessment.
  4. Select Choose a Grade Item and select the item you’d like to attach to this discussion topic if you’ve already created your grade item. Otherwise, select New Grade Item and create one.
  5. To grade all posts together, uncheck Allow assessment of individual posts. To grade posts separately, check the box and choose a calculation method to combine scores.
Grading Discussion Topics

Grade Discussions from the Discussions Tool

  1. From the course navigation bar, click Course Tools and select Discussions from the drop-down.
  2. Click the drop-down icon to the right of the discussion topic you would like to grade and select Assess Topic from the drop-down.
  3. Click Topic Score for the student you want to grade.
  4. Review the students initial post and/or replies, provide feedback if desired, and enter their score(s).
  5. Click Publish if you would like to immediately publish the students score to the Gradebook. Click Save Draft if you would like to save what you have entered and publish scores for all students at a later time.

Grade Discussions from the Gradebook

  1. From the course navigation bar, click Grades.
  2. Locate the column of the discussion you would like to grade and click the chat icon for a particular student.
  3. Review the student’s initial post and/or replies, provide feedback if desired, and enter their score(s).
  4. Click Publish if you would like to immediately publish the students score to the Gradebook. Click Save Draft if you would like to save what you have entered and publish scores for all students later.
Private & Small Group Discussions
+

Private discussion topics will first require you to create one-member groups (one for each student in the class).

  1. From the course navbar, click Tools then select Groups.
  2. Click New Category.
  3. Provide the category name [A].
  4. (Optional) Provide a description for this group category [B]
  5. Choose the enrollment type: Single-user, or member specific groups [C].
  6. Scroll to Additional Options.
  7. Check Set up discussion areas [A]
  8. Click New Forum [B] to create a separate forum for all of the private discussion topics. This is strongly recommended, as it will help you stay organized.
  9. Click Save.
Subscribing to Discussions
+
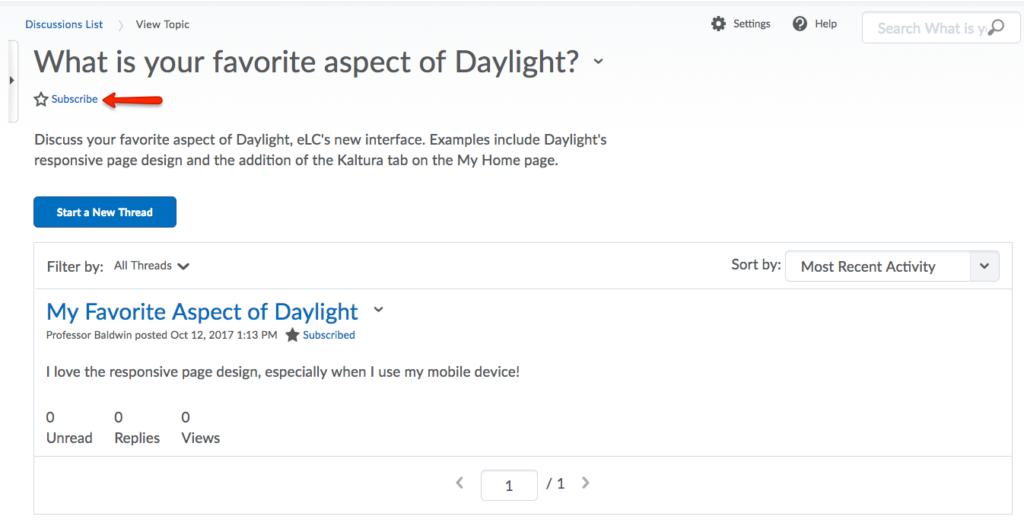
  1. From the course navbar, click Tools, then select Discussions.
  2. Click on the topic to which you want to subscribe.
  3. Click Subscribe beside the topic title to subscribe to the entire topic. Alternatively, you can subscribe to specific threads by clicking Subscribe next to the thread title.
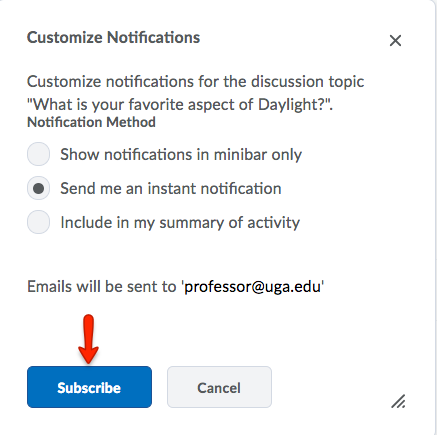
  4. In the Custom Notifications pop-up window, select your Notification Method. If you do not have an email address set up in your user profile to receive notifications, in the Customize Notifications pop-up window, click the Add an email address in a new window link. Click the Enable email notifications link, then set your email preferences in the Email Settings pop-up window. Click Save.
  5. Then, Click Subscribe.
Participating in Discussions
+

While participating in discussions and reading discussion posts, you have the ability to change the settings of the Discussions tool. Specifically, you can alter the Default View.

Discussion Settings

  1. Open the discussions tool.
  2. Click Settings in the upper right corner.
  3. Under Default View, select either Grid View or Reading View, based on your preferences.
    • Grid View will display the discussion posts with post subjects displaying in a grid.
    • Reading View will display the entire text for all posts. Reading View is the default option.
  4. After selecting your preferred Default View, click Save.

Starting a Thread within a Topic

You can participate in discussions by posting a new thread to a topic or replying to another user’s thread. Follow the steps below to start a new thread.

  1. From the course navbar, click Tools, then select Discussions.
  2. Click the Topic where you want to start a new thread.
  3. Click Start a New Thread.
  4. Enter a subject and post.
  5. When starting a thread, you can modify the following settings:
    • Pin thread – Select this option to keep the thread at the top of the list.
    • Subscribe to this thread – Select this option to receive updates on the thread using your selected notification method.
    • Add attachments – Select this option to add attachments. To attach a file, click Add attachments for several options on adding an attachment to your thread. These options include, Upload, Record Audio, and Choose Existing.
    • Post to other topics – Select this option to post your thread to more than one topic.

Audio & Video in Discussions
+

Instructors and students can share audio and video files in the Discussions tool, as a new thread or reply, using the Insert Stuff button in the eLC HTML editor.

Note: We recommend using Kaltura to save video files before embedding them in discussions. This saves on file space, and ensures that videos are saved in a secure UGA platform.

  1. When you start a new thread or reply to a discussion post, you see the Brightspace editor. Click the Insert Stuff button on the toolbar.
  2. Next, click Kaltura My Media, then Add New [A].

    • Media Upload will let you add files from your computer to your Kaltura account, and then embed them in the discussion
    • Express Capture will quickly record a video using your webcam and microphone, upload the file to Kaltura, and embed it in your discussion
    • YouTube allows you to search for YouTube videos, add links to your Kaltura account, and then embed them into your discussion
    • Kaltura Capture uses the desktop Kaltura app to record your webcam, audio, and screen before saving the video to your Kaltura account and embedding it in your discussion
    • Video Quiz allows you to create a video quiz using an existing Kaltura video in your account, then embeds it into your discussion.
  3. After creating, selecting or uploading a file, give your file a title, description, and tags. Then click Save and Embed.
  4. Click Insert. After inserting the file, you can attach a transcript to make your file accessible.
Copying Discussions between Courses
+

Instructors can copy discussion topics between courses to avoid re-entering them manually and save time.

  1. In the course navigation bar, click Course Admin.
  2. Select Import / Export / Copy Components from the list.
  3. Select the radio button for Copy Components from another Org Unit.
  4. Click the Search for Offering button and find the course you want to copy from (the “source” course).
  5. Select the source course and click Add Selected.
  6. Click the Select Components button.
  7. On the next screen, check the box next to Discussions.
  8. You can either choose to Copy all components or click to Select individual items to copy to choose a specific forum or topic within Discussions.
  9. Click Continue and then Finish to complete the copy process.

Need more help with eLC?

Visit our support page to identify your best help options

FIND SUPPORT