The Calendar Tool in eLC provides instructors and students the ability to efficiently view the schedule of all their classes.

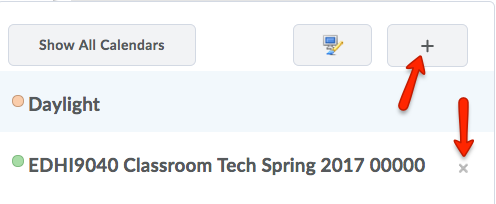
Users have the ability to select specific calendars to view, choose between multiple view options (monthly, weekly, next 7 days, agenda, etc.) and subscribe to their calendar for use in an external calendar tool such as the UGA Calendar, Google Calendar, or iCal.


The Calendar Widget

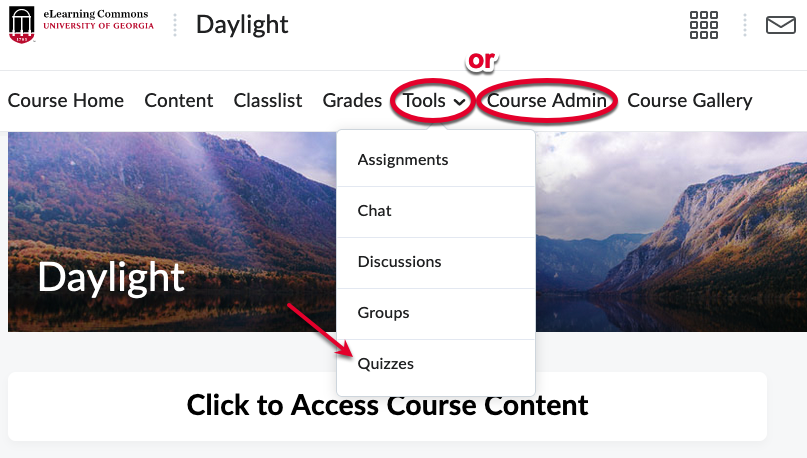
  1. Find the eLC Calendar: From your Course Home, the calendar will appear in one of two places if enabled: the Course Nav bar or a Calendar Widget.
  2. Click on any of these areas to access the course’s calendar.

In this example, we will click on the Calendar Widget.

Adding a Quiz to the Calendar
+
  1. Go to Quizzes from either the Tools dropdown or by clicking Course Admin.
  2. In the dropdown next to the quiz for which you will create a Calendar Event, click Edit.
  3. Under Availability Dates & Conditions on the right side, you can set a start and end date, and you can check the Add Availability Dates to Calendar.
  4. Click Save and Close.
Adding an Assignment to the Calendar
+
  1. Go to Assignments from either the Tools dropdown or by clicking Course Admin.
  2.  In the dropdown next to the assignment for which you will create a Calendar Event, click Edit Assignment.
  3. The options to enter an assignment into your calendar, both of which automatically create a Calendar Event, are:
    • Due Date (under Due Date)
    • Start Date or End Date (under Availability Dates & Conditions)
  4. Ensure that the assignment is set to Visible, otherwise, the dates will not appear in the student calendar view.
  5. Click Save and Close.
Adding a Discussion to the Calendar
+
  1. Go to Discussions from either the Tools dropdown or by clicking Course Admin.
  2. In the dropdown next to the discussion for which you will create a Calendar Event, click Edit Topic.
  3. Under Availability Dates & Conditions on the right side, you can set a start and end date.
  4. After you set these dates, click on either Visible with access restricted or Visible with submission restricted. A window will open and you can selected Add availability dates to Calendar, then click Done.
  5. Click Save and Close
Creating a Calendar Event
+
  1. In your course, click Course Admin, then click Calendar.
  2. Choose your preferred view from Week (default) to Agenda, Day, Month, or List (allows sorting by type: Assignments, Checklists, Discussions, Events, and more), then click Create Event. You may enter dates before or after clicking Create Event.
    You may also filter the calendar by course by clicking the All Calendars dropdown on the right.
  3. Enter an Event Title and Description. If you wish to add information from the Content section of the course, click Add Content and choose the desired attachment.
  4. Choose the event’s Attendees from the dropdown menu (this function will only work if the course has more than one person). Use the When section to enter the event’s date and time, including any Recurrences or Restrictions (visibility), then enter the Location.
  5. Click Create
Following & Unfollowing Calendars
+
  1. If you want to unfollow any of the listed calendars, click the arrow to the right of the course calendar name and simply click the “x” to the right of the course name.
  2. To add calendars, click the arrow to the right of the course calendar name and select the Add Calendar icon. You can search active and inactive course calendars. Select the preferred calendar, and click the Add button.
Calendar Settings
+

Customizing Calendar Settings

By default, your calendar will display the month’s events for the current course in which you accessed the calendar tool.

  1. Adjust the calendar view by selecting AgendaDayWeekMonth, or List from the Calendar menu.

All Calendar View or One Calendar View

  1. Click the arrow to the right of the course calendar name to select another individual calendar to view or click Show All Calendars to view all calendars in one screen.
  • In One Calendar view:
  • In All Calendar view:

Changing the Calendar Color

To change the colors of specific calendar:

  1. Click the arrow to the right of the course calendar name
  2. Select on the edit icon.
  3. Change the calendar color using the default color palette, sliding scale, or by typing in the Hex Value. You can also change the font size..
  4. Click the Done button after making your selection.

Need more help with eLC?

Visit our support page to identify your best help options

FIND SUPPORT