
The Announcements tool is helpful for distributing information to your students, especially if they have set up notifications for your course.
Creating Announcements −+
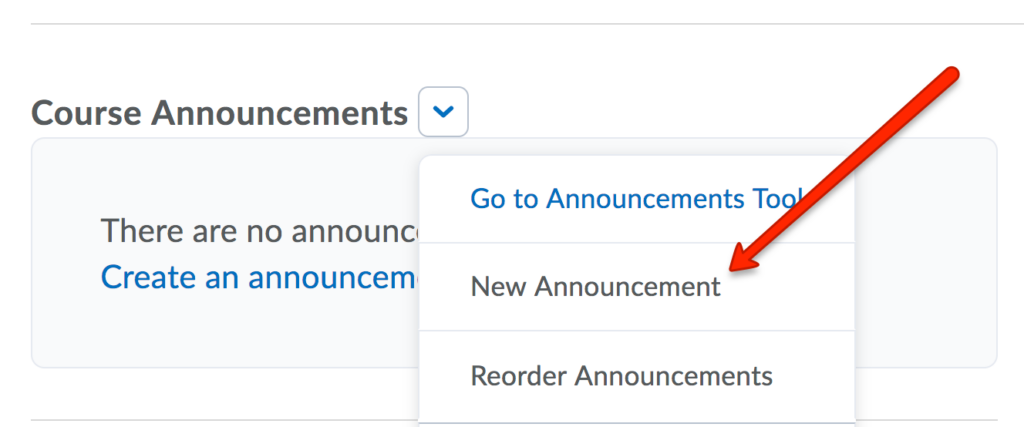
- Go to your course home page and locate the Announcements widget. Click the drop-down arrow next to Announcements and click New Announcement.
- Type a headline, then the content of your announcement in the Text Editor.
- Configure the availability of the announcement. We recommend always adding an End Date to your announcement – this will prevent old announcements from being sent out when you copy content into new courses.
- You can also add attachments or release conditions.
- Click Publish to publish your announcement on your course home page.
Scheduling Announcements −+
Instructors can schedule and reorder announcements created in advance.
- From the Course Navigation Bar, click Course Admin, and select Announcements.
- Open the announcement you would like to (re-)schedule (or select New Announcement to work with a new announcement).
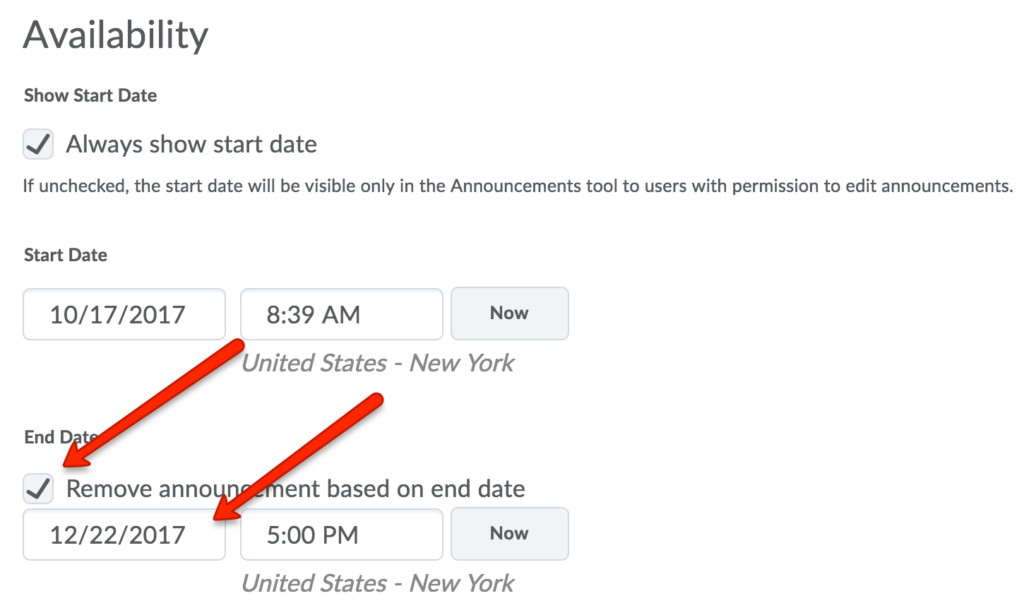
- Scroll down to the Availability section.
- Start Date: Adjusting this setting will determine the time at which the announcement will be posted and available to students.
- End Date: Adjusting this setting will remove the announcement from your students’ feed at the established date and time. Note that you must also check the Remove announcement based on end date box.
- Click Update.
Modifying Announcements −+
Announcements remain editable after creation. Instructors can modify them at any time.
- From the Course Navigation Bar, click Course Admin, and select Announcements.
- Click the title of the announcement you want to modify.
- Make your desired changes.
- If needed, select Major edit – send a notification and restore it for those who dismissed it (under the Content box).
- Click Update to publish the modified announcement.
Personalizing Announcements −+
Using replacement strings to personalize announcements can help create a more engaging and student-centered learning experience by automatically addressing each student individually.
Example: “Welcome to the course, {FirstName}!” will appear as “Welcome to the course, Kexin!” for a student named Kexin.
Note. You don’t need to replace the text in the replacement strings because in eLC, instructors use replacement strings to tailor messages for individual students. By inserting a predefined code like {FirstName} into the text, the system automatically replaces it with the corresponding student’s information when displayed.
Here are the steps in eLC:
- Go to Announcements.
- In the editing mode, go to Announcement Content.
- Edit your text to include replacement strings (e.g., {FirstName}) where you would like personalized text to be incorporated.
- Click Publish, Save as Draft, or Update.